Usually we think of rendering as “turning our scene into a frame on the screen”. However, as described in Rendering to Textures: Shadows, Cubemaps, and Special Effects, that’s not the only use-case for the rendering pipeline. Sometimes, we want to render something onto a texture and use that texture elsewhere.
One common example is thumbnails: if you have a 3D game with an inventory, you may not want to manually create icons for each item. It would be more practical to generate icons from the 3D models automatically by rendering each item to an individual texture.
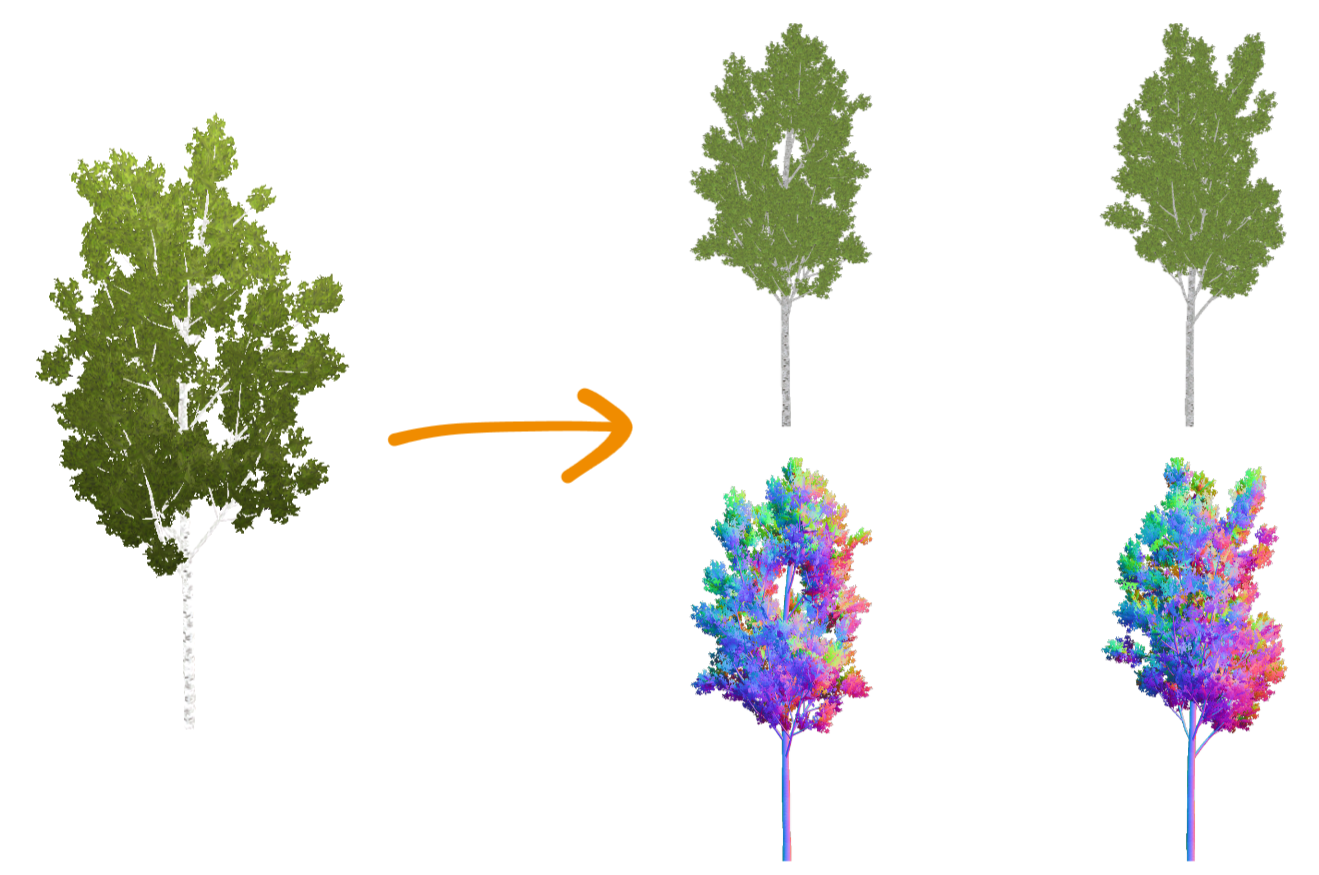
Another use-case is billboards: if you have a complex mesh, e.g. a tree, you probably want to switch that to a billboard at some point in the distance. To create these, you could just render the mesh onto a texture. By dynamically doing this in-engine, you ensure that the billboard always matches the mesh. These baked textures might look something like this:
It’s possible to use a scene for this. You could use ViewportContainers, Viewports, and Cameras to render an object from different perspectives and with different settings:
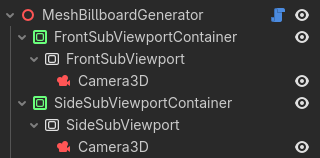
This works if you want to use it as a @tool in the editor and run it manually, but it’s hard to use automatically while the game is starting or running. Because it’s part of Godot’s overall scene logic, you’d have to repeatedly wait until nodes are set up and rendering is finished.
Here, I’ll show a different, more low-level approach using Godot’s RenderingServer which will allow you to render any individual 3D object to a texture at any point in your code. I’ll try to explain the concept of Servers in Godot and go over each line of code to give you the knowledge you need to use the RenderingServer for any type of stand-alone offscreen rendering.
What is the RenderingServer?
Within this context, you can think of Godot as being made up of three layers:
- The high-level system you usually interact with in the editor: 3D Nodes and Scenes which are rendered by Cameras.
- Individual mid-level systems (e.g. the
RenderingServer) which fill data into their corresponding low-level implementations. - Low-level implementations (e.g. the
RenderingDevice) which talk to drivers and hardware.
Using the high-level node system is usually very practical, but all it really does is provide a more comfortable way of creating data for the mid-level systems. It’s entirely optional: you can also just fill the mid-level systems with data directly.
Doing this has two major advantages: firstly, it gives you much more control over what happens and when it happens, which opens up new possibilities for functionality and performance. Secondly, you bypass all the node and scene logic, thus also removing a fair bit of potential performance impact.
How to use the RenderingServer?
Here, we’ll look at how to use the RenderingServer to render an isolated world into an off-screen texture. Note that if you just want to efficiently render objects into your main scene, there are other tutorials you can check out, such as Aaron Anderson’s post on performance optimization using RenderingServer.
Setting up our rendering
To render an isolated world, we need to create a scenario. A scenario is a 3D world which objects and cameras exist in. Usually, you probably only have one scenario: your game world. However, you can just create another one like this:
var render_scenario = RenderingServer.scenario_create()
Note that this returns an RID, a resource identifier. When working with servers like the RenderingServer, you rarely work with traditional class instances such as Camera3D or WorldEnvironment - these are nodes, which we do not use here. Rather, you remember RIDs, unique pointers to resources, and pass those around to tell functions which object you’re referring to.
Now that we have a scenario, we can create a viewport to actually render to, and tell it to render the scenario we’ve just created:
var render_viewport = RenderingServer.viewport_create()
RenderingServer.viewport_set_scenario(render_viewport, render_scenario)
Again, note how we connect the scenario to the viewport by just passing their RIDs to the RenderingServer.
If you’re creating thumbnails or billboards, you probably also want to set some other parameters, particularly the resolution, unshaded rendering, and a transparent background:
RenderingServer.viewport_set_size(render_viewport, 1024, 1024)
RenderingServer.viewport_set_update_mode(render_viewport, RenderingServer.VIEWPORT_UPDATE_ALWAYS)
RenderingServer.viewport_set_debug_draw(render_viewport, RenderingServer.VIEWPORT_DEBUG_DRAW_UNSHADED)
RenderingServer.viewport_set_transparent_background(render_viewport, true)
The update mode is required to make sure the viewport will actually render something, even if it doesn’t render to anything immediately visible.
Now that we have our rendering setup, we can put a mesh into our scenario. Rendered objects are referred to as instances in this context. We can create one like this:
var render_instance = RenderingServer.instance_create()
Once again, this gives us an RID to use in future function calls. We’ll want to link this instance to our scenario, like we did with the viewport:
RenderingServer.instance_set_scenario(render_instance, render_scenario)
And lastly, we’ll fill an actual mesh into the instance and set its transform:
var mesh = preload("res://path/to/mesh.tres")
RenderingServer.instance_set_base(render_instance, mesh)
RenderingServer.instance_set_transform(render_instance, Transform3D.IDENTITY)
That’s all we need to do to create a rendered object. As you can imagine, this is quite a bit more efficient than instancing nodes and adding them to a scene.
Lastly, in order to actually render anything, we need a camera. Creating and configuring a camera works essentially the same as everything else we’ve done. Here, I create a camera, remember its RID, set it to orthogonal (which is usually what you’ll want to do for thumbnails or billboards) and move it so that it’ll render a 1x1x1 cube above the coordinate origin:
var camera = RenderingServer.camera_create()
RenderingServer.camera_set_orthogonal(camera, 1, 0.05, 1.0)
RenderingServer.camera_set_transform(camera, Transform3D.IDENTITY.translated(Vector3(0.0, 0.5, 0.5)))
Cameras aren’t directly linked to scenarios, but to viewports, so we’ll attach the camera to our viewport. Also, the viewport we want to render must be set active:
RenderingServer.viewport_attach_camera(render_viewport, camera)
RenderingServer.viewport_set_active(render_viewport, true)
That’s it, we now have our entire rendering setup done! However, we’ve only supplied data yet, nothing has really happened. If you’re going to use this code in a loading step, you don’t want to wait until the next frame for the GPU to actually do its work. Instead, we’ll tell the GPU to do it right now:
RenderingServer.force_sync()
RenderingServer.force_draw()
Warning: This works for pre-processing steps (loading screens, or perhaps in a tool script outside of the actual game), but note that it’ll block until the GPU has rendered every viewport, i.e. rendered a full frame. Therefore, this will definitely create a stutter if you’re using it in a game while it’s running. In that case, you’ll want to go the asynchronous way and just wait for the GPU to process its next frame:
await RenderingServer.frame_post_draw
Getting the result
Now that the RenderingServer has talked to the driver and gotten it to do the work we’ve set it up for, we can retrieve the rendered frame like this:
var render_texture = RenderingServer.viewport_get_texture(render_viewport)
var image = RenderingServer.texture_2d_get(render_texture)
This texture_2d_get function retrieves the actual resource for the RID you give it. So now we’re dealing with traditional classes again: image contains an Image resource that we can use as usual. If you want to use it as a texture directly, you can do something like this:
var texture = ImageTexture.create_from_image(image)
$Sprite2D.texture = texture
Alternatively, if you’re pre-processing or caching these images, you can save it to disk:
image.save_png("albedo.png")
Cleaning up
Note that everything we create on the RenderingServer must be destroyed at some point, otherwise we’ll end up with memory leaks and needlessly re-render our custom viewports every frame. You can do that by passing each RID into the free_rid function of the RenderingServer once you’re finished with it. For example, we’d delete the mesh instance we created like this:
RenderingServer.free_rid(render_instance)
Application for Billboard creation
When using this approach for creating billboards, we may want to render two angles: one from the front (like we did before), and another from the side, rotated by 90°. That way, we get textures to use on a crossed billboard mesh like this:
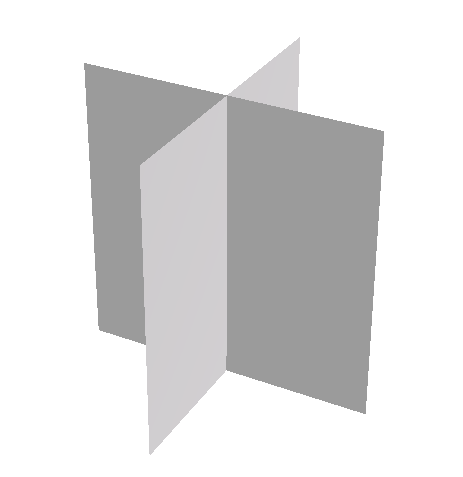
Luckily we don’t need to repeat the entire setup, we can just change the camera’s transform and do another force_draw(). Here’s how I’d extend the code above for baking two billboard textures and saving the resulting spritesheet to disk:
[...]

RenderingServer.force_sync()
RenderingServer.force_draw()

var image_front = RenderingServer.texture_2d_get(render_texture)

# Render another image from the side (rotated by 90°)
RenderingServer.camera_set_transform(camera, Transform3D.IDENTITY.rotated(Vector3.UP, -PI / 2.0).translated(Vector3(-0.5, 0.5, 0.0)))

RenderingServer.force_sync()
RenderingServer.force_draw()

# Combine the two images into a spritesheet
var image_side = RenderingServer.texture_2d_get(render_texture)

var total_image = Image.create(2048, 1024, true, image_front.get_format())

total_image.blit_rect(image_front, Rect2i(0, 0, 1024, 1024), Vector2i(0, 0))
total_image.blit_rect(image_side, Rect2i(0, 0, 1024, 1024), Vector2i(1024, 0))

total_image.generate_mipmaps()
total_image.save_png("billboard-sheet.png")
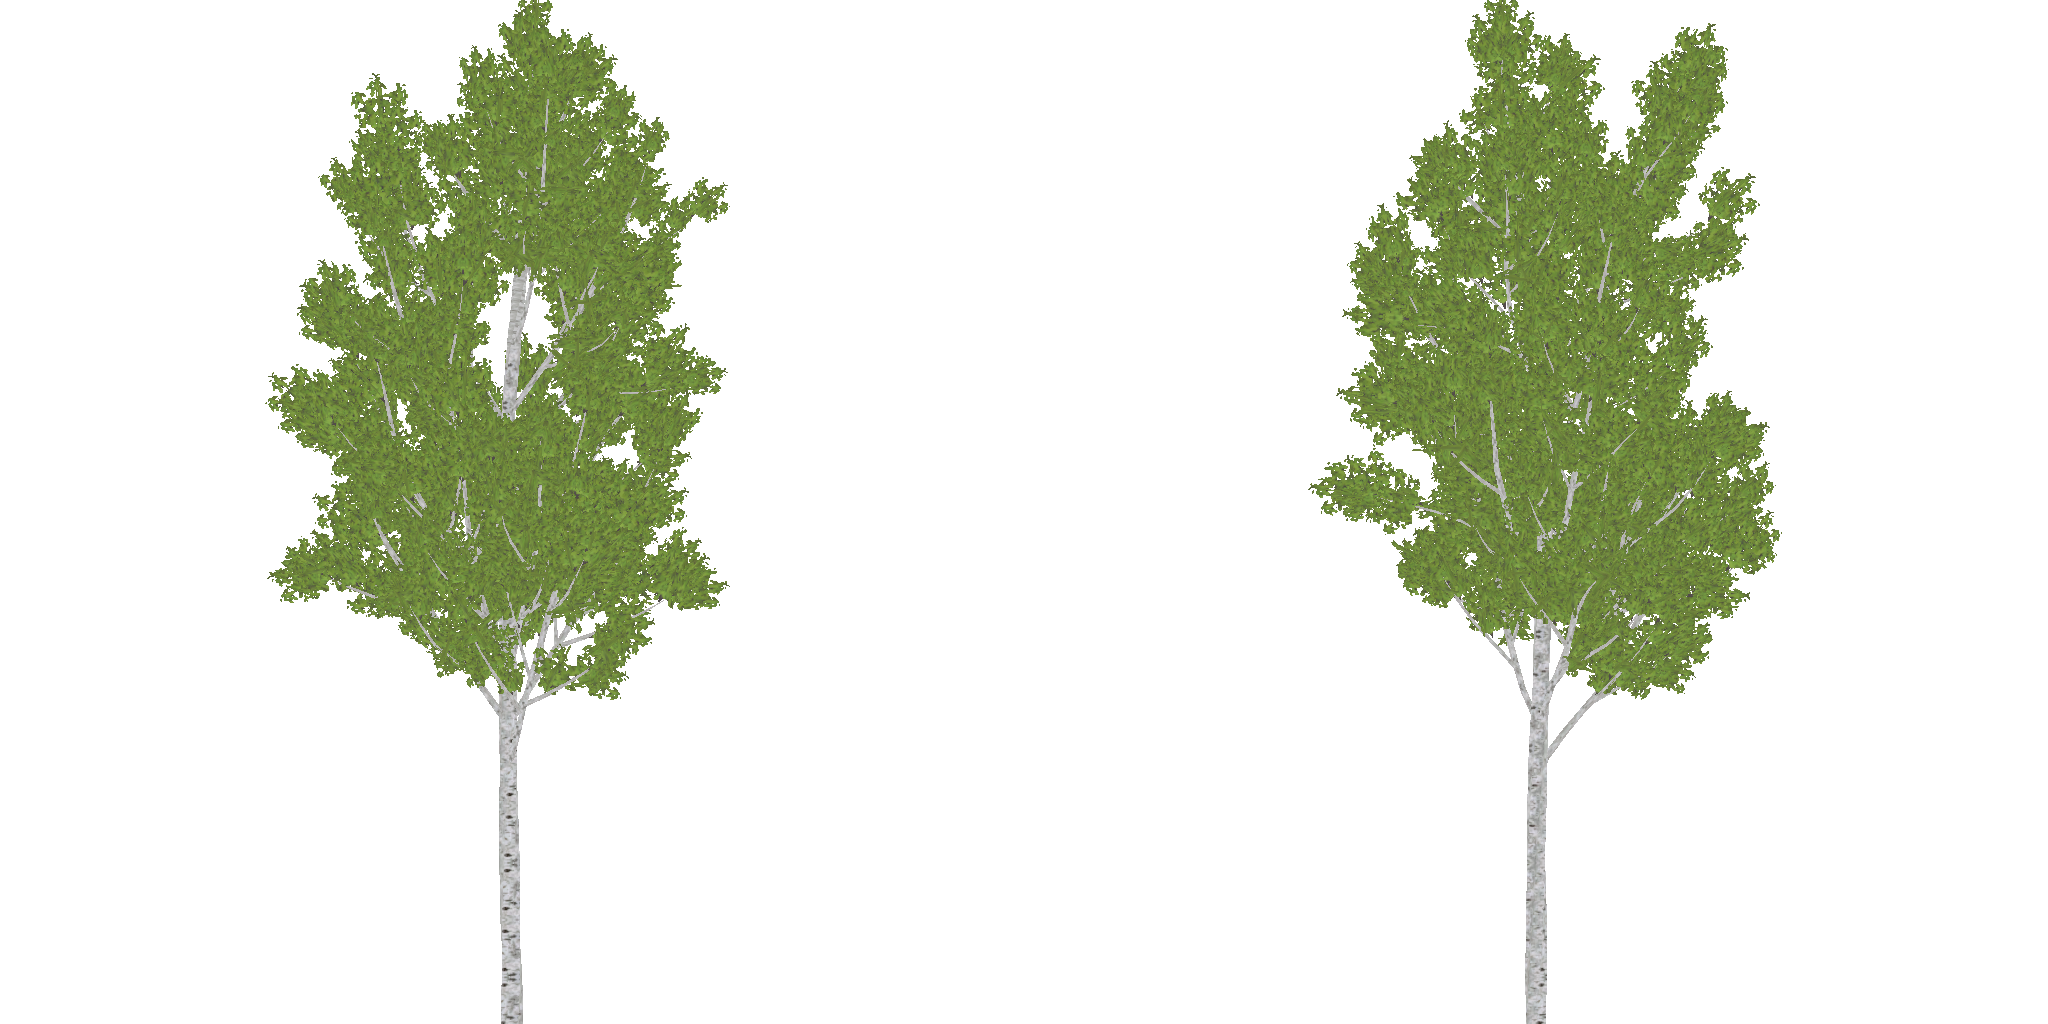
That’s how we create our vegetation billboards without having to do any manual work. The resulting spritesheets look like this:
You might also want to create a normal map for your billboard sprite. You can do that by doing another draw, but with the debug draw mode set to normal buffer instead of unshaded:
RenderingServer.viewport_set_debug_draw(render_viewport, RenderingServer.VIEWPORT_DEBUG_DRAW_NORMAL_BUFFER)
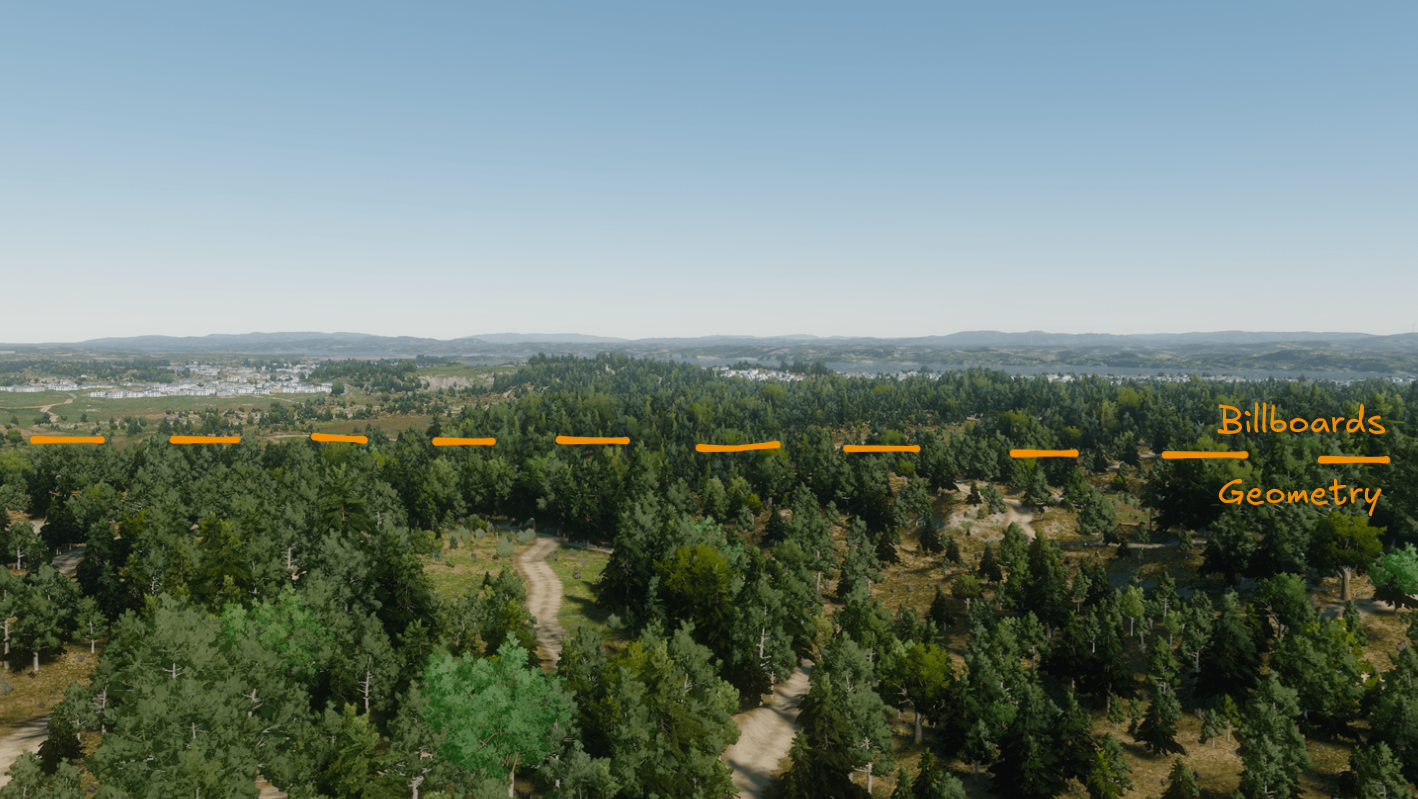
And here’s how the billboard impostors with such spritesheets look like in practice:
I also mention this billboard creation technique in my presentation at GodotFest 2025. I only briefly show the scene-based approach there, but go into much more detail on how to shade and switch between these billboards. If you want to learn more about optimization using billboards, check out that talk:
Entire code for billboard creation
Here’s my complete stand-alone function for generating front-and-side spritesheets for both albedo and normal textures of a mesh, assuming the mesh is scaled to fit into a 1x1x1 cube. Since this is entirely separate from the scene system, this code works anywhere you put it with no dependencies or requirements. Feel free to use it (consider it Unlicensed).
static func create_billboard_sprites_for_mesh(mesh: Mesh, resolution := 1024) -> Array[Image]:
	var render_scenario = RenderingServer.scenario_create()

	var render_viewport = RenderingServer.viewport_create()
	RenderingServer.viewport_set_size(render_viewport, resolution, resolution)
	RenderingServer.viewport_set_update_mode(render_viewport, RenderingServer.VIEWPORT_UPDATE_ALWAYS)
	RenderingServer.viewport_set_transparent_background(render_viewport, true)
	RenderingServer.viewport_set_scenario(render_viewport, render_scenario)
	var render_texture = RenderingServer.viewport_get_texture(render_viewport)

	var render_instance = RenderingServer.instance_create()
	RenderingServer.instance_set_base(render_instance, mesh)
	RenderingServer.instance_set_transform(render_instance, Transform3D.IDENTITY)
	RenderingServer.instance_set_scenario(render_instance, render_scenario)

	var camera = RenderingServer.camera_create()
	RenderingServer.camera_set_orthogonal(camera, 1, 0.05, 1.0)

	RenderingServer.viewport_attach_camera(render_viewport, camera)
	RenderingServer.viewport_set_active(render_viewport, true)

	RenderingServer.force_sync()
	RenderingServer.force_draw()

	var render_modes = [
		RenderingServer.VIEWPORT_DEBUG_DRAW_UNSHADED,
		RenderingServer.VIEWPORT_DEBUG_DRAW_NORMAL_BUFFER
	]
	var camera_transforms = [
		Transform3D.IDENTITY.translated(Vector3(0.0, 0.5, 0.5)),
		Transform3D.IDENTITY.rotated(Vector3.UP, -PI / 2.0).translated(Vector3(-0.5, 0.5, 0.0))
	]

	var results : Array[Image] = []

	for render_mode in render_modes:
		RenderingServer.viewport_set_debug_draw(render_viewport, render_mode)

		var images = []

		for camera_transform in camera_transforms:
			RenderingServer.camera_set_transform(camera, camera_transform)

			RenderingServer.force_sync()
			RenderingServer.force_draw()

			images.append(RenderingServer.texture_2d_get(render_texture))

		var total_image = Image.create(
			resolution * images.size(),
			resolution,
			true,
			images.front().get_format()
		)

		for image_index in range(images.size()):
			total_image.blit_rect(
				images[image_index],
				Rect2i(0, 0, resolution, resolution),
				Vector2i(resolution * image_index, 0)
			)

		total_image.generate_mipmaps()

		results.append(total_image)

	# Clean up
	RenderingServer.free_rid(camera)
	RenderingServer.free_rid(render_instance)
	RenderingServer.free_rid(render_viewport)
	RenderingServer.free_rid(render_texture)
	RenderingServer.free_rid(render_scenario)

	return results
You can call this function like so, and e.g. save the results, or use them directly in a Sprite or Material:
var albedo_and_normal = create_billboard_sprites_for_mesh(preload("res://path/to/mesh.tres"))

albedo_and_normal[0].save_png("billboard-sheet-albedo.png")
albedo_and_normal[1].save_png("billboard-sheet-normal.png")
Instead of the 1x1x1 cube, you could also get the bounding box of the mesh with mesh.get_aabb() and use that for your camera size and position. That might be useful for inventory thumbnails, where you want every item to be scaled uniformly. However, for billboards, we always use meshes scaled to 1 unit because that makes it easy to apply scales later (and to have a consistent size between geometry and billboards with no additional logic).