Overview
Shaders are everywhere, but these days you rarely have to write them yourself. Game engines come with a multitude of shaders which do everything from moving objects, scaling and rotating them, to coloring and texturing them, calculating lighting (perhaps using a physically-based rendering approach), and applying post-processing effects like bloom or HDR. But sometimes these built-in features are not enough: perhaps you’re going for a certain lighting aesthetic, want to create a unqiue special effect, or just need to improve the rendering performance.
This is where custom shaders come in: by replacing parts of your engine’s pre-defined shader pipeline, you can apply all kinds of effects and optimizations which would otherwise be impossible, such as water, clouds, outlines, or portals. But in order to do this, we first need to take a step back and look at what shaders actually are, why they are used, what they can be used for, and how you can write custom shaders which add or replace parts of the default shading pipeline of your engine.
What is a shader?
Shaders are, in essence, just programs which run on the GPU. The term originates from shading (adding shadows), since shader were originally only used for things like calculating how bright a surface should be based on the light it receives. Today however, they are almost as versatile as normal programs that run on the CPU.
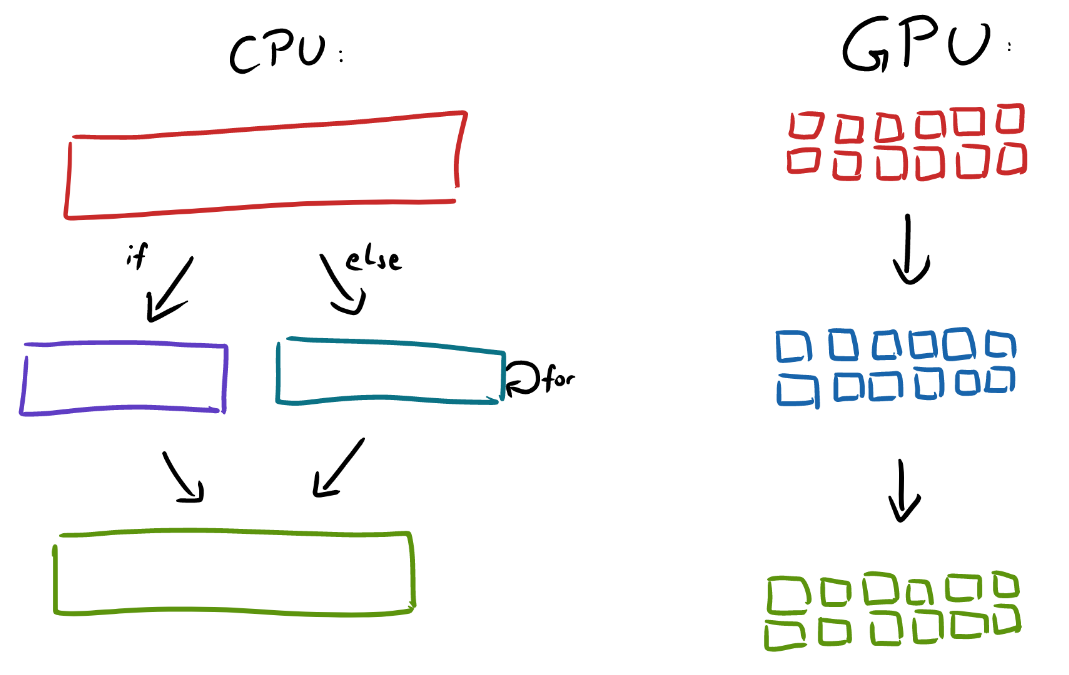
Shaders are generally used to move certain calculations onto the GPU in order to make them more efficient. Why can they be more efficient on the GPU? Because the GPU allows for much more parallelization than the CPU. When we write normal code for the CPU, we think pretty linearly: the code runs once, from top to bottom. Even for loops run multiple times, but consecutively (one iteration after the other). On the GPU, things are completely different: shader programs actually run in parallel, many times, with different inputs. This means that, when programming shaders, you are writing functions which can convert a certain input to a desired output independently of each other.

In parallel means that every line of code - in fact, every machine code instruction - is running on thousands of GPU cores at the same time. This also means that the instructions themselves can’t change based on the input, meaning that simple things like if statements can be problematic (since they branch out into different sets of instructions based on the input). But more on that later.
Aside from the efficiency won by parallelization, shaders are not all too special. As the previous paragraph hinted at, they are in fact quite limited compared to programs on the CPU. This means that every shader could, in principle, be translated into a ’normal’ programming language such as C# and run on the CPU instead of the GPU. (This is what happens when you tick the ‘software renderer’ setting in a game or other 3D application).
What are shaders used for?
As already mentioned, the term shader comes from calculating shadows. This refers to calculating light in 3D renderings. After the previous overview over parallelization, it may already be apparent why that makes sense: light is calculated in exactly the same way for every point on an object, just with different parameters (things like the incident angle, the distance to the light, and the normal vector of the object at that point). It’s similar when positioning and rotating objects: it’s all just matrix multiplications. Modern games can include objects with over 10 000 vertices - on a CPU, moving such an object would require a for loop with 10 000 iterations! But while wildly inefficient on the CPU, running such a transformation is no problem on the GPU: a modern GPU with 2 500 cores just runs the shader 4 times for 2 500 vertices each. This results in just 4 cycles rather than 10 000. (Of course, this is simplified, but you get the idea.)
Whenever objects are moved or rotated in a game engine, shaders are used to make this movement or rotation visible on the rendered pixels on the screen. “Materials” are also nothing but large and flexible “uber-shaders” that are configurable via a more pleasant UI. These shaders are usually implemented following the principles of “Physically-Based Rendering”, meaning that they try to simulate surfaces based on real-world physical parameters. For most use-cases, such a general PBR shader is enough; if not, you need to write a custom shader (or download one from the asset store).
With custom shaders, objects can be distorted, textured, and shaded in arbitrary ways. A popular example is a water shader: it moves vertices to create waves and its surface simulates varying reflection and refraction instead of applying a simple texture.
The movement of vertices is done by a Vertex Shader; for coloring pixels, a Fragment Shader (sometimes called Pixel Shader) is used.
There are more shader types such as geometry shaders and compute shaders. These are mainly used for advanced optimizations, so I will only explain them briefly here:
-
Geometry shaders run after the vertex shader and can create new geometry - this can be relevant for level-of-detail systems or particle effects.
-
Compute shaders are the most general type: they have no specific purpose, but can work with any input to create any output. These are increasingly replacing specialized shaders like geometry shaders, and they’re also used for other tasks like machine learning.
I mentioned above that geometry shaders run after the vertex shader. The order in which all shaders run is called the rendering pipeline:
The Rendering Pipeline
The rendering pipeline is the process which the GPU goes through in order to get from raw scene data (geometry, material parameters, lights, …) to a finished, rendered frame. It’s very valuable to at least roughly understand this pipeline: not only to get an idea of what shaders can and can’t do, but also to understand various other concepts and performance aspects down the line.
When we develop a level, we add objects (usually from files like .obj or .fbx) and move, scale and rotate them relative to a camera, which also has a position and other properties like a projection, field of view and render distance. Usually, when using an engine, we see a preview of this level right away, so we rarely think about how the engine actually gets from this raw data (position vectors, camera values, etc.) to a rendered image.
We can roughly divide the process into two parts: first, the geometry stage, in which vertices are moved around in order to apply e.g. object rotation or the camera’s projection. Second, the raster stage takes these transformed vertices as an input and turns them into pixels. These pixels initially consist of abstract data interpolated from their closest vertices (more on that later); the later parts of the raster stage ultimately turn this data into colors.
Parts of the pipeline can’t be modified: for example, there is always a fixed process at the beginning of the raster stage in which geometry is rasterized (vertices are transformed to pixels with interpolated values). But other parts, such as the coloring of those pixels, can be changed by shaders. Engines differ in how much of the pipeline can be altered; usually, the basics are done by the engine in fixed steps.
I’ve already mentioned the two most important types of shaders which will be covered here: vertex shaders and fragment shaders. Vertex shaders are right at the beginning of the pipeline, the first step of the geometry stage. The basics of vertex processing, such as rotation and camera projection, are usually done by the engine; but custom vertex shaders can alter that behavior and change vertex positions based on custom logic.
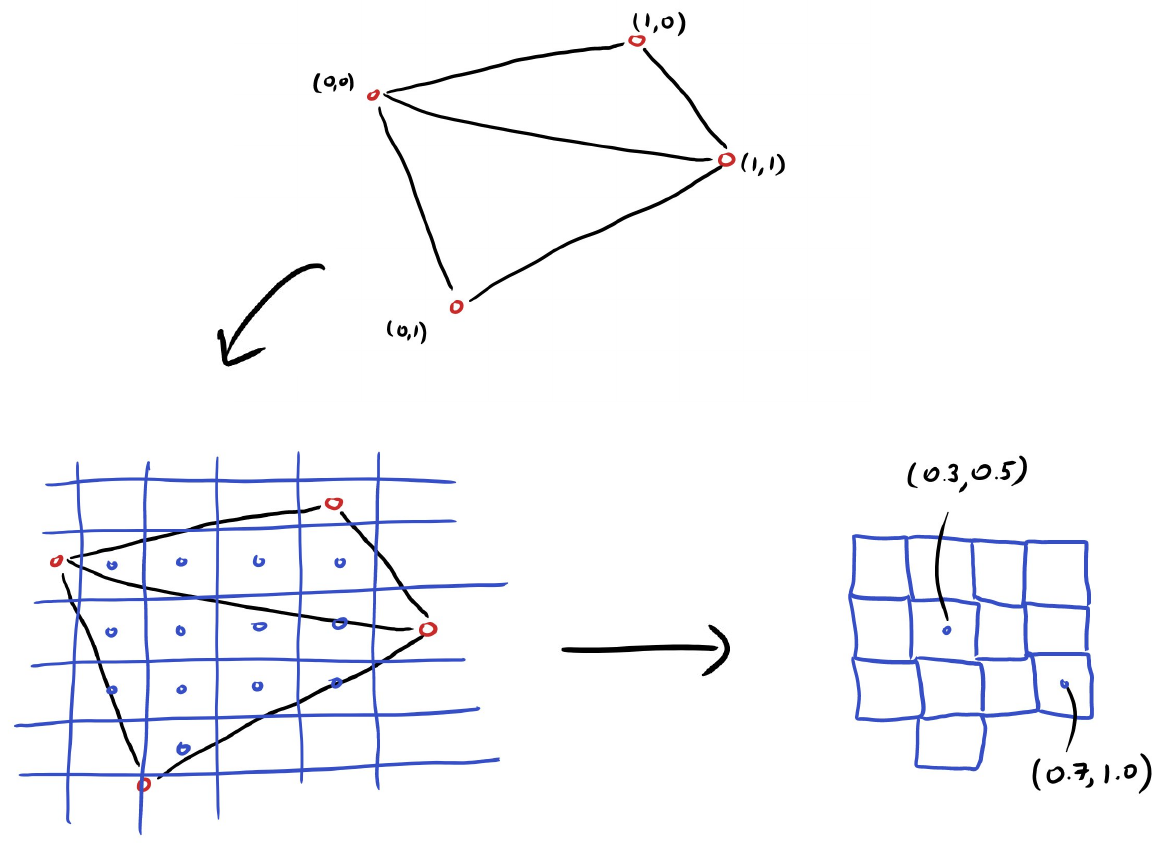
After that comes the fixed process of rasterization. Here, a pixel grid is overlaid over the geometry, and each pixel gets values interpolated from the closest vertex (or none if there is no geometry at that pixel). For example, when a pixel is exactly between two vertices, its values are exactly half of the values from vertex 1 plus half of the values from vertex 2. This is also how UV coordinates are created which ultimately allow the shader to read out the right part of a texture:

The result of this rasterization process is the input of the fragment shader, which can be entirely custom. As already mentioned, it turns abstract data - interpolated UV values, normal vectors, colors, light positions and angles, etc. - into colors. We’ll go into more detail on this later, but just to get an idea, here’s shader pseudocode for how a pixel can get its color from a texture based on the UV values: COLOR = texture(albedo_texture, UV).rgb
This raster stage is also where sorting happens. We often have multiple objects beneath the location of one pixel, but we only want to show the one whose surface is closest to the camera. To do this, a depth buffer is calculated in addition to the colorful output image. For each pixel of the screen, the depth buffer contains the distance to the closest object. Using this buffer, we know which object’s shader to use for each pixel. This works great for opaque objects, but you may already be able to see how transparency breaks this concept a bit, since in that case, we care not just about the closest object, but about potentially all objects beneath a given pixel, and even need to know the order they’re in.
Lighting
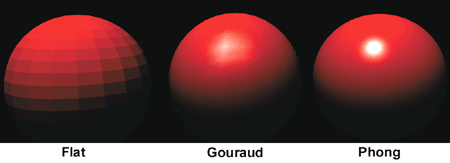
There are two options for where to calculate light: either in the vertex shader, or in the fragment shader. Usually, there are far fewer vertices than pixels (performance would be terrible otherwise), so it’s more efficient to do the calculation in the vertex shader. If you later don’t interpolate between these values, you get flat shading, which is relevant for low-poly art styles. If you do interpolate, you get gouraud shading, which produces a N64- or PS1-era look. Modern games, however, usually do all of its lighting calculation in the fragment shader, which is called phong shading. Since each pixel now calculates its lighting based on its values (normal vectors, distance to the light, etc.), the result is much more detailed and even.

2D Games
A brief note on 2D games: under the hood, all 2D games are essentially the same as 3D games. The only difference is that the geometry is very simple, usually consisting of only quads (rectangles with 4 vertices) which are textured. That way, GPUs don’t need to implement a second 2D-specific pipeline, but only one powerful 2D- and 3D-pipeline.
The basic task of vertex shaders - moving, rotating, and scaling vertices - is still important, since that’s how objects move. But custom vertex movement don’t often play a role in 2D. Fragment shaders, on the other hand, are as relevant as in 3D and can be used for all kinds of special effects.
Custom Vertex Shaders
We’ve read before that vertex shaders are the very first step of the rendering pipeline. Once the CPU has finished running all the update-functions of that frame, it sends the latest data to the GPU. That data roughly encompasses…
-
Vertex data: positions, normals, colors, … (vectors)
-
Scene data: position and projection of the camera (matrices)
The output of the vertex shader is exactly the same - its only purpose is to transform raw vertex data (as exported from 3D modelling software) into the situation of the current frame. As mentioned, much of those transformations are handled by engines, so all we need to do in custom shaders is define where to deviate from this.
For example, say you’ve exported a flat mesh and want to apply a heightmap to it. This is how terrain is often rendered, and a similar concept is needed for things like water shaders. The shader code for this looks something like this:
VERTEX.y = texture(heightmap, UV).r
The height of the vertex (its y-component) is set to the texture value at that position (a heightmap is likely grayscale, so we just take the red component).

Since shaders are run every frame, this vertex height does not need to be static - we can update it every frame. For example, this is how waves for a water shader might be implemented:
VERTEX.y = texture(wave_map_1, UV + TIME * vec2(0.5, 0.5)).r - texture(wave_map_2, UV - TIME * vec2(0.5, 0.5)).r
We use the TIME variable which represents the time that has passed since running the game (so its value changes every frame). That way, we get animation. By subtracting two textures from each other, we create dynamic, procedural waves. Note that, since this is a vertex shader, it is only run for every vertex - in order to see smooth and complex waves, we’d need a mesh with quite a high subdivision so that we have enough vertices to work with. Instead, we may want to hint at more detail in a custom fragment shader.
Custom Fragment Shaders
After the result of the vertex shader has been rasterized, we have pixels with interpolated values, which are the input of the fragment shader:
-
UV coordinates
-
Vertex positions
-
Vertex normals
-
Vertex colors
-
…
This time however, the output will be a single color (often named albedo, which refers to the base color before lighting is applied).
A very basic fragment shader might visualize the UV coordinates. (This can actually be helpful in order to debug whether UV coordinates for a model have been exported from the modelling software and imported into the game engine correctly.) Such a shader looks like this:
ALBEDO = vec3(UV.x, UV.y, 0.0);
The red value of the pixel is the result of the x-component of the UV coordinates, the green value gets the y-component. On a simple quad with UV coordinates going from (0, 0) in the top left to (1, 1) in the bottom right, this looks like this:

Returning to the water shader example: as noted earlier, we’d need quite a lot of vertices in order to visualize waves nicely. This costs performance; therefore, it might be good to consider which parts of the effect really need to be done by moving vertices, and which parts can be faked by simply animating the texture in the fragment shader. This is the same principle as with normal maps and depth maps: they create seemingly 3-dimensional detail without actually requiring additional geometry, they just alter the texture. For example, by applying the same calculation as we used for creating waves in a water shader, but this time onto the color instead of the vertex height, we get additional detail which nicely matches the 3D waves:
ALBEDO = water_color * texture(wave_map_1, UV + TIME * vec2(0.5, 0.5)).r - texture(wave_map_2, UV - TIME * vec2(0.5, 0.5)).r
Here, water_color is a color (a 3D vector filled with RGB values) which is multiplied with the height of the waves at that position.
How to Read Shaders
We’ve seen some code for shaders in the previous examples, but at first, it can be hard to wrap one’s head around how they actually run. Lines like VERTEX.y = texture(heightmap, UV).r seem more abstract than we might be used to. That’s because - as described before - these lines run many times in parallel, with varying input. In order to make this a bit more clear, I’ll give an example shader - a basic heightmap terrain shader written for Godot’s shading language - followed by C# code which might do the same thing on the CPU.
Shader Code
shader_type spatial;

uniform sampler2D ground_texture;
uniform sampler2D heightmap;

void vertex() {
	VERTEX.y = texture(heightmap, UV).r;
}

void fragment() {
	ALBEDO = texture(ground_texture, UV).rgb;
}
Most of this is very similar to previous examples, just two things are new: we first define a shader_type which defines what this shader can later be applied to, and we define uniform variables. These are just public variables - self-defined input which can be sent from the CPU into the shader on the GPU. sampler2D is the texture type.
C# Version
public Texture ground_texture;
public Texture heightmap;

VertexData[] vertices;

// Vertex Shader
foreach (VertexData vertex in vertices) {
	vertex.position.y = heightmap.get_value(vertex_data.uv).x;
}

FragmentData[] fragments = rasterize(vertices);

// Fragment Shader
foreach (FragmentData fragment in fragments) {
	fragment.color = ground_texture.get_value(fragment.uv);
}
Of course, the GPU does not actually use foreach loops - these would run consecutively, while the GPU works truly in parallel - but the basic principle is the same: the code we write is applied to all vertices and to all fragments (pixels).
Graphics APIs and Shading Languages
Just like there are multiple programming languages, there are different shading languages. Which one we use is prescribed by the engine we use and the graphics API we use.
In order to use the GPU, we need some sort of interface in order to talk to it from the CPU. When developing games, we most commonly deal with one of these three:
-
OpenGL, the free and open API from the Khronos group.
-
Vulkan, the modern successor to OpenGL, also an open standard by the Khronos group.
-
DirectX, the proprietary API by Microsoft.
Most engines support all three APIs; which one we choose largely depends on the devices we want to support. To oversimplify:
-
OpenGL is the safe choice, it runs on all PCs and on smartphones.
-
Vulkan has a lot of new high-end features, but only runs on somewhat modern hardware.
-
DirectX only runs natively on Windows devices (although translation layers exist for Linux and Mac).
I left out Metal, the native graphics API for Mac devices, since most engines just use one of the interfaces described above and translate the calls to Metal later if needed. Vulkan is in a similar position: often used under-the-hood, but rarely directly interacted with.
Unity primarily uses HLSL, the native shading language of DirectX, but it also supports GLSL, OpenGL’s shading language. Godot uses a simplified version of GLSL for usual shaders and also supports full GLSL for Vulkan compute shaders. In Unreal, shaders are written in C++ and converted into platform-specific shader code later. This is what all engines will often do: even when writing HLSL code in Unity, it will be automatically converted to GLSL calls if the player runs a system which only supports OpenGL and not DirectX. So the choice of shading language is largely a matter of preference (and engine).
Example GLSL Shader (OpenGL)
attribute vec4 InPosition;
attribute vec2 InUV;

varying vec2 UV;

void vertex()
{
	gl_Position = InPosition;
	UV = InUV;
}

varying vec2 UV;

void fragment()
{
	gl_FragColor = vec4(UV, 1.0, 1.0);
}
Example HLSL Shader (DirectX)
void Vertex (
	float4 InPosition : ATTRIBUTE0,
	float2 InUV : ATTRIBUTE1,
	out float2 OutUV : TEXCOORD0,
	out float4 OutPosition : SV_POSITION
	)
{
	OutPosition = InPosition;
	OutUV = InUV;
}


void Fragment(
	in float2 UV : TEXCOORD0,
	out float4 OutColor : SV_Target0
	)
{
	OutColor = float4(UV, 1.0, 1.0);
}
Some Notes on Performance
Simple shaders like the examples above will not cause any performance issues - in fact, they might be more efficient than default materials provided by game engines. However, when more complex effects are created or many different custom shaders are used, the impact on the frame rate or on the VRAM usage might become noticeable at some point. So here are some basic tips on how to avoid performance issues:
The transfer of data from the CPU to the GPU is one of the most expensive parts of the whole process. That is one of the reasons why 3D models should have as little vertices as possible, since these need to be transferred from the CPU to the GPU (and then stored on the VRAM). But in addition, shaders themselves need to be transmitted from the CPU to the GPU at some point, and the GPU must apply that current shader to its cores. This is called a context switch and it happens multiple times per frame, for each unique material or shader that is rendered. Therefore, a good first step for increasing performance is to reduce the number of different materials and shaders.
Now, that might entice you to write one massive shader with a lot of if branches. Unfortunately, the result will be exactly the same: as mentioned before, the GPU applies each instruction for all of its input in parallel, and this approach is incompatible with branching: different paths in if conditions would require different instructions based on the result! Since this is impossible, the compiler has two options:
-
Each GPU core runs both branches of the
ifcondition, but only uses the result of the relevant branch and discards the other right after calculating it. -
The
ifcondition is checked before running the shader, and two different shaders are produced for each branch.
Which of these two options is used is decided by the compiler, but both are pretty bad for performance: option 1 runs unnecessary code, whereas option 2 again results in a context switch. Therefore, it’s generally good to avoid if conditions in shaders. (Some older devices and smartphones actually don’t support ifs at all, and even in some more modern devices, the results can be inconsistent.)
The water shader example already hinted at a choice which often needs to be made when writing a shader: which parts should go in the vertex shader, and which in the fragment shader? Generally, it’s good to move as much as possible into the vertex shader, since there should be far fewer vertices in a rendered frame than pixels. That’s why gouraud shading was usually used on older platforms rather than the higher-quality per-pixel phong shading. At the same time however, the opposite is true in another regard: when an effect would necessitate complex geometry with a lot of vertices, it’s probably a good idea to try to fake the effect by applying it in the fragment shader (with simpler geometry) instead. The best middle ground depends on the specific hardware used by the player, so as long as something is not wildly inefficient, you probably shouldn’t overthink it.
Some additional factors which can decrease performance are:
-
Transparency and discarded pixels: these require additional steps in the rendering pipeline, as hinted at in the paragraph on the depth buffer.
-
Calculating roots: a
sqrt()call seems simple, but under the hood it’s quite complex. Note that a root is also required whenever a vector length is calculated or a vector is normalized! -
Textures: too many textures fill up the VRAM and texture reads are a pretty expensive operation. Lots of effects such as blurs and outlines require a large number texture reads, so use them with care.
Links
-
Collection of Godot shaders: https://godotshaders.com/
-
Getting even closer to the hardware with raw OpenGL: https://learnopengl.com/Getting-started/Shaders
-
Artistic deep dive into fragment shaders: https://thebookofshaders.com/
-
Browser shader editor and collection: https://www.shadertoy.com/