This article expands on the previous parts of the grass rendering series and makes it feasible for real-world use with a level-of-detail system utilizing impostors. If you want to implement a grass effect from scratch yourself, definitely go through the previous parts first, starting at Grass Rendering Series Part 1: Theory. However, this tutorial will also be useful if you just want to learn about level-of-detail systems in general, as I’ll provide some theory and show my general approach towards hand-crafting impostors with custom shaders. I’ll dive fairly deep into fine-tuning the impostors, not because it’s absolutely necessary for this effect, but to share the tricks I’ve come up with in my work on foliage rendering. Feel free to skip these deep-dive sections if you only want to learn about the general technology behind LOD systems for grass.
Here’s what we’ll end up with at the end of this tutorial:
As always, the Godot project is available here: https://git.hexaquo.at/karl/godot-grass/src/commit/37bcb521953b31e0be24775eec563b81535660e0
If you want to follow along, you can start from this commit: https://git.hexaquo.at/karl/godot-grass/src/commit/00526b9e1f7d2d1e327ed60ac46ae33fe57488a8
The Problem
In the previous parts of this series, we set up a grass shader with special lighting logic and a wind animation:
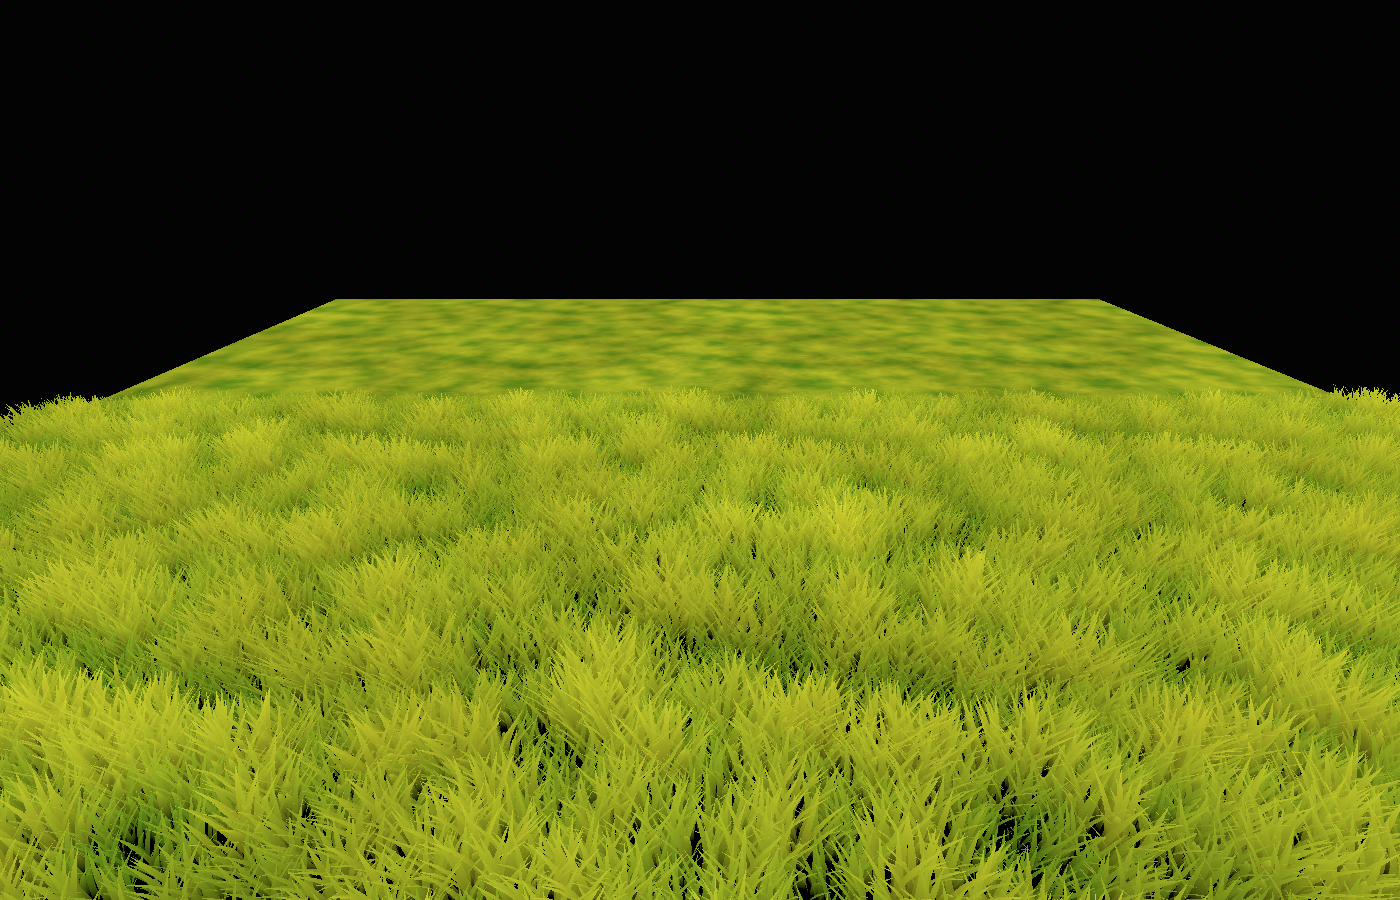
The grass looks good and performance is fine, but it’s just a 5x5 meter chunk. That’s fine for a demo, but not suitable for an actual game, where you likely want to cover much larger areas with grass.
We could duplicate our 5x5 meter chunk and cover, say, 50x50 meters by using 100 chunks. However, when doing that, you’ll notice that the framerate starts to drop dramatically. This makes sense: each chunk contains 10.000 blades of grass, or 90.000 triangles (since I modeled my grass blade out of 9 triangles). 10 million triangles is the ballpark of what modern games tend to render at once, so with 100 chunks of grass, you’re essentially maxed out. And even with 50x50 meters, we’re far from the coverage required for a real open world game.
Luckily, there is another thing we can notice when duplicating the existing grass chunks: the farther they get from the camera, the less discernible the individual blades of grass really are. The general structures as well as the wind animation remain visible, but rendering individual grass blades at that distance is quite a waste, since many of these will turn out smaller than a single pixel.
This insight leads us to the solution…
The Solution: Level of Detail
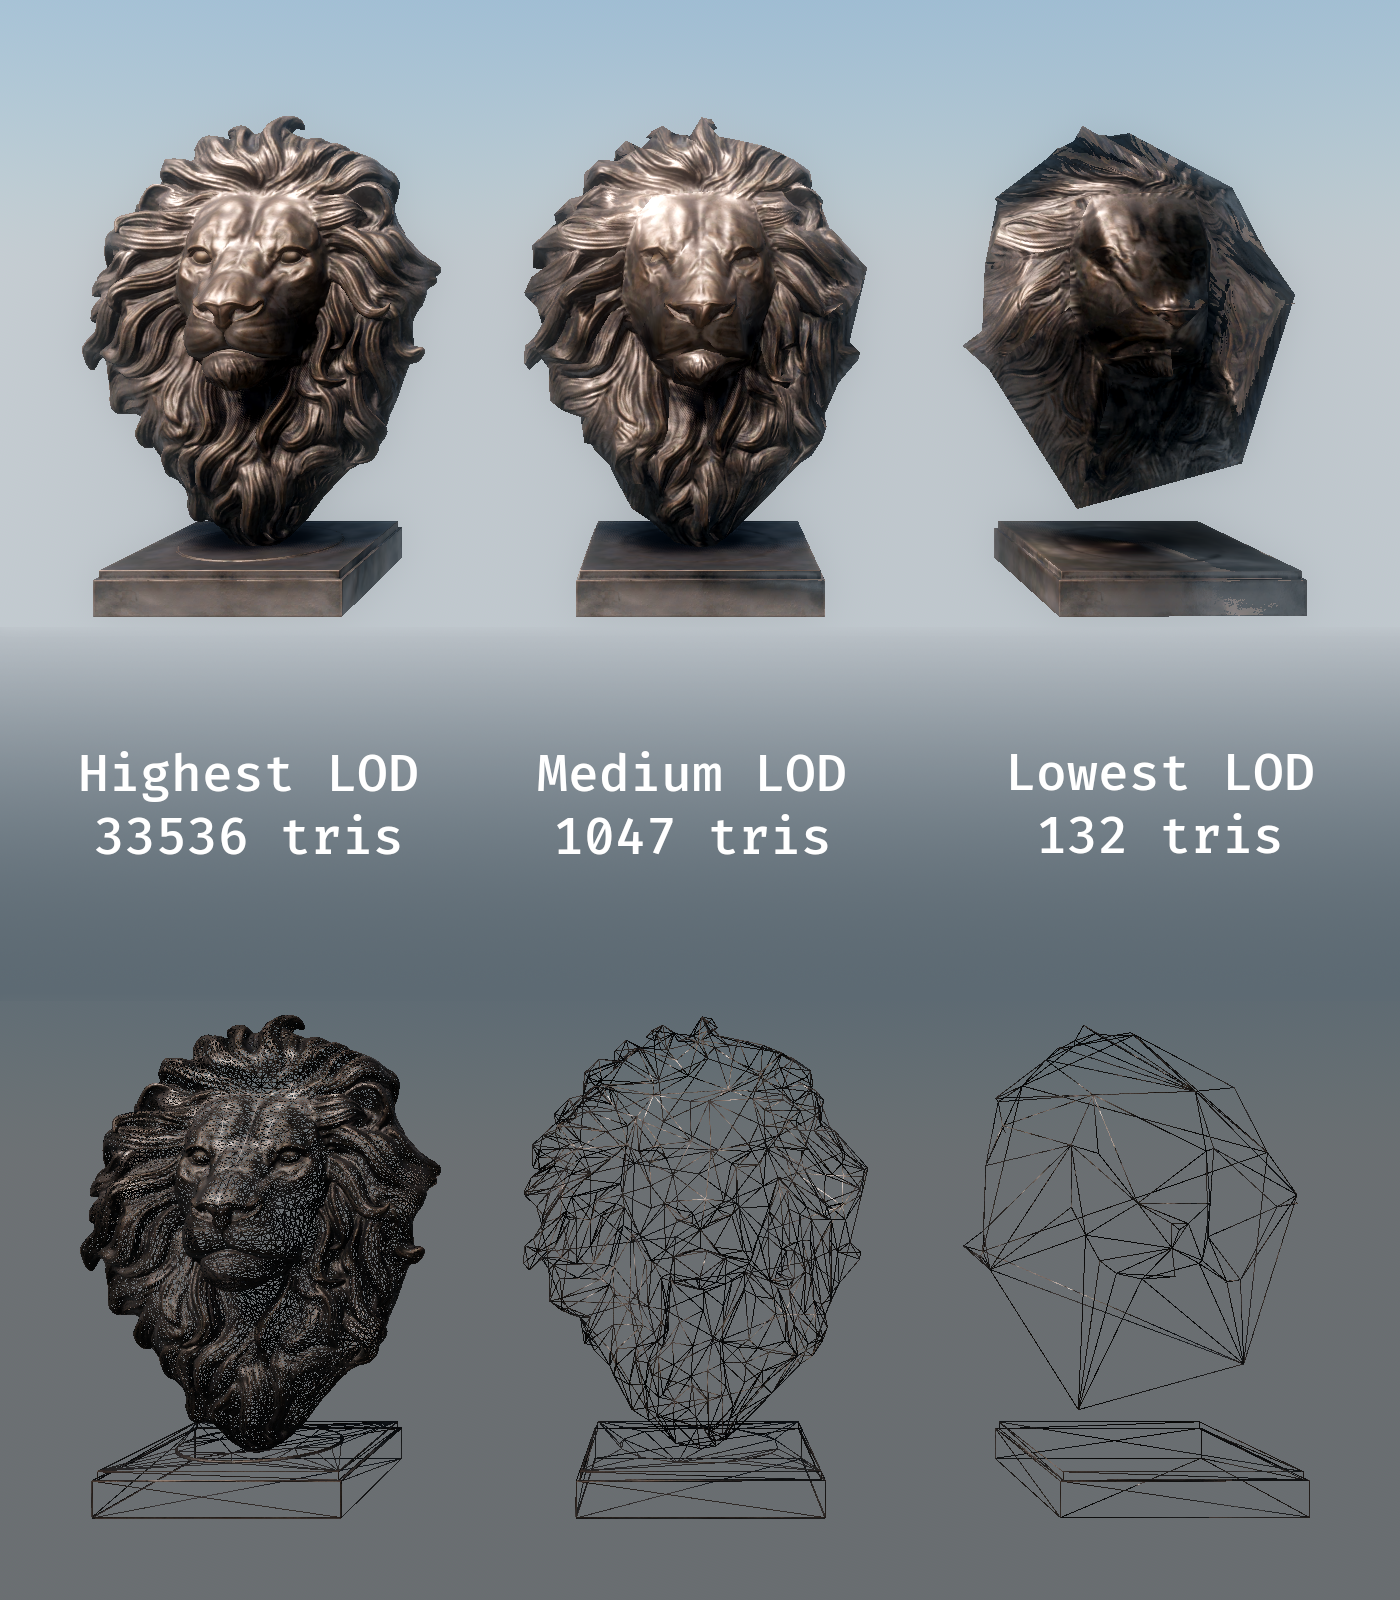
Almost all modern 3D games use some sort of level-of-detail (LOD) system. What this means is that, for each 3D object in the scene, there are multiple levels of complexity which that object can choose from. Objects switch between these levels depending on how close to the camera they are.
As we’ve noticed with the grass, fine detail is not discernible past a certain distance, so you might as well not render it. That’s exactly the thought process behind all level-of-detail systems: When you get further away from the camera, you leave out the details that wouldn’t be noticeably anymore anyways.
In fact, this kind of detail reduction can be beneficial not only for performance, but also for visuals: when geometry gets smaller than individual pixels, it’s hard for the renderer to decide what to render on a given pixel, which can cause flickering and noise.
With 3D geometry, this detail reduction can be (partially) automatic. Godot does this by default: it generates simplified geometry and switches to that when you get further from the camera. You can alter the “LOD bias” property of a complex mesh to see this in effect:
Our grass blade, however, does not play too nicely with this system because its geometry is already incredibly simple. For such objects, it’s best to generate LODs by hand. In our case, there is an obvious way we could make a lower LOD version: simply remove all vertices until the blade of grass is a single triangle.
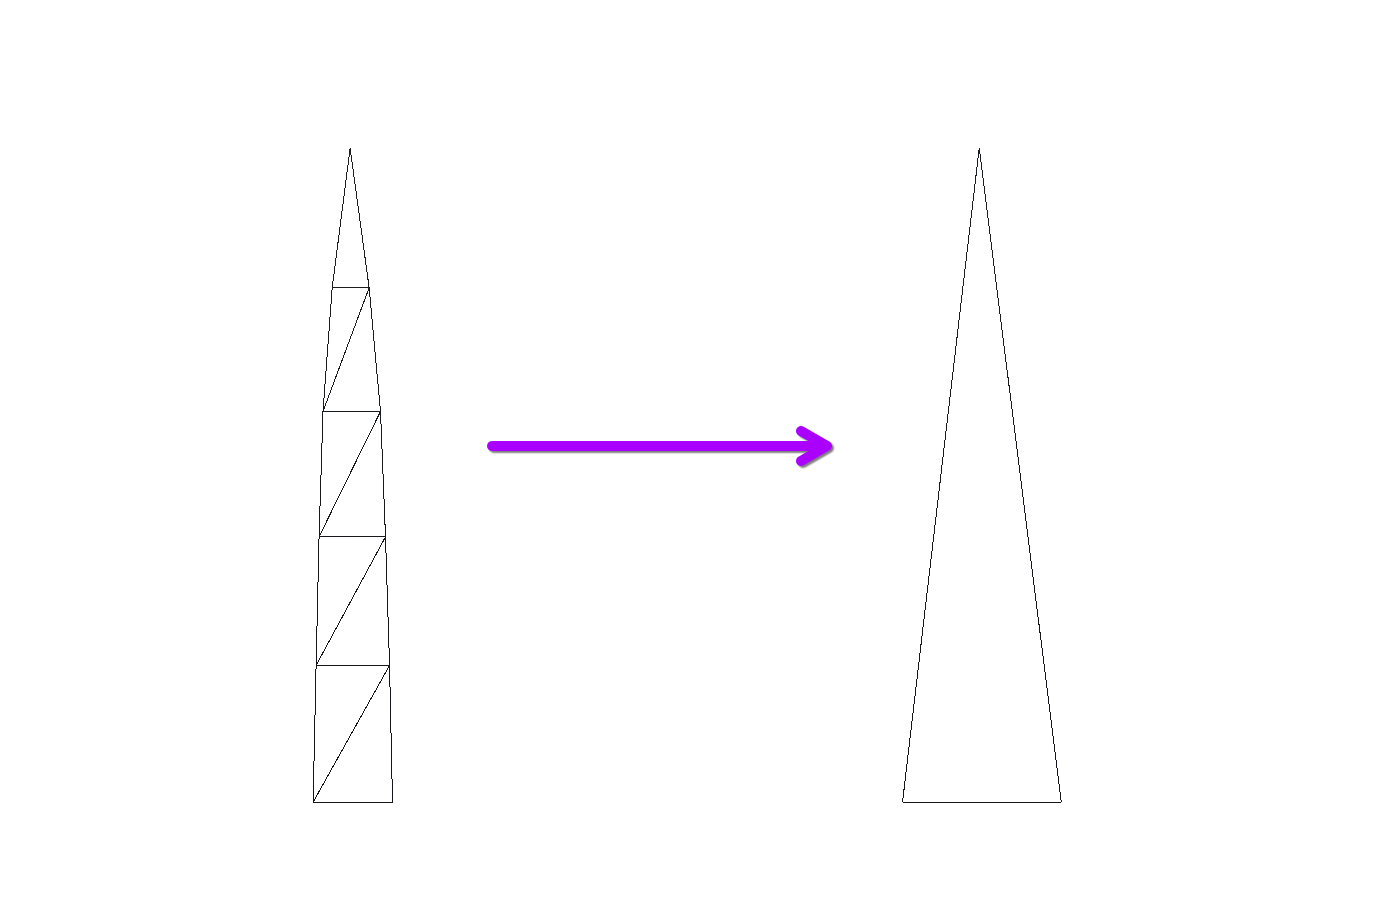
This triangle behaves very similarly to the original grass. It doesn’t bend as nicely, but at the distances where we’d use this lower LOD, the shape of the bend will barely be discernible.
Of course, we don’t want to place these lower-LOD chunks by hand. Instead, we can add a script to our grass chunk which switches out the mesh depending on the distance to the camera. Actually, we can’t just switch out the mesh inside the multimesh, since that multimesh is shared across all instances of the grass (which is great for performance). Instead, we’ll want to duplicate the multimesh, swap out the mesh in this new multimesh resource, and assign the multimesh based on the distance. Something like this as a script in our grass chunk:
func _process(delta: float) -> void:
		var camera_pos

		if Engine.is_editor_hint():
			camera_pos = EditorInterface.get_editor_viewport_3d().get_camera_3d().global_position
		else:
			camera_pos = get_viewport().get_camera_3d().global_position

		var camera_distance = global_position.distance_to(camera_pos)

		if camera_distance < lod_switch:
			$Grass.multimesh = preload("res://grass_multimesh_detailed.tres")
		else:
			$Grass.multimesh = preload("res://grass_multimesh_simple.tres")
Since we switch immediately without any blending, it’s not unnoticeable, but the difference is still very minor:
To clean up the transition, you could define a short distance where you render both multimeshes and blend between the two. Alternatively, just add a few more LOD steps in-between to make each shift less severe.
We’re only rendering about 1/10th of the original triangles in these lower-LOD chunks, so that’s definitely an improvement! However, it’s still not quite the full solution to our original problem. We may be able to increase our framerate a bit by using this mesh in some chunks, but we’re still rendering at least 10.000 triangles per chunk, and at a distance, we’re still getting multiple vertices within a single pixel. We need something else here.
The idea is: when you’re so far away that the individual geometry can’t be discerned anymore, why even render geometry at all? Why not, essentially, put up a screenshot of a grass chunk? This is the basic idea behind impostors.
As the name implies, impostors (yes, that’s the real term) are objects which pretend to be more complex than they really are. Specifically, they pretend to have much more complex geometry than they really have. This is usually done by getting rid of (parts of) the geometry entirely and instead using textures.
It’s commonly used for trees, where lower LODs generally swap out the geometry for billboard textures - orthographic, unshaded renderings of the tree - with transparency:
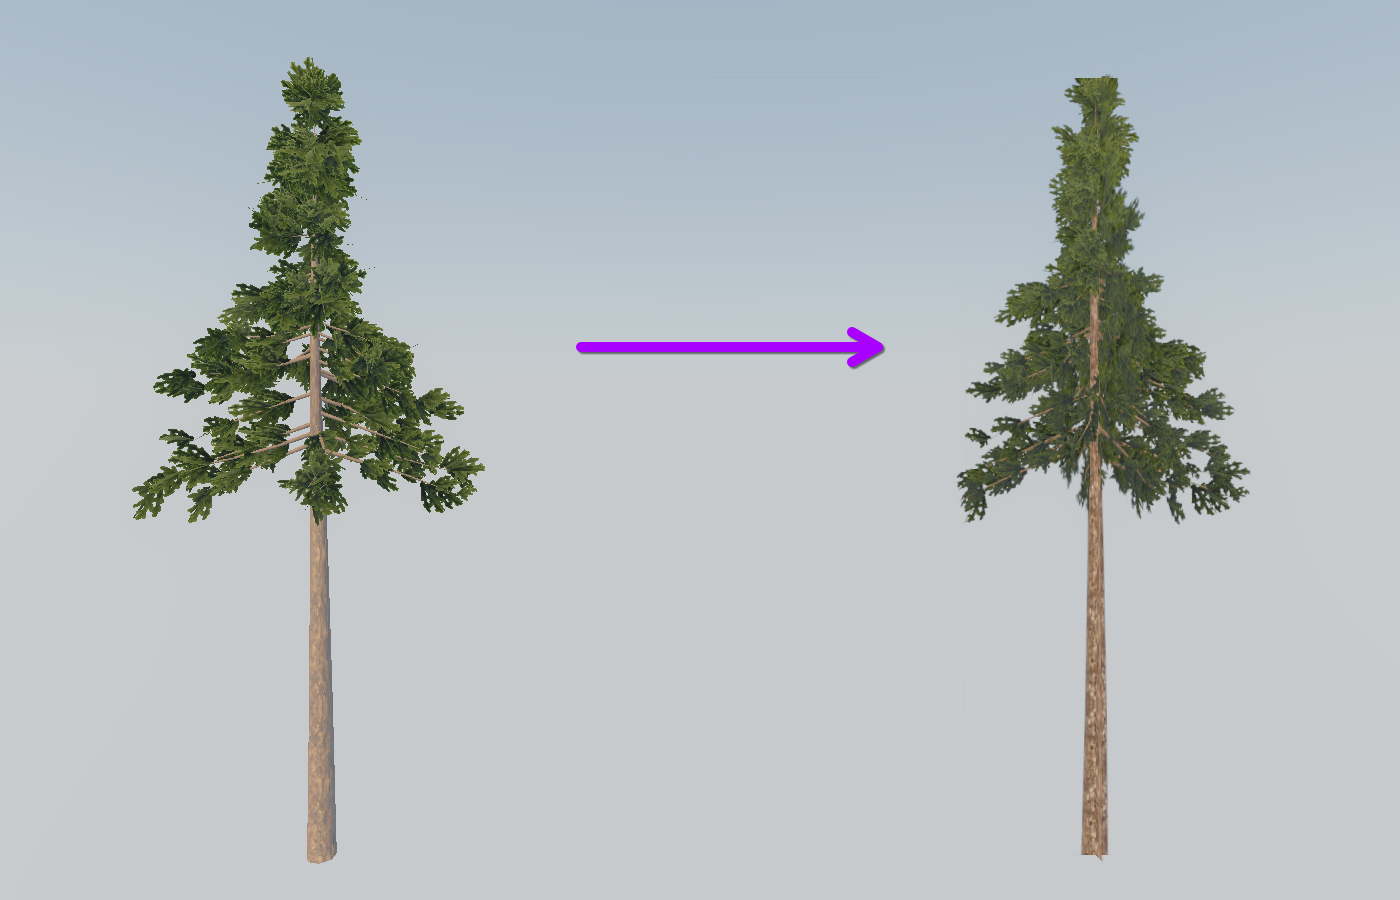
The tree on the left here is an optimized tree with about 4500 triangles (it already uses billboards for the leaves), whereas the tree on the right is a simple billboard made from just 4 triangles: two crossed-over quads, textured with screenshots of the albedo buffer and the normal buffer of the original tree.
You could do something very similar for the grass: create a billboard mesh with multiple grass stalks on it and transparency in-between. That would certainly be another improvement, but still not the full solution: transparency introduces new complexity into the rendering pipeline and the heavy overdraw (having to render the same spot multiple times in order to know what’s in front of what) might make the performance gain negligible.
Instead, we’ll make use of the fact that grass is largely ground-covering. We want to emulate the color and shading of the grass without actually rendering individual grass blades; instead, we’ll just render the ground - a single plane mesh without any additional geometry - and make it act as if there were grass blades on it.
Implementing Grass Impostors
When creating impostors, we want to get as close to the original geometry as possible without actually rendering the geometry. As mentioned, the simplest solution would be to literally take a screenshot and use that as a texture for a plane. But of course, this screenshot will only depict the grass with the specific current lighting and camera angle, and without animation.
Therefore, it’s best to think of impostors as made up of individual components. We want to recreate all aspects of shading as accurately as possible. Here, these are:
-
Albedo
-
Ambient Occlusion
-
Normals
-
Lighting
Going back to the simple screenshot approach, we could take one unshaded screenshot for the albedo texture and one screenshot of the normal buffer for the normal map. This is actually how impostors for things like trees, as mentioned earlier, can be created. However, for the grass, we implemented some quite unique lighting and animation logic, and the albedo color is based on world-space noise textures, so we’ll need more sophisticated logic there.
What we’ll do instead is write a new shader which re-uses as much of the grass blade shader as possible. We’ll want to use the same logic for getting albedo colors and animation, even using the same world-space textures. Once we have that, we can deal with the parts where we have to deviate because of the lack of grass blade geometry.
Here, I’ll apply that shader to a simple Plane mesh. In a real game, you could instead re-use the terrain geometry by adding the impostor grass as a second pass on your terrain material.
Getting the Albedo right
In order to avoid distractions at this stage and not over-complicate things right away, I like to switch my viewport to Unshaded. This way, I can focus purely on the albedo logic, without accidentally trying to replicate shading which should actually be handled by the normal map later.
Note that Ambient Occlusion is still applied in the Unshaded render mode. I’ll also comment out our AO = ... line in the grass shader for now so that we’re only dealing with albedo first.
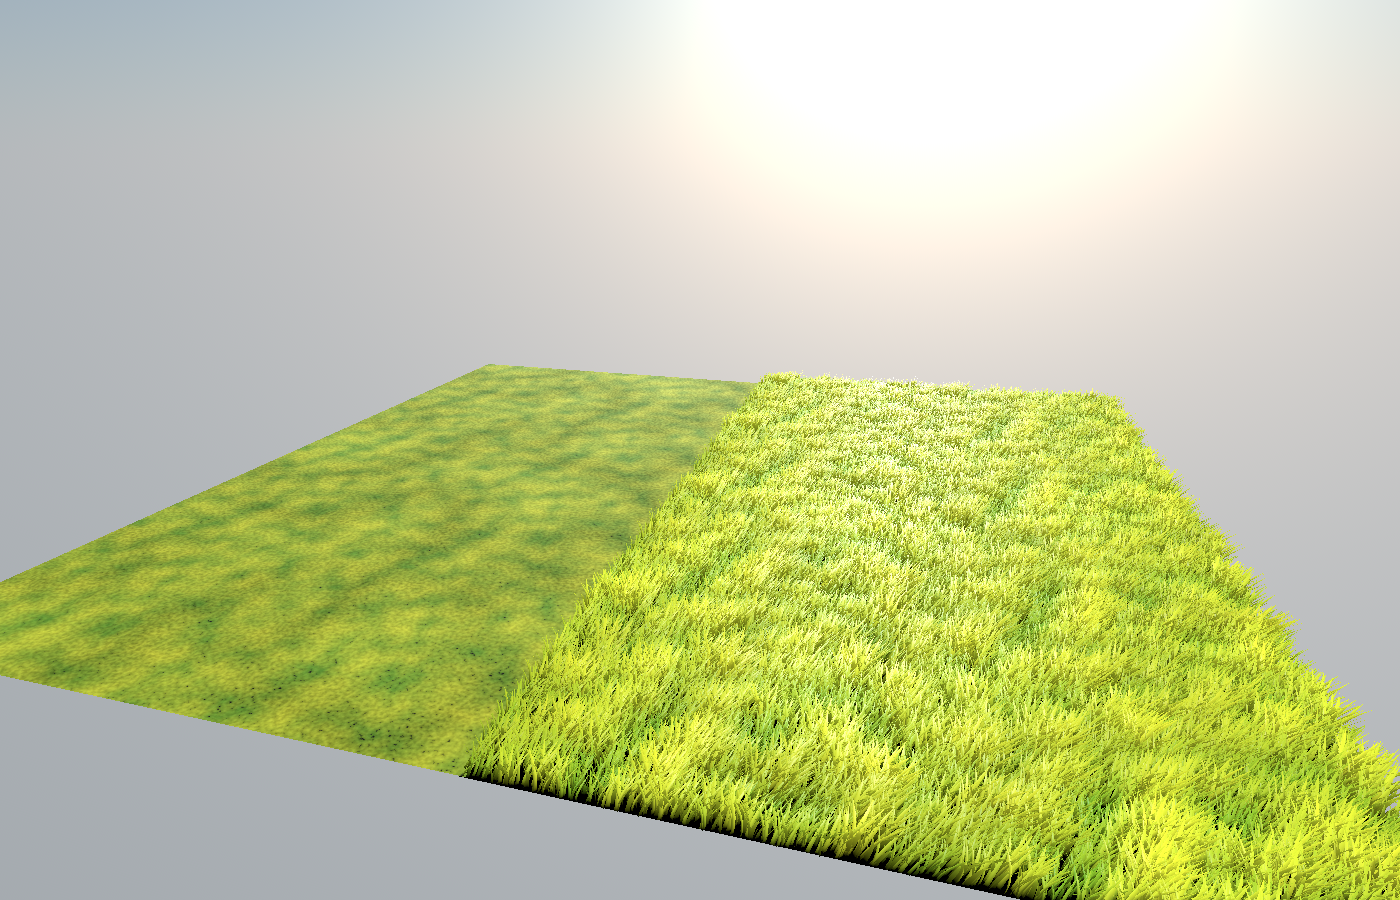
I set up a scene with a few grass chunks next to a few chunks of our impostor plane, here depicted in the Unshaded render mode:
Let’s consider what gives the grass its main color. Looking at the fragment shader, it’s fairly obvious, it’s really just this one line:
ALBEDO = mix(color_small, color_large, patch_factor);
Where patch_factor is read from a texture in world-space:
patch_factor = texture(patch_noise, NODE_POSITION_WORLD.xz / patch_scale).r;
We can re-use this almost 1:1 in our impostor plane! The only thing we need to change is NODE_POSITION_WORLD, since that will just give us the center of the quad. What we need instead is the world position of the current fragment. We can get that by converting the vertex position to world-space in the vertex shader, which is (MODEL_MATRIX * vec4(VERTEX, 1.0)).xyz; and writing that into a varying variable. This leaves us with the following first shader for our impostor:
shader_type spatial;

uniform vec3 color_small: source_color = vec3(0.3, 0.6, 0.1);
uniform vec3 color_large: source_color = vec3(0.9, 0.9, 0.2);

uniform sampler2D patch_noise;
uniform float patch_scale = 5.0;

varying vec3 world_vertex;
varying float normal_to_view;

void vertex() {
	world_vertex = (MODEL_MATRIX * vec4(VERTEX, 1.0)).xyz;
}

void fragment() {
	float patch_factor = texture(patch_noise, world_vertex.xz / patch_scale).r;

	ALBEDO = mix(color_small, color_large, patch_factor);
}
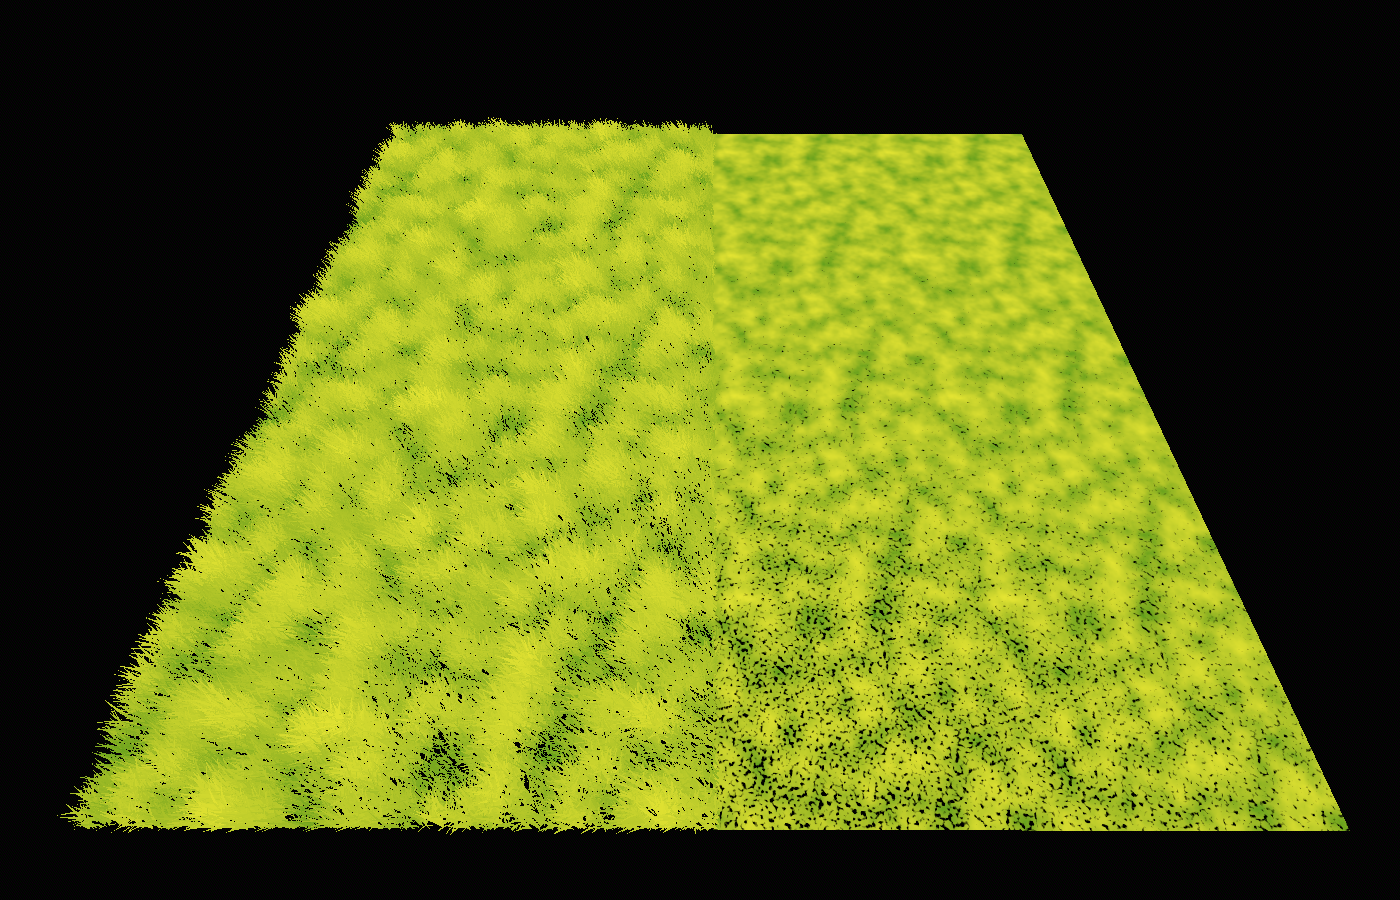
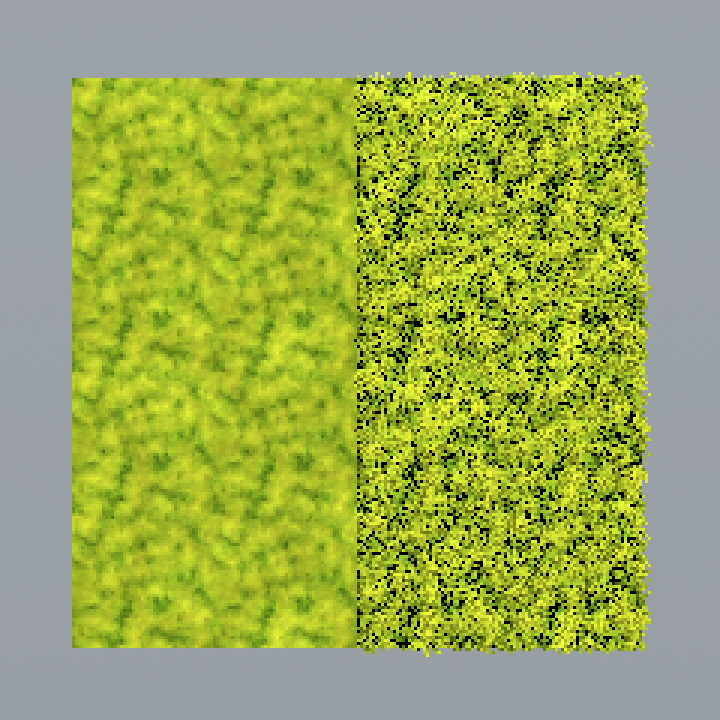
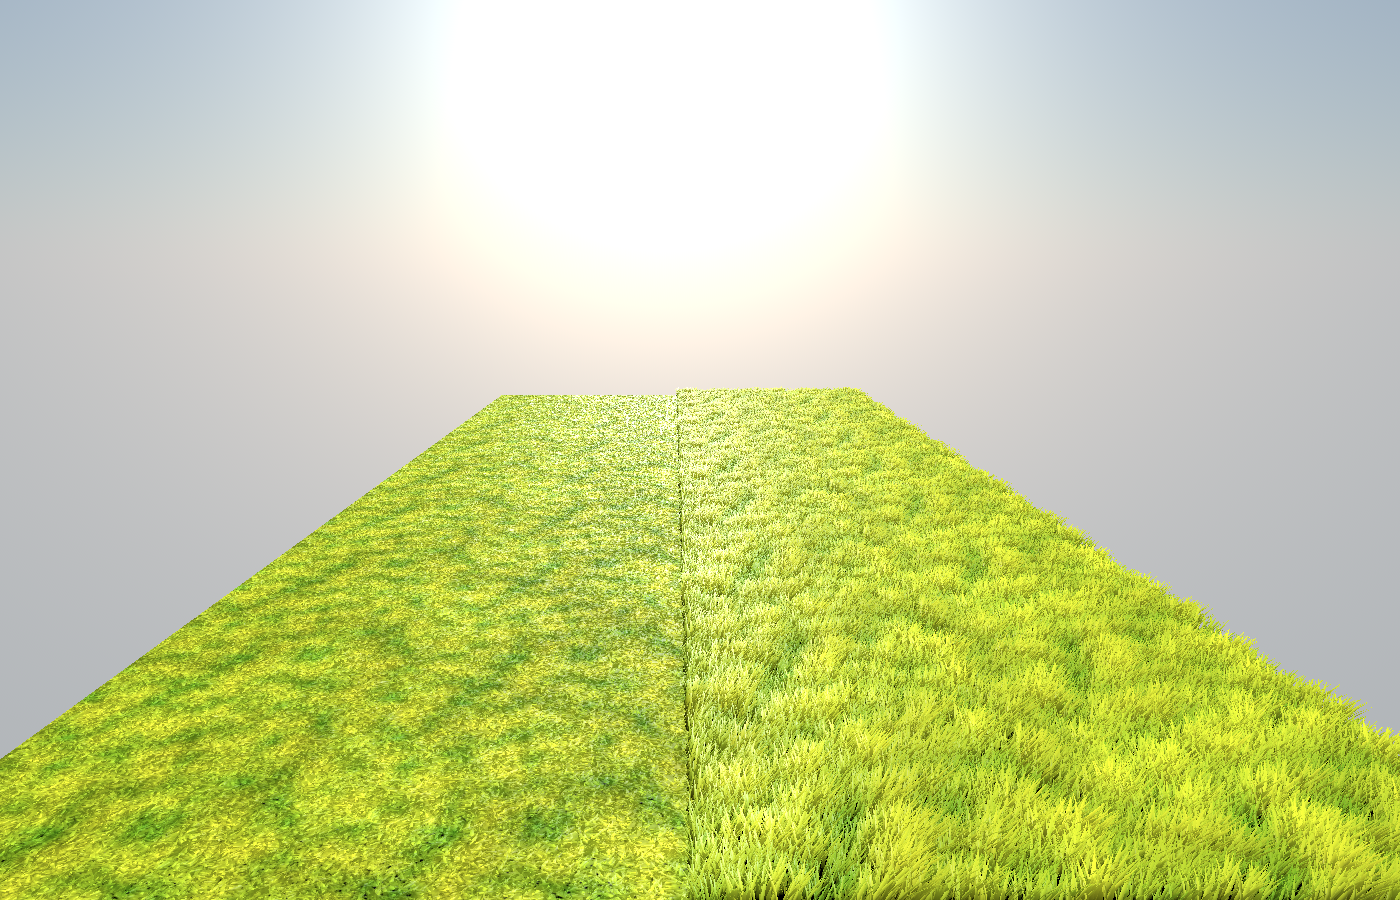
I filled patch_noise with the exact same texture as the original grass is using. In our unshaded test scene, if we squint a bit, this already makes a quite nice transition from high-LOD grass into impostor:
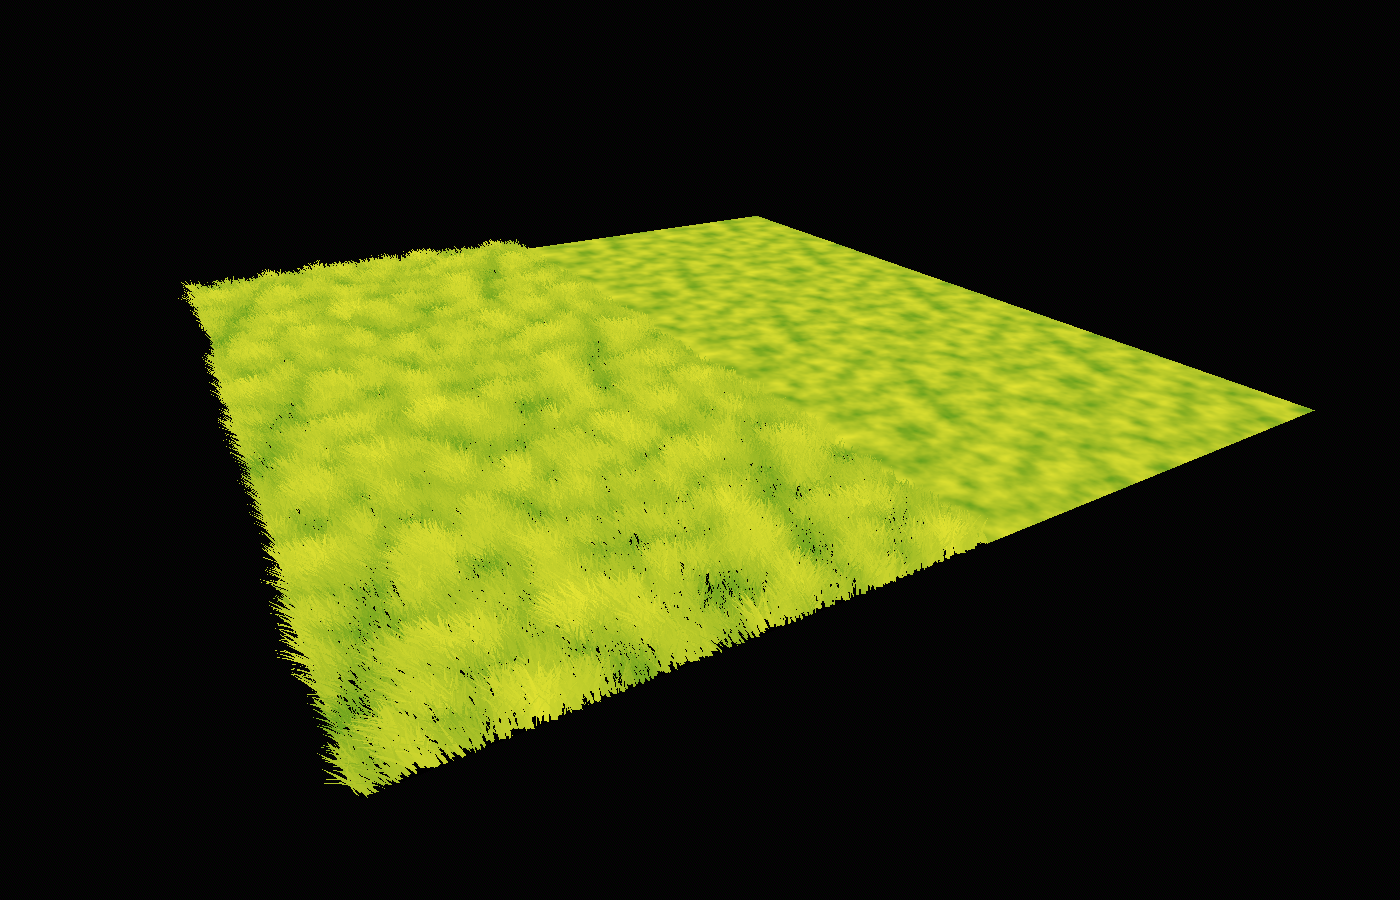
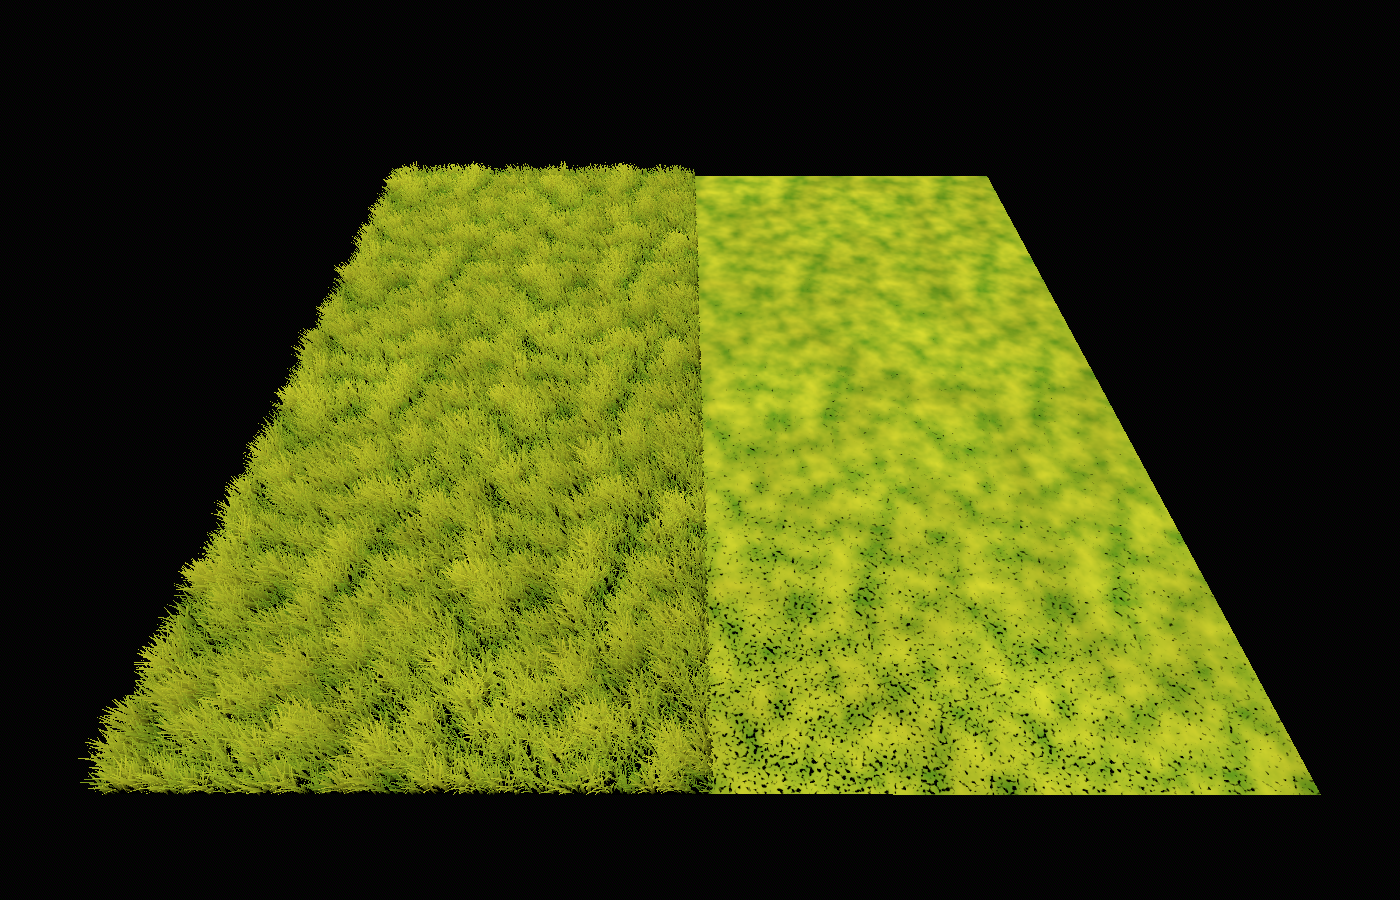
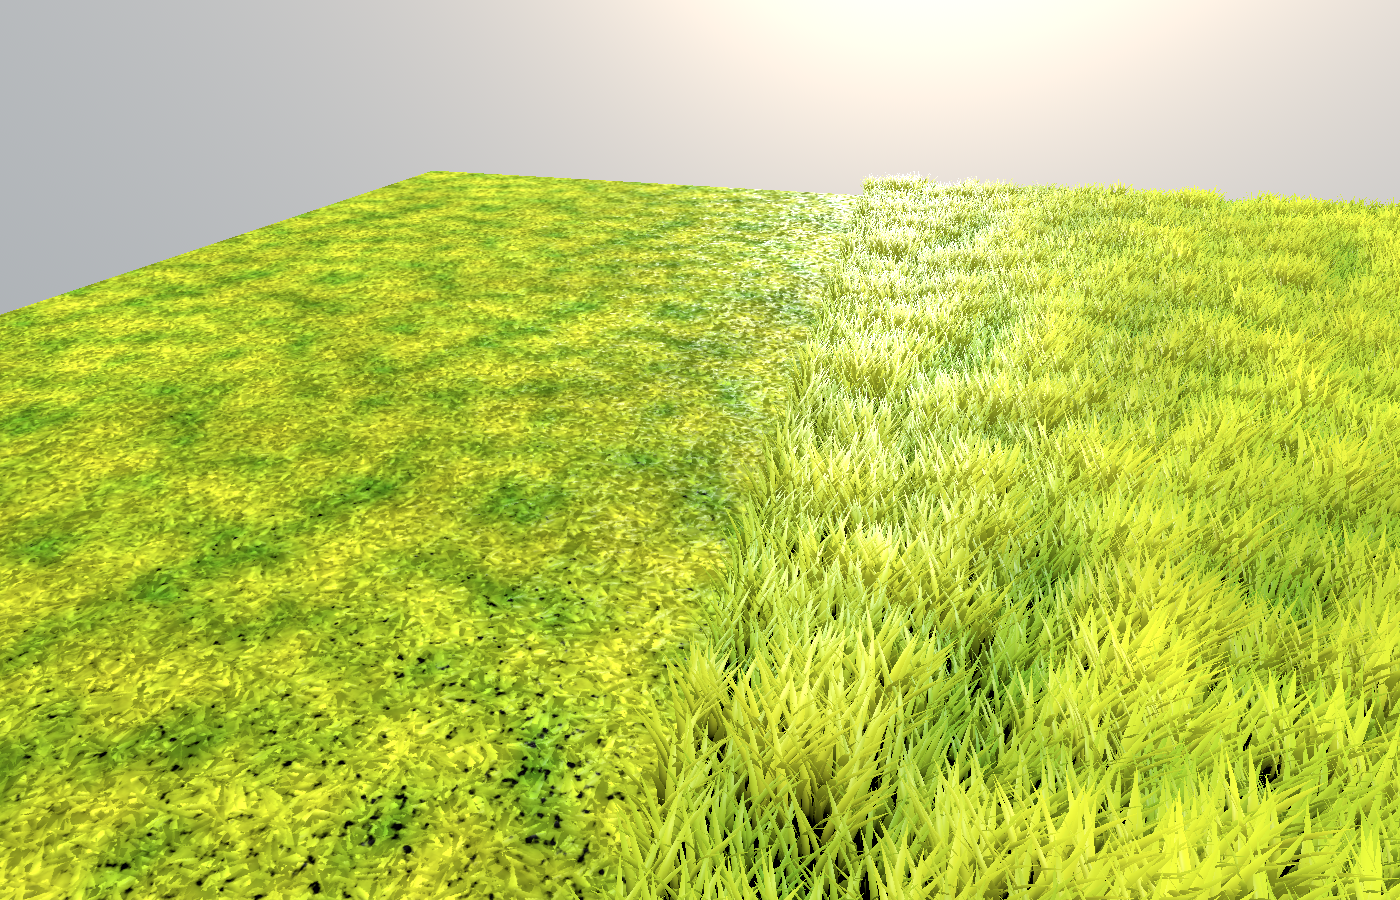
This might already be good enough for some use-cases. However, I tricked a bit here by choosing a fairly neutral camera angle. It’s important to remember that, because our high-LOD grass is made up of actual grass blades, it can look very different depending on the viewing angle.
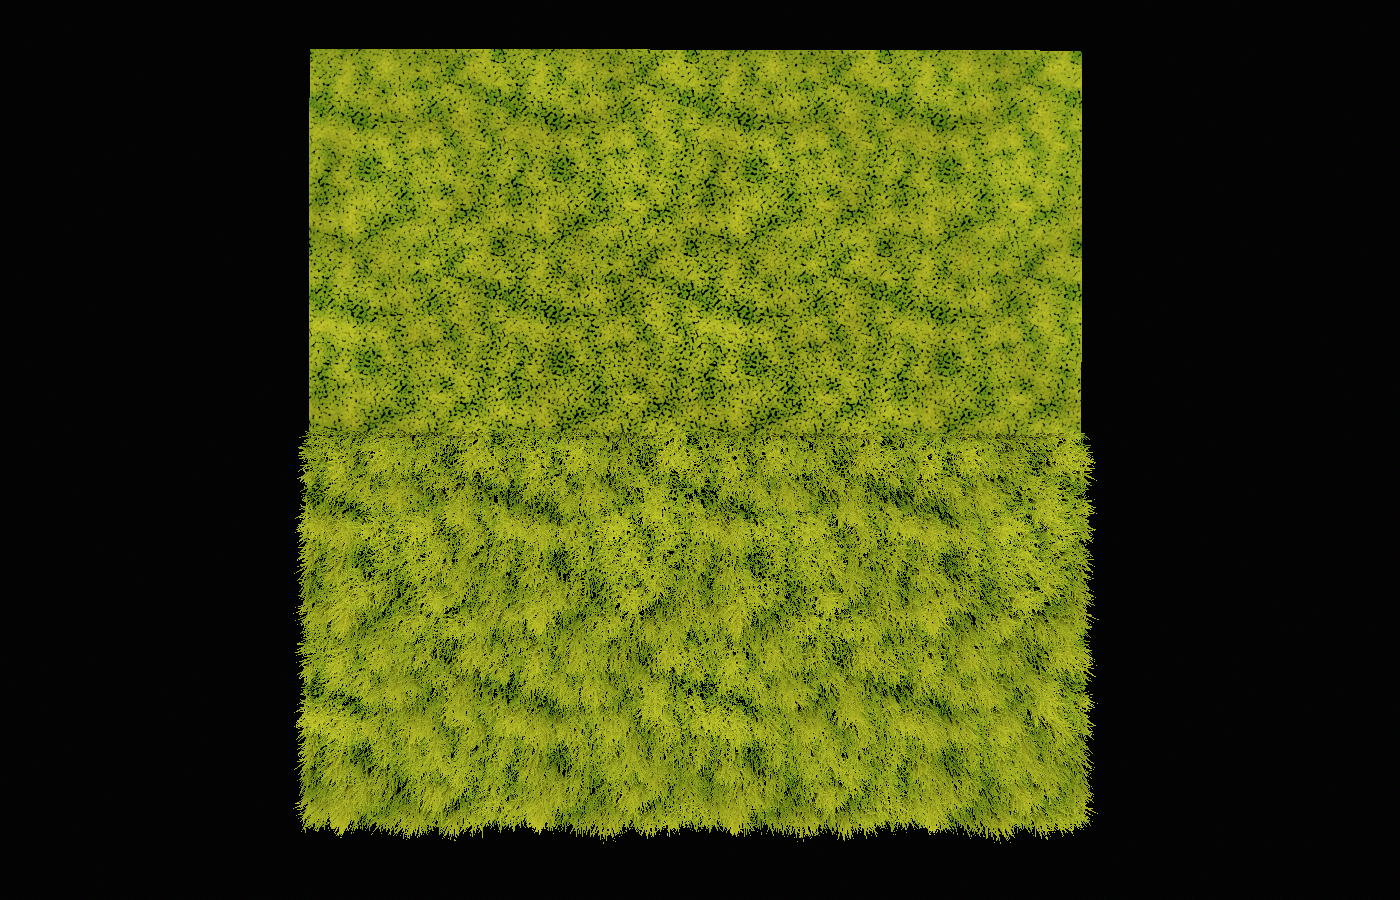
Specifically, from above, the high-LOD meadow looks darker and more contrastful than our impostor because we see more of the stuff in-between grass blades:
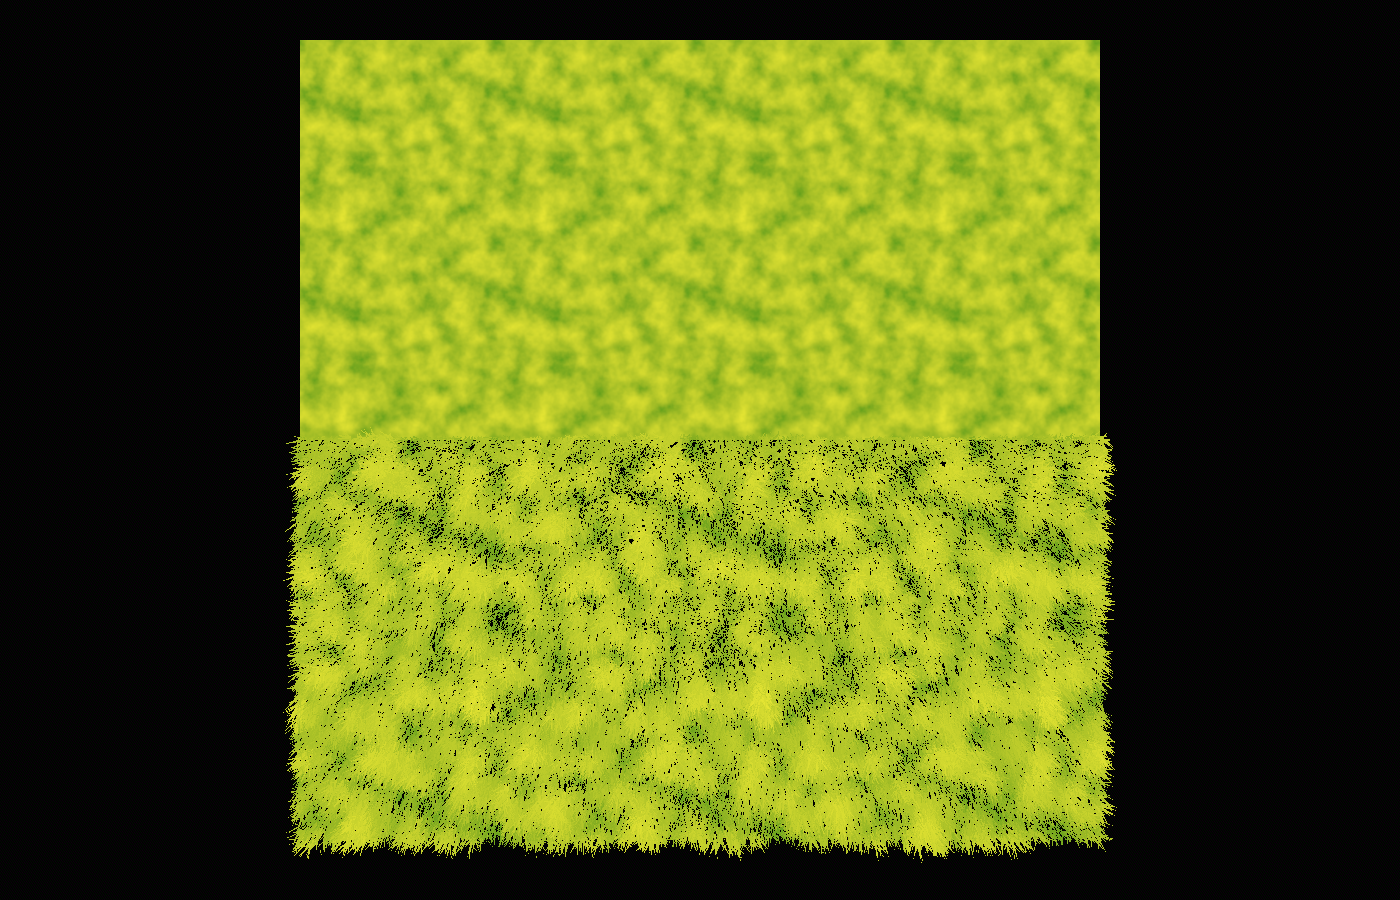
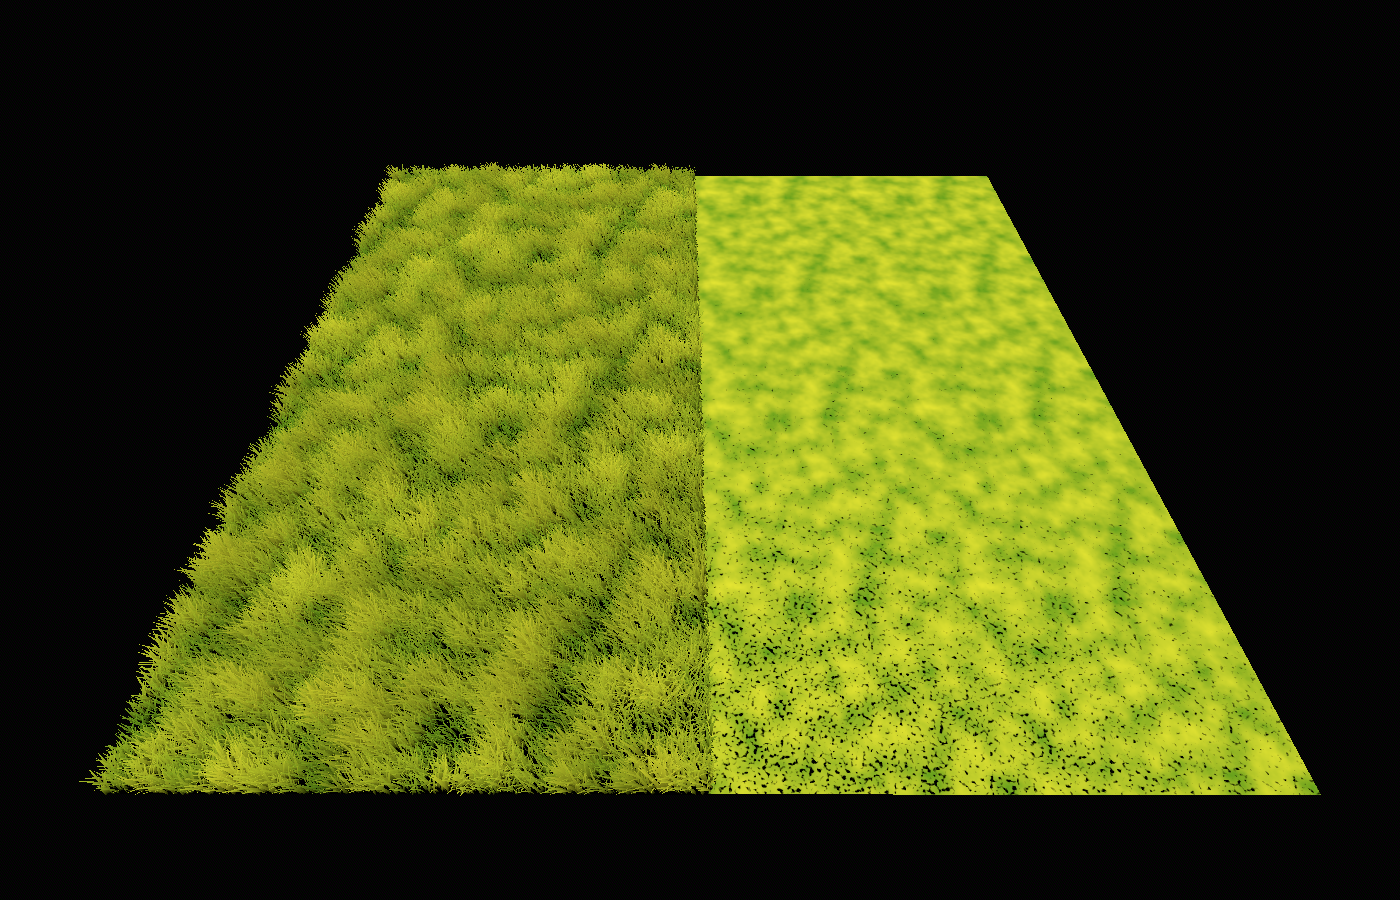
On the other hand, when viewed from a more eye-level position, the high-LOD meadow actually looks brighter and less contrastful than the impostors because from this position, the tips of the higher grass blades (which have a lighter color) largely cover the ground and the lower stalks:
Let’s hack our way around this. We recognized that the real grass looks different depending on the viewing angle. This means that we need to calculate this viewing angle in our impostor grass somehow.
In shader terms, the viewing angle is the angle between the camera direction and the normal vector. If you’ve read my post Understanding Godot Light Shaders and Light Calculations by Implementing a Toon Light Shader, this might sound very familiar: it’s the exact same logic as rim lighting! In fact, we can use the same line of code here:
float normal_to_view = 1.0 - dot(VIEW, NORMAL);
This gives us a factor which is 0.0 for a top-down view and (almost) 1.0 for a steep eye-level angle.
Using this, let’s first fix the overly dark and contrastful eye-level view. As noted above, it’s caused by the real grass being dominated by the higher, brighter blades. In other words, it’s as if the patch_factor gets closer towards 1.0 at steep angles. So what we could do is lerp between the real patch_factor and 1.0 based on our normal_to_view factor. Perhaps not all the way to 1.0 since that would remove all contrast, so I’ll scale normal_to_view down a bit:
patch_factor = mix(patch_factor, 1.0, normal_to_view * 0.4);
This makes the transition at steep angles a bit more seamless:
Since normal_to_view is 0.0 when viewed from top-down, that view still has the full contrast of patchiness. However, what’s missing there is the bits of ground showing through. How could we fake that?
We don’t have any geometry which may or may not cover the ground, so we need to trick again. As is often the case, we can approximate geometrical detail using a texture. From a sufficient distance, the spots of ground showing through the grass looks essentially like noise, which is great, since that means we can use another noise texture. (I used a NoiseTexture2D with a frequency of 0.1 here.)
float high_frequency_sample = texture(high_frequency_noise, world_vertex.xz / patch_scale).r;
As we noted, in addition to this noise texture, our normal_to_view factor should decide whether we really do see ground showing through or not. In addition, more ground is covered in taller patches of grass, so we can factor in the patch_factor as well. Using these assumptions, here’s a “spottiness” from 0.0 (no spots) to 1.0 (full of spots) which I came up with after some playing around with the values:
float spottiness = (1.0 - normal_to_view) * 0.5 - patch_factor * 0.2;
Right now, this is a value from 0.0 to 1.0 for the entire plane; we still need to apply the high_frequency_sample we took before. You could think about it like this: if the viewing angle is closer at eye-level, we only want to have spots where the high_frequency_noise is very bright. With a more top-down viewing angle, parts of the noise texture which are a bit darker should also turn into spots, thereby producing more and larger spots.
This is a typical use-case for step or smoothstep: sample from a texture and turn it into either 0.0 or 1.0 based on a given threshold. I recommend smoothstep here to have a small transition between 0.0 and 1.0, otherwise it can get harsh and noisy. Something like this:
float ground_factor = smoothstep(spottiness + 0.1, spottiness - 0.1, high_frequency_sample);
If you aren’t familiar with these functions, check out Godot Shader for Beginners: Lightning Strike Effect using step and smoothstep.
This ground_factor is now 0.0 if we want to use the grass color and 1.0 if the ground color should be applied. So we can simply lerp between ALBEDO and a ground_color (in my case, black) for our final ALBEDO:
ALBEDO = mix(ALBEDO, ground_color, ground_factor);
Now, our top-down view also looks much more like the high-LOD grass:

And it looks nice in-between too (view rotated by 90°):
Of course, if you have a ground texture underneath your grass rather than black, you can also sample from that and use it as the ground_color; that’ll depend on your art style.
Alright, I think the albedo color is good enough! Let’s move on to the next thing…
Getting the Ambient Occlusion Right
Remember that we turned off ambient occlusion to focus purely on albedo. When turning it back on, we notice that quite a lot is missing, especially the entire wind effect:
Let’s see how AO is calculated in our high-LOD grass blades. It comes down to this line:
AO = bottom_to_top - current_wind_bend * wind_ao_affect;
Where current_wind_bend is calculated as follows in the original high-LOD vertex shader:
vec2 wind_position = NODE_POSITION_WORLD.xz / 10.0;
wind_position -= (TIME + 8.0) * wind_direction * wind_strength;

current_wind_bend = texture(wind_noise, wind_position).x;

current_wind_bend *= wind_strength;
current_wind_bend *= bottom_to_top * 2.0;
It’s just another world-space texture read! That means we can do basically the same thing as we did for ALBEDO: replicate this texture read in our impostor fragment shader and apply the same logic. It’s important that we sample the current_wind_bend in the same way (just with our world_vertex varying rather than NODE_POSITION_WORLD) for a seamless transition between high-LOD and impostor:
vec2 wind_position = world_vertex.xz / 10.0;
wind_position -= (TIME + 8.0) * wind_direction * wind_strength;

float current_wind_bend = texture(wind_noise, wind_position).x;
current_wind_bend *= wind_strength;
Note that all the variables, including the noise texture, need to be filled with the same values and resources as in the high-LOD grass blade shader.
Now, we can apply this in a very similar way:
AO = 1.0 - current_wind_bend * wind_ao_affect;
AO_LIGHT_AFFECT = 1.0;
You may notice that I replaced bottom_to_top with 1.0 here. Because we don’t have any geometry, we don’t have a bottom_to_top factor. However, strictly using 1.0 makes the shader act as if only the tips of grass blades were visible, causing the result to still be too bright overall:
We need to somehow simulate the very fine-grained detail of individual grass blades. Remember how we simulated the spots of ground showing through by using a high-frequency texture; we could also use a noise texture for simulating different parts of grass blades showing through. In fact, our previous high-frequency noise is quite suitable for this!
After some playing around with it, I found that this produces a quite similar result as the high LOD:
AO = mix(0.5, 1.0, high_frequency_sample) - current_wind_bend * wind_ao_affect;
I can’t give you an objective reason why this works, it just seems to be a good-enough approximation of how the original geometry behaves - specifically, how frequently the more self-shadowed lower bits of the grass stalks are visible.
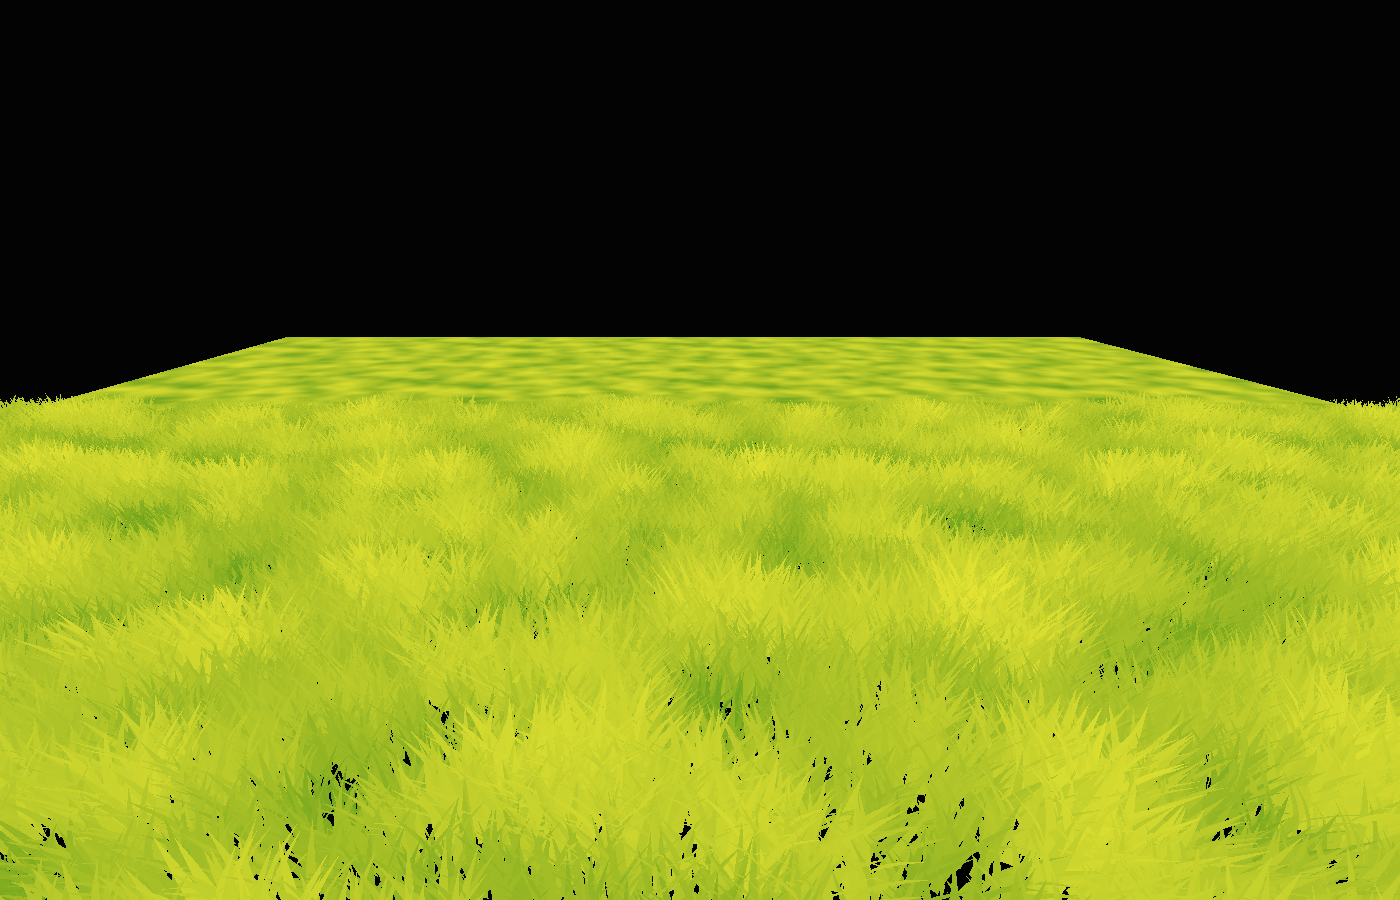
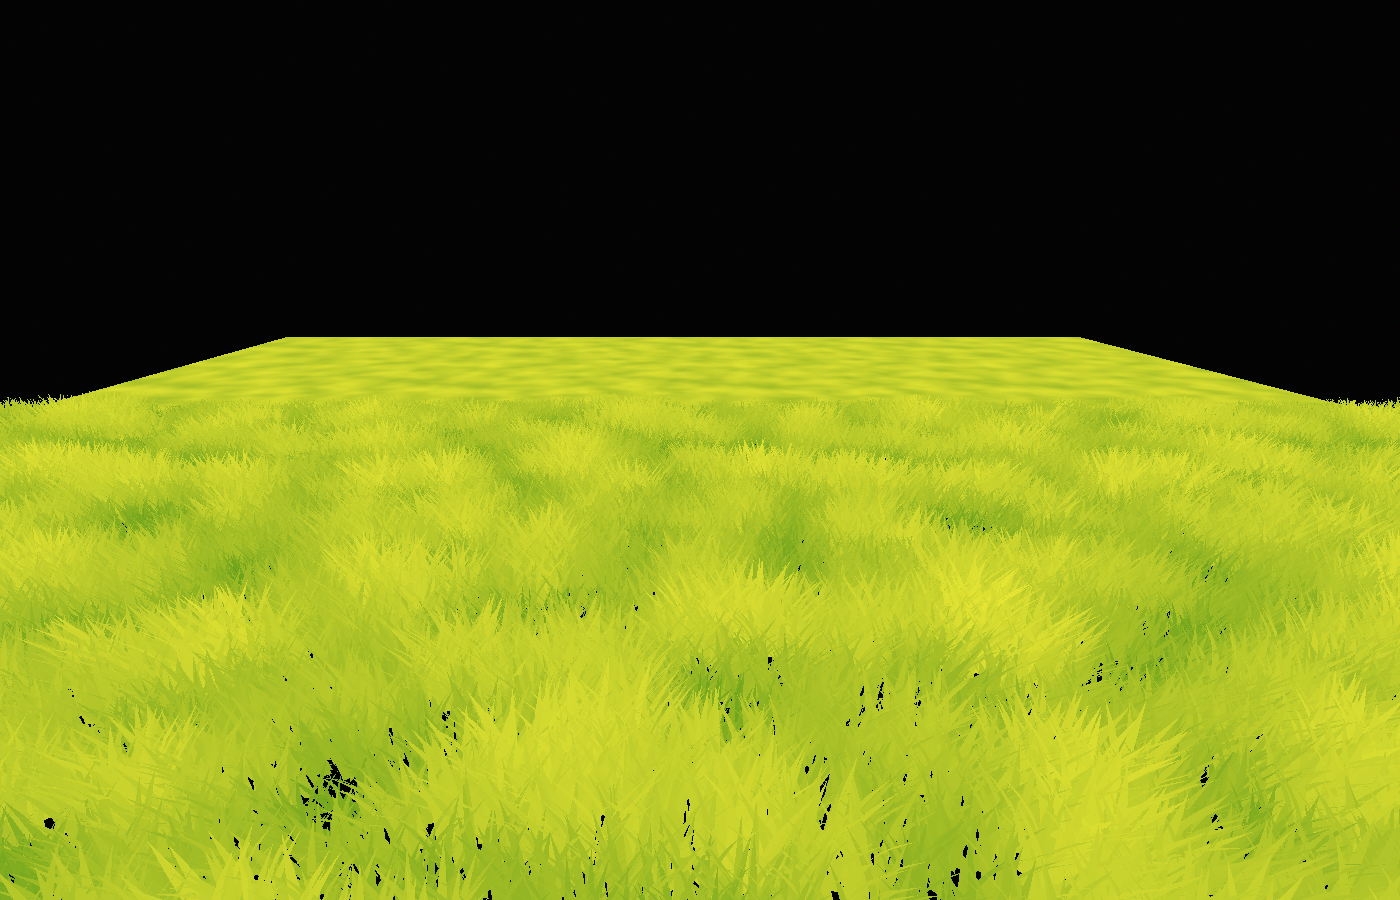
It looks great from the top:
And quite good from eye-level too:
It might make sense to factor in our normal_to_view value since, from steep angles, the parts shadowed by AO should be less visible, causing the overall impression to be brighter (higher AO value). I find that the effect is actually quite small here, but I do get a slight improvement, especially when the camera is very close to the ground, like this:
float bottom_to_top_simulation = high_frequency_sample + smoothstep(0.6, 1.0, normal_to_view) * 0.4;
AO = mix(0.5, 1.0, bottom_to_top_simulation) - current_wind_bend * wind_ao_affect;
What I’m doing here is making bottom_to_top_simulation lean more towards “top” rather than “bottom” (higher value) if normal_to_view is above 0.6, so if the angle is quite steep.

Again, there’s no way to mathematically derive these things, I’m just showing you the kinds of tricks that I come up with from my experience with vegetation rendering. Don’t take any of this as hard facts or correct solutions; I really encourage you to just play around with it yourself and see if you can come up with something better!
Getting the Normals right
Now that we have albedo and AO (including the wind effect) working, let’s switch from Unshaded to normal rendering and see where we’re at:
Not too bad! But of course, we’re not even touching the normal vectors yet, so the lighting is quite off. We’ll deal with this now. That means we’ll replicate the normal vectors of the grass as closely as possible.
Again, to avoid distractions, I’ll start by switching to the render mode Normal Buffer. That way, we can focus purely on replicating the normals.
Let’s consider, again, how the normals are calculated in the high-LOD grass. There’s just this one line:
NORMAL = mix(NORMAL, vec3(0.0, 1.0, 0.0), bottom_to_top);
We can tell that a significant part of the normals is coming directly from the geometry. Our high-LOD grass has a lot of geometric complexity, so the normals are also quite complex. We could try replicating them with a noise texture, like we did for the spottiness, but in this case, I feel like baking a texture from the original geometry is the easiest start.
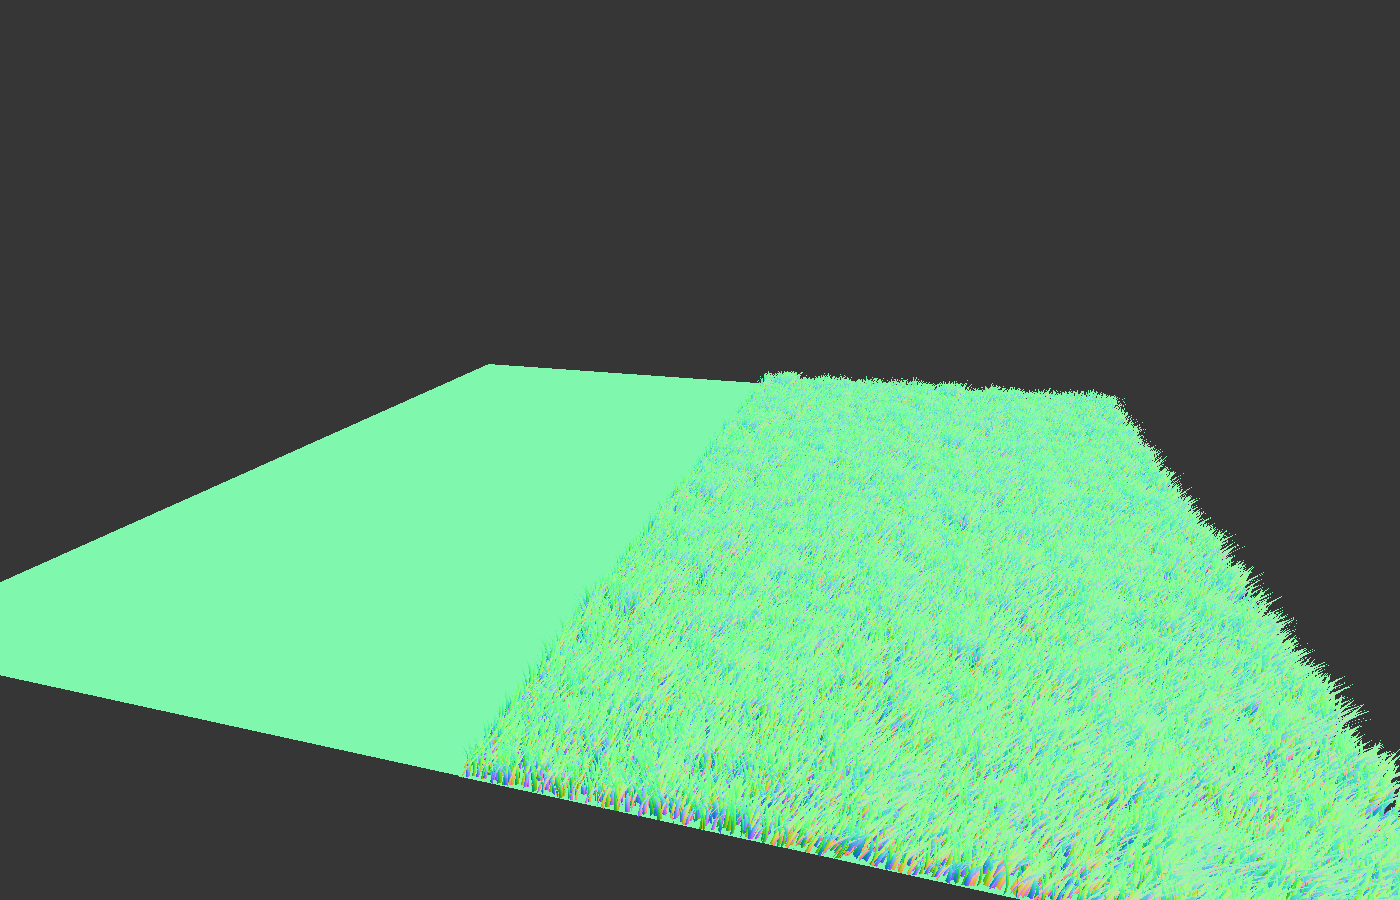
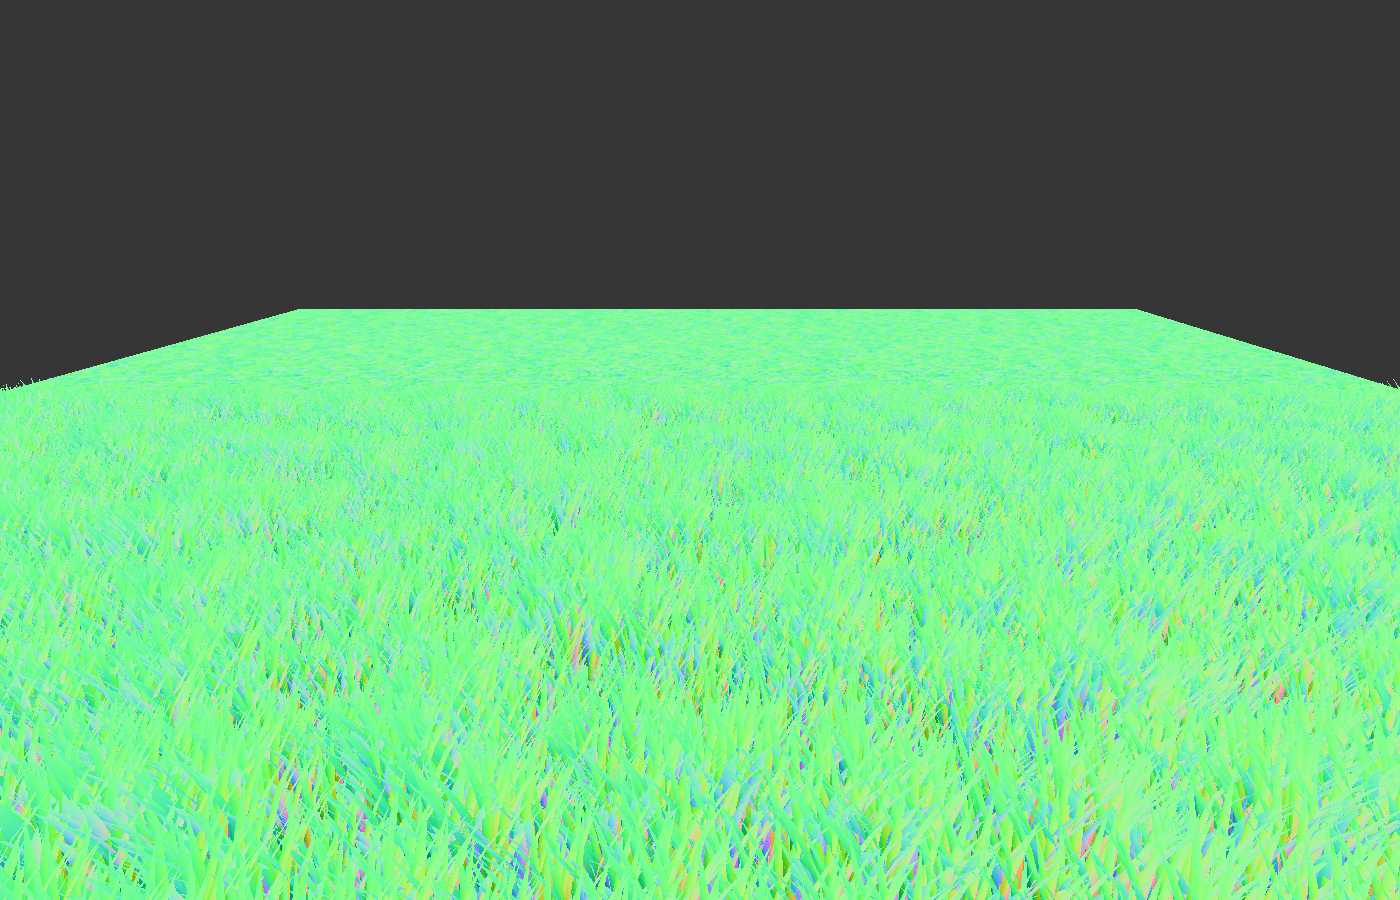
Here’s how I quickly bake a normal map from geometry in Godot: with the viewport switched to Normal Buffer, just align the camera to look straight down with an orthographic projection (you can do that by clicking the Y-axis in the top left gizmo) and take a screenshot! I did that and ended up with this:
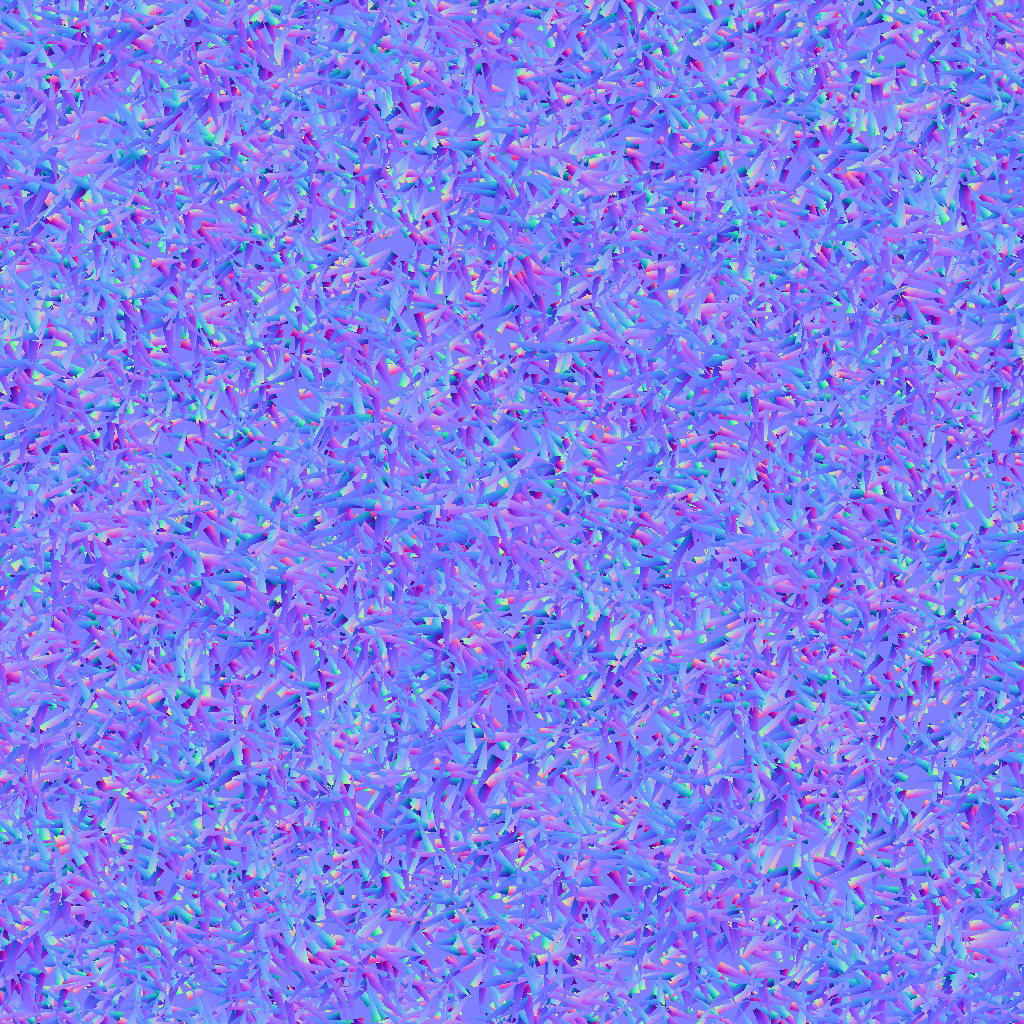
In this case, I don’t think there’s any need to make it tiling, since it’s so noisy anyways. It’s only the general shape of the geometry that matters. I did turn off the wind effect on the grass before taking the screenshot, since I wanted to capture the grass in a neutral position.
We can apply this normal map directly in the fragment shader of our impostor plane:
NORMAL_MAP = texture(baked_normals, world_vertex.xz / 5.0).xyz;
As expected, this works very well when viewing from the top:

And it actually works nicely from the side too:
I was surprised by this when first working on this effect. I had already planned out how I could use the bottom_to_top_simulation from before to simulate how, when viewing from the side, you primarily see grass blade tips which we point straight up. What I had in mind was something like this:
NORMAL_MAP = mix(texture(baked_normals, world_vertex.xz / 5.0).xyz, vec3(0.5, 0.5, 1.0), bottom_to_top_simulation);
However, it turned out that that’s not necessary. I believe that this is because, when viewing at a steep angle, the renderer reads from a fairly low mipmap level of the normal map to avoid noise. Since, on average, our normal map points straight up, these lower mipmap levels (which are just nicely downscaled versions of the original texture) also point straight up, which is exactly what we want when viewing at this angle!
In fact, you can verify this by disabling mipmaps on the normal map by adding the filter_linear type hint to it. When doing that, the normals get not only very noisy, but less fitting.
Lighting and Fine-Tuning
Now that we have albedo and normals dialed in, we can switch our viewport back to normal rendering. We’ll see that it’s still not quite there, but that’s because we haven’t set any of the other lighting parameters such as ROUGHNESS and SPECULAR. Let’s have a look at our original grass shader again for this. It has:
BACKLIGHT = vec3(0.2);
ROUGHNESS = 0.4;
SPECULAR = 0.12;
We can copy all of that right over to the impostor plane as it is. Now we’re really getting somewhere! Thanks to the baked normal map and identical lighting parameters, the shading and specular highlights are very similar between impostor and high LOD:
There’s one more detail which may or may not matter depending on your game. As I mentioned earlier, because we work with textures as opposed to real geometry in our impostors, we benefit from mipmapping. This reduces noise by smoothing out details at high distances or steep angles. However, there’s an interesting problem here: our high LOD grass doesn’t do that. Because it’s actual geometry, it’s perfectly noisy. We can see this by zooming very far out (this screenshot is magnified 3x):
In our low LOD, we get a nice and smooth result, whereas the high-LOD grass is really noisy, since at this point, the renderer is essentially sampling random points from the geometry.
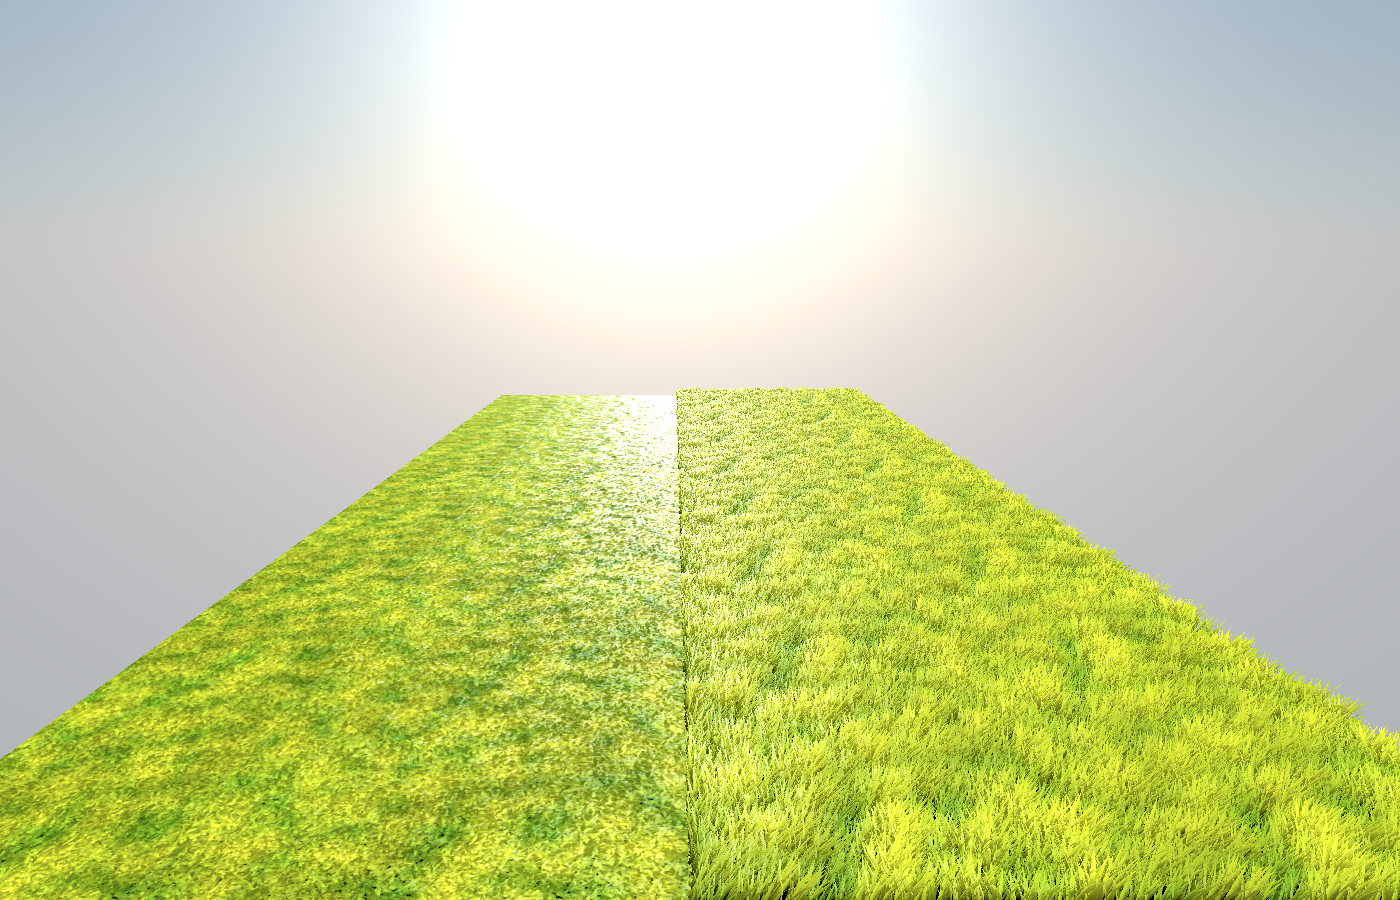
This is great: not only is our impostor more performant, it also looks better! However, there’s a trade-off to be made here: grass is supposed to be a bit noisy at a distance. The shiny highlights flickering in and out of view are part of what makes us see that this is a volume made up of individual stalks rather than just a plane. This limitation gets more apparent when viewing the grass against the light:
Our impostor plane reduces noisiness, but it does so at the cost of implied geometry. Luckily, there’s an easy way to work around this. If you’ve looked at the documentation of the texture() function, you may have noticed an optional third parameter:
gvec4_type texture (gsampler2D s, vec2 p [, float bias])
This bias can be used to steer mipmaps into a certain direction. A positive bias means mipmaps will be used earlier (more smoothing), a negative bias reduces smoothing. By adding a bias of -3.0 to our normal map read, we get a much more similar result between high LOD and impostor:
Of course, the same can be done for the high_frequency_sample. When I also add a bias of -3.0 there, the high LOD becomes almost indistinguishable from the impostor in the view angle I showed before (again magnified by 3x):
But beware: when the camera is moving, this does introduce some amount of noise. You’ll want to play with these biases to find a good trade-off between desired and undesired noisiness.
Using our Impostors in a LOD System
After a lot of trickery, we have a plane which looks very similar to our original grass field. However, in all the screenshots above, I just had them side-by-side for testing. What we really want is to switch between LODs based on the camera distance. We’ll add a system for this now.
First, we need to be able to fade between high LOD and impostor, since just swapping them out immediately would be very noticeable. We need some sensible implementation of transparency for this. In the high-LOD grass, I’ll just add this to the end of the fragment function:
ALPHA = alpha;
ALPHA_HASH_SCALE = 1.0;
By specifying a ALPHA_HASH_SCALE, we use dithered alpha rather than true alpha, meaning that neighboring pixels will alternate between fully transparent and fully opaque, rather than doing complicated alpha blending. This makes a lot of things easier for rendering, and there’s no need for true alpha here.
I defined alpha not as a normal uniform variable, but as an instance uniform like so:
instance uniform float alpha = 1.0;
That way, we don’t need to duplicate the material for each chunk in order to be able to change the alpha; instead, we can set it on each instance of the material individually.
One problem with alpha is that the lower ends of grass stalks can shine through the disabled pixels. I fixed this by altering the AO_LIGHT_AFFECT, which is the prime contributor to this darkening:
AO_LIGHT_AFFECT = mix(0.2, 1.0, alpha);
Similarly, the very harsh bottom normals can shine through the transparent grass. We can fix this in a similar way, by lerping towards the up vector earlier if alpha is smaller than 1.0:
NORMAL = mix(NORMAL, vec3(0.0, 1.0, 0.0), mix(1.0, bottom_to_top, alpha + 0.2));
(Conveniently, this is another solution for the problem we worked around earlier by changing the impostor textures’ biases, just the other way around: rather than adding noisy complexity to the impostor, we reduce complexity of the high-LOD grass at a distance, thereby reducing noise and making the noise-free impostor less noticeable.)
In our impostor plane, “alpha” should mean “fade to ground”. We’ve already implemented a system which fades to the ground in some cases: the spottiness added in the albedo section. We just need to incorporate a new alpha parameter there (also defined as an instance uniform):
ALBEDO = mix(ALBEDO, ground_color, clamp(ground_factor + 1.0 - alpha, 0.0, 1.0));
Now that we have alpha systems for both LODs, we just need to set these parameters from a script. I wrote this script for the GrassChunk node, which has both the high-LOD multimesh and the impostor as a child:
@export var impostor_fade_in_start := 5.0
@export var impostor_fade_in_end := 10.0
@export var grass_fade_out_start := 10.0
@export var grass_fade_out_end := 20.0

func _process(delta: float) -> void:
		var camera_pos

		if Engine.is_editor_hint():
			camera_pos = EditorInterface.get_editor_viewport_3d().get_camera_3d().global_position
		else:
			camera_pos = get_viewport().get_camera_3d().global_position

		var camera_distance = global_position.distance_to(camera_pos)

		var start_to_mid = smoothstep(impostor_fade_in_start, impostor_fade_in_end, camera_distance)
		var mid_to_end = smoothstep(grass_fade_out_start, grass_fade_out_end, camera_distance)

		$Grass.visible = mid_to_end < 1.0
		$Impostor.visible = start_to_mid >= 0.0

		# Interpolate
		$Impostor.set_instance_shader_parameter("alpha", start_to_mid)
		$Grass.set_instance_shader_parameter("alpha", 1.0 - mid_to_end)
With these parameters, I start fading from ground to impostor at 5 units. At 10 units, when the impostor is fully visible, the grass geometry starts to fade out to reveal the impostor underneath, until it’s fully invisible at 20 units.
Of course, these properties are not set in stone, and in fact, these are perfect to plug into some sort of “graphics quality” setting. That’s another great thing about good LOD systems: it makes your game more accessible, since you can alter the LOD switch distances based on the hardware. And with good impostors, bad hardware doesn’t mean less grass, it just means the impostors will fade in earlier. (It’s actually shocking to me how many games don’t do this, and very noticeably make grass appear out of nowhere, meaning that players with slower hardware will simply see more bare ground.)
Note that setting the visible properties is essential for the LOD system to have its full effect. Since “alpha” is just some custom property, simply setting it to 0.0 has no special meaning to the renderer, so it still runs through most rendering logic until eventually discarding the pixel.
All that’s left to do now is to populate the game world with grass chunks! If your levels are small enough, you can simply place all chunks at the start; otherwise, I’d recommend instantiating chunks near the camera and using one huge impostor plane to cover all the remaining area.
Here’s the end result with some better environment and lighting settings:
This entire effect takes just under 2 ms to render on my machine. If you’re aiming for 60 FPS, that’s 12% of your budget. For an effect which covers the entire ground of the entire world, that’s quite acceptable - and even if not, you have the LOD fade-in and fade-out distances at your disposal for fine-tuning performance.
With this, our full geometry grass effect is done! As I mentioned, I recommend taking all of this as inspiration rather than “how it should be done”. LOD always involves lots of trickery, and these are just the tricks I’ve come up with. Maybe you can come up with something better?
In the next part, I’ll showcase a different vegetation rendering system based on billboards. I’ve also been meaning to write a post about performance benchmarking and optimization for a while, which will delve deeper into some concepts that I touched on here.