In this second part of the Grass Rendering series, we’ll go over one possible implementation of grass in Godot. It will be full-geometry grass, meaning that each grass blade is an actual 3D object. This is in contrast to the also very popular billboard grass, where multiple blades of grass (or other plants) are drawn onto a transparent texture, which is rendered onto quads scattered across the ground. If you haven’t read part 1, I’d recommend to check that our first: Grass Rendering Series Part 1: Theory
Full-geometry grass is probably the only way to create luscious fields of high grass. It can look great both in realistic games, such as Ghost of Tsushima, or in more cartoony games like Breath of the Wild. However, it is less flexible than billboard grass, as each different plant needs its own geometry (as opposed to just swapping a texture), and it is very heavy on vertex count. In modern graphics hardware, however, this is not a big problem, and may even be preferable to the high overdraw caused by transparent billboards.
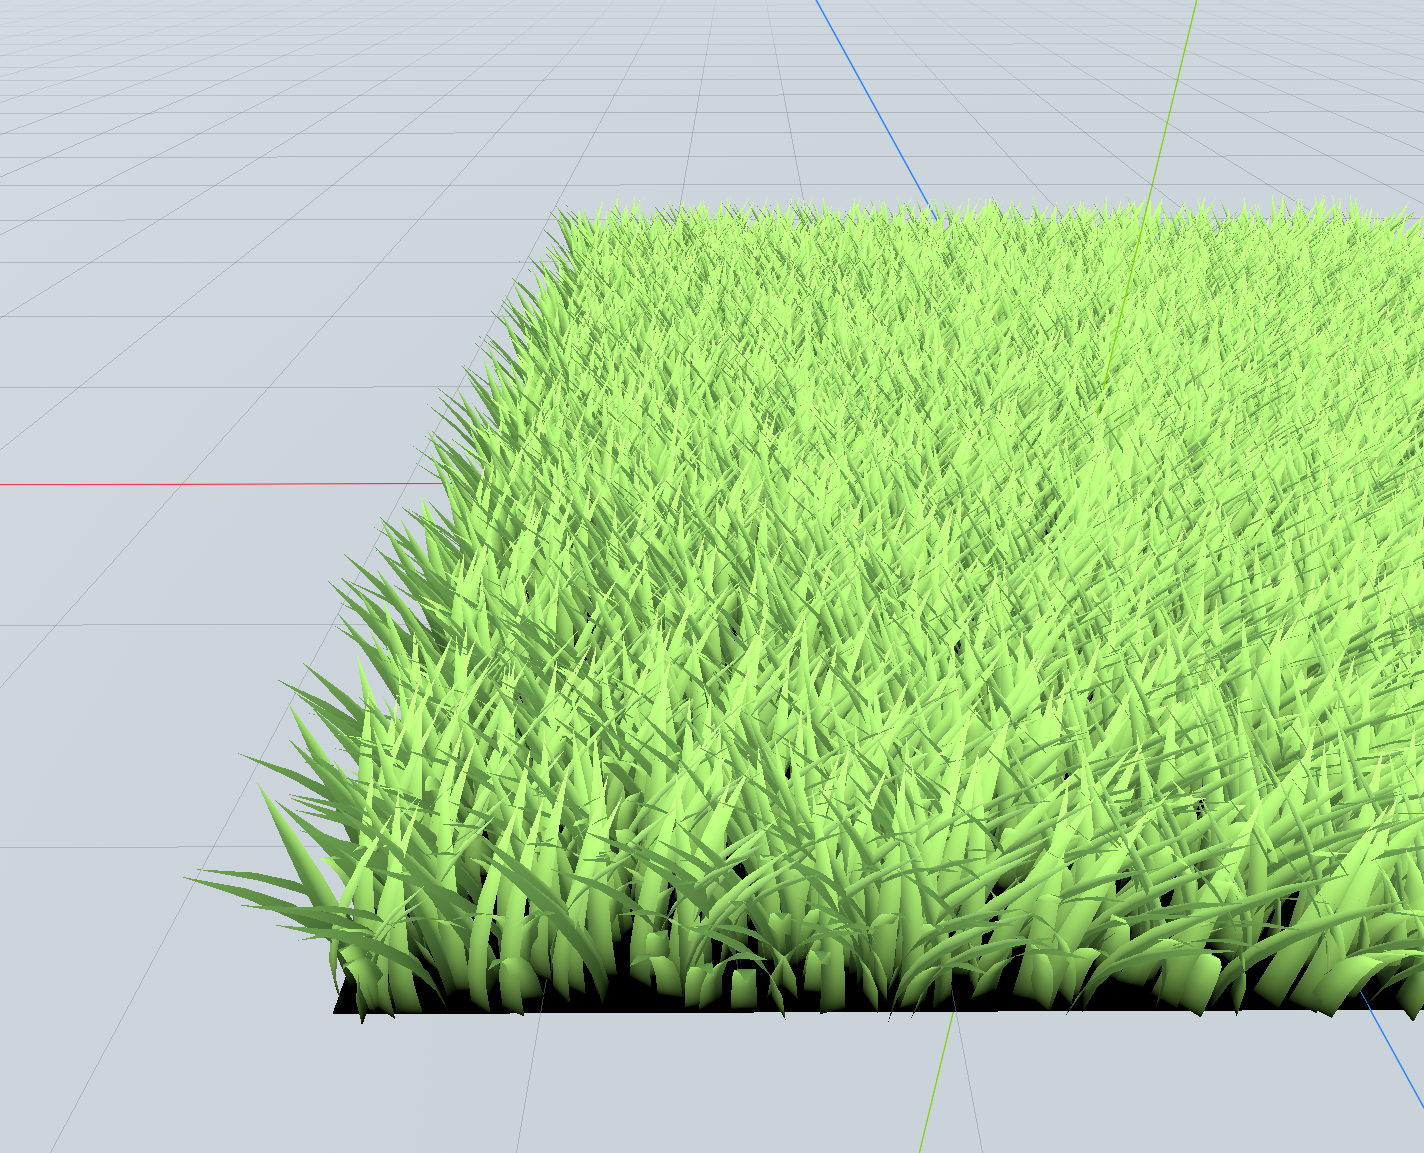
This is what the result will look like:
The Godot project is available here: https://git.hexaquo.at/karl/godot-grass/src/commit/dd02cb971c6e6dbf41e3cba06213939d4d2b1d20
Creating a Grass Stalk
I used Blender to create a simple grass stalk made up of a few quads. You’ll want to go fairly minimalist here, since this object will be rendered tens of thousands of times. However, it should have enough vertices to be able to bend it somewhat smoothly later.

This already works, but we can make it a bit better by changing the normal vectors as if the geometry was more detailed than it really is. In particular, we can imply a certain roundness to the grass blade by bending the normals sideways. In Blender, we can do this via the “Data Transfer” modifier, which takes the closest normal from a different mesh and applies it to the target. Using a cylinder as the source, we can get rounded normals:

This way, the grass gets shaded as if it were slightly rounded, making the geometry look more detailed than it really is:

One thing that we always need to be aware of when modeling and shading vegetation is that we’re dealing with an approximation of the real object. Our geometry is simplified, but it should end up looking as similar to the non-simplified version as possible. With vegetation, we can often do this by changing the normal vectors into a shape that more closely resembles the real object, like we did here by implying roundness which is not actually there in the geometry. A similar technique is often used to hide the fact that billboards and other flat approximated geometry are used; for example, this blog post shows how cartoon trees can be shaded with this technique: https://simonschreibt.de/gat/airborn-trees/
Note that I made the grass stalk approximately 1 unit high - this makes it easier to adapt it to whatever desired size in the shader later on. I also unwrapped the UVs to make them go from 0 to 1 on the vertical axis, which will make some shader logic easier.
Filling a Surface With Grass
We can export the grass stalk we have created as a .obj and import it into a Godot project, but we will quickly realize that manually placing these is not sensible. We could create a script to place lots of grass MeshInstances, but having so many nodes in the scene tree will soon slow down our game. We need a different approach.
Godot offers a node for rendering one object lots of times: the MultiMeshInstance3D. As the name implies, it’s similar to the MeshInstance3D in that it instances a mesh into the scene, but it instances multiple instances at the same time without creating nodes for each of them. Each of these instances has the same material, which makes it really efficient for the GPU, since it can batch all of them into one call.
We could now write a script to set all the object instances of the MultiMesh, but Godot also offers a utility for quickly scattering instances on top of a surface, which is exactly what we need here. It’s called “Populate MultiMesh” and it can be accessed above the 3D viewport while having the MultiMeshInstance3D selected:

It needs a node to take the source mesh from - an instance of our grass blade - and a surface to scatter that mesh on top of - in this case, a plane representing our ground. We can also apply a random rotation, which is great to get a more varied field of grass. Then we just set the number of instances and hit apply:

Now we have all the geometry we need in the scene - we just need it to look like actual grass.
Shaping the Grass
We looked at the visual properties of grass in Grass Rendering Series Part 1: Theory; now, we’ll write a shader to apply this to our grass in Godot. We can put a ShaderMaterial into the Material Override property of the MultiMeshInstance3D, just like with normal MeshInstances.
First, we’ll want to scale the grass to a more appropriate size. This is easy by just multiplying VERTEX by a number, e.g. 0.1, in the vertex shader:
shader_type spatial;
render_mode cull_disabled;

uniform float size = 0.5;

void vertex() {
	VERTEX *= size;
}
Also note the render_mode cull_disabled, which disables backface culling so that the back sides of the grass blades are also visible.

Next, we’ll want to bend the tip a bit in order to not have all the grass stalks stand up perfectly straight. Just like the size, we could’ve done that in Blender, but then we would’ve been stuck with that specific type of grass. By bending the grass in the shader, we can change the angle and direction based on the type of grass and (later) other factors such as wind.
For bending the tip, we need a factor which gives us information about how high up we are in the grass. This is why I unwrapped the UVs to be exactly between 0.0 and 1.0: They’re 1.0 at the bottom and 0.0 at the top, so in order to get a “bottom to top” factor, we just invert this. (We could also use VERTEX.y, but this would be more prone to unintended behavior if the model height isn’t precisely 1.0.) We’ll save this into a variable before scaling the vertex, and we’ll use a varying so that we also have access to it in the fragment shader later:
shader_type spatial;
render_mode cull_disabled;

uniform float size = 0.5;

varying float bottom_to_top;

void vertex() {
	bottom_to_top = 1.0 - UV.y;
	VERTEX *= size;
}
Now we can offset the tip of the grass blade by this factor. The most simple solution would be VERTEX.z += bottom_to_top (also applied before scaling the vertex by size), but that gives us perfectly diagonal blades, which is not really what we want:

Instead, we’d want a function which bends the grass less in the area close to the bottom and more in the area around the tip. As is often the case when writing shaders, having an idea of some basic mathematical functions is quite helpful here. Remember that squaring a number close to 0.0 gives us an even smaller number, whereas squaring 1.0 gives us 1.0. This would be a good fit for our grass, since we want to barely bend the bottom half, but gradually progress to a steep angle at the tip. So we can try VERTEX.z += pow(bottom_to_top, 2.0):

This works well! Now we just add a factor to scale this bend so that we can change it from outside later, resulting in this shader:
shader_type spatial;
render_mode cull_disabled;

uniform float size = 0.5;
uniform float blade_bend = 0.5;

varying float bottom_to_top;

void vertex() {
	bottom_to_top = 1.0 - UV.y;

	VERTEX.z += blade_bend * pow(bottom_to_top, 2.0);

	VERTEX *= size;
}
We’re still missing variation (the patchiness discussed in part 1), but for now, our grass geometry looks good enough - we’ll deal with coloring and lighting next, since that is still far from real vegetation.
Shading the Grass
We’ll start with disabling the “Cast Shadow” property of the grass MultiMeshInstance3D. Games rarely render real shadows for small herbage: this would require lights to also render the grass, causing a big performance hit. And even then, it doesn’t usually look clean because of how small and detailed grass geometry is.
Instead, we’ll use an insight from part 1: that the self-shadowing of grass generally causes the tips to be bright and the bottom to be dark.
We can use the Ambient Occlusion property for this, since that’s exactly what it’s for: assigning areas which should appear darker in ambient light due to the surrounding occluding geometry. We already have the bottom_to_top property that we can use for this:
void fragment() {
	AO = bottom_to_top;
	AO_LIGHT_AFFECT = 1.0;
}
And this immediately adds a lot of depth to our grass:

At this point, we can also finally add a proper color:
uniform vec3 color = vec3(0.3, 0.6, 0.1);

[...]

void fragment() {
	AO = bottom_to_top;
	AO_LIGHT_AFFECT = 1.0;

	ALBEDO = color;
}
I also set the ground underneath the grass to black (presuming that it’s fully shadowed by all the grass on top of it) and added a more appealing WorldEnvironment (PhysicalSky with white ground, and a DirectionalLight with an energy of 3.0):
It’s starting to look like something! We’re missing the shininess and translucency though, which causes harsh shadows and a lack of highlights.
The easiest way to get translucency is the BACKLIGHT property, which we can set like this: BACKLIGHT = vec3(0.2); I’m using a dark gray here, but you could try different colors to create the bright green which translucent grass tends to have.
For specular highlights, we need to change the ROUGHNESS property using a simple number: ROUGHNESS = 0.4; However, we’ll see that this does not really produce the specular highlights at grass tips which we’re looking for:

That’s because, while we blend the grass blade by moving the vertex, we didn’t modify the normals: the grass blades are still shaded as if they were upright, so there’s no way for there to be highlights up-top, since there’s no surface where the light could bounce off this way.
In addition, real grass blades have a much more complex and properly 3-dimensional shape, which creates far more opportunities for light to bounce off at the right angle to produce specular highlights. Even with correct normals, our simplified geometry can’t create the specular highlights we’re looking for. In order to get something good-looking anyways, we’ll again trick a little, similarly to what we did when modeling it: we just modify the normal vector to act as if the geometry was different.
Specifically, we’ll interpolate between the normal of the geometry and a straight-up normal based on how high up we are in the grass blade. We can do this with a mix and our bottom_to_top factor:
NORMAL = mix(NORMAL, vec3(0.0, 1.0, 0.0), bottom_to_top);
This line takes the normal vector from the geometry and gradually bends it upwards the closer we are to the grass blade’s tip, until it points straight up at the top. This makes a big difference and gives us the sharp highlights we’re looking for, making the distinct grass blades stand out much more:

We might also want to modify the “specular” parameter in order to make the highlights more defined:
SPECULAR = 0.2;
This is not something you usually do, since the default value of 0.5 is physically correct for most materials and shouldn’t be changed. But grass is a special material and requires so much trickery that we’re far from physical reality anyways!
Note on Normals and Culling
Remember that we added render_mode cull_disabled at the start of our shader. When we use this together with custom normals, the renderer can get a bit confused about what to do with the back-sides. Without culling, the normally invisible back-faces receive flipped normals, meaning they point into the opposite direction of the front-face. This makes sense in most cases - it assumes that what we want to depict is a thin wall - but when we set custom normals, this logic breaks down: when we set our normal to point straight up at the tip of a grass blade, we don’t want it to point straight down on the back of that grass blade - we still want it to point up!
You can work around this behavior by adding this line to the start of the fragment shader:
if (!FRONT_FACING) NORMAL = -NORMAL;
(I added this note after taking all the remaining screenshots, so they won’t take this into account. It actually looks fairly good with our ‘false’ normals in the lighting settings here, but in some light situations, it does look noticeably wrong.)
Clumping the Grass
Our grass is looking good, but it looks like a heavily fertilized and mowed lawn since it’s missing the large-scale patchy structures of more naturally grown fields of grass. We’ll model these structures based on a noise texture (and also add a scale factor and a varying to read the sample into):
uniform sampler2D patch_noise;
uniform float patch_scale = 5.0;
varying float patch_factor;
In the editor, we can fill this slot with a NoiseTexture2D. The default settings are fine, just make sure to add a new Noise at the bottom and tick the “Seamless” property:

We now need to read from this noise at world scale. VERTEX and UV are all values which change within a single grass blade instance, but this noise should cause changes between different grass blades based on their position. Luckily, we can read from textures based on any 2D vector, not just the UV coordinates like we usually do. In this case, we can use the x and z components of the NODE_POSITION_WORLD vector, which corresponds to the positions of the individual instances of a MultiMesh on the ground plane:
void vertex() {
	[...]

	patch_factor = texture(patch_noise, NODE_POSITION_WORLD.xz / patch_scale).r;
}
Just to see what this does, we could just scale our grass blades by this value, causing some blades to remain at their original size and other to be scaled down to zero:
void vertex() {
	[...]

	patch_factor = texture(patch_noise, NODE_POSITION_WORLD.xz / patch_scale).r;
    VERTEX *= patch_factor;
}
This immediately makes the grass look far more organic:

However, we’re now scaling grass blades down to size 0 where the noise is very dark, which not only looks bad, but also reduces the perceived density while still impacting performance just the same. Instead, we’ll want to go from a minimum size to a maximum size based on the noise value. We’ll replace the original size uniform with a minimum and maximum size:
uniform float size_small = 0.2;
uniform float size_large = 0.6;
And, in the shader, we can replace the previous size calculations with an interpolation between these new min and max sizes based on the value in the clump noise:
void vertex() {
	[...]
	patch_factor = texture(patch_noise, NODE_POSITION_WORLD.xz / patch_scale).r;
	VERTEX *= mix(size_small, size_large, patch_factor);
	[...]
}
By modifying these parameters, we can now have either very noticeable clumps (as would be the case with wild grass on more rough terrain) or very even grass, where the clumps mainly show up as variation in the specular highlights:

One more thing we can do is to also alter the color based on the value in the noise texture. Taller grass blades are probably older, and old grass probably tends more towards yellow than the freshly green young stalks. Therefore, instead of defining a single color, we’ll define two colors: one for the smallest blades and one of the highest blades, which we can interpolate between. The logic is essentially the same as with the size:
[...]

uniform vec3 color_small: source_color = vec3(0.3, 0.6, 0.1);
uniform vec3 color_large: source_color = vec3(0.9, 0.9, 0.2);

[...]

void fragment() {
	[...]
	ALBEDO = mix(color_small, color_large, patch_factor);
    [...]
}
Of course, there are a lot of additional details we could add, but this is a fairly solid base for a flexible grass effect. We can have old, tall grass with noticeable clumps:

Or, by changing the size, color and bend, we can have grass that is more reminiscent of a freshly fertilized and mowed lawn:

This concludes the shading of our grass! In the next part, we’ll give the grass more live by adding wind and interaction: Grass Rendering Series Part 3: Animating and Interacting With Grass in Godot