In this post we’ll go through the process of making a simple lightning VFX using a shader, from conception to implementation. In the process, we’ll learn about step() and smoothstep, both very important and popular functions to achieve all kinds of effects in shaders, as well as (Signed) Distance Fields, which sound intimidating but are really quite simple.
First, let’s think about what kind of effect we want to achieve. A lightning strike mainly consists of a bright, thin line. This line starts at the top and moves to the bottom. When it hits the ground, the line becomes thicker and brighter. Then, it fades out again.
A first decision we’ll have to make is: what kind of object should the lightning strike be, i.e. with what type of geometry should it be represented? Is it a 3D object, a thin mesh representing the line? Or a texture? Or both? A case could be made for all options, but I’ll go for “a texture” here. Specifically, a billboard texture, meaning that it always faces the camera, no matter from what angle you look at it. A lightning strike is visible for such a short period of time that you won’t notice that its rotation is following you. Besides, it would be hard to choose the right thickness for a line mesh such that it doesn’t look thick up-close, but doesn’t become a flickering sub-pixel mess from afar.
So we’ll use a billboard texture. But what kind of texture? We noted earlier that the lightning strike should start off thin and extend downwards, then increase in thickness, then get thinner and fade out again. Whenever we’re dealing with a vector object (a line) whose thickness we want to vary, a Distance Field might be a good option.
A distance field is a texture where each pixel represents the distance to the closest point on a vector geometry. So a pixel that’s quite close to the line might be very opaque, whereas a pixel that’s far away from the line would be almost transparent.
I drew a squiggly line representing a lightning strike in Inkscape, saved it as a .svg, and generated a distance field for it. There are a few tools for this, e.g. this website: https://jobtalle.com/SDFMaker/
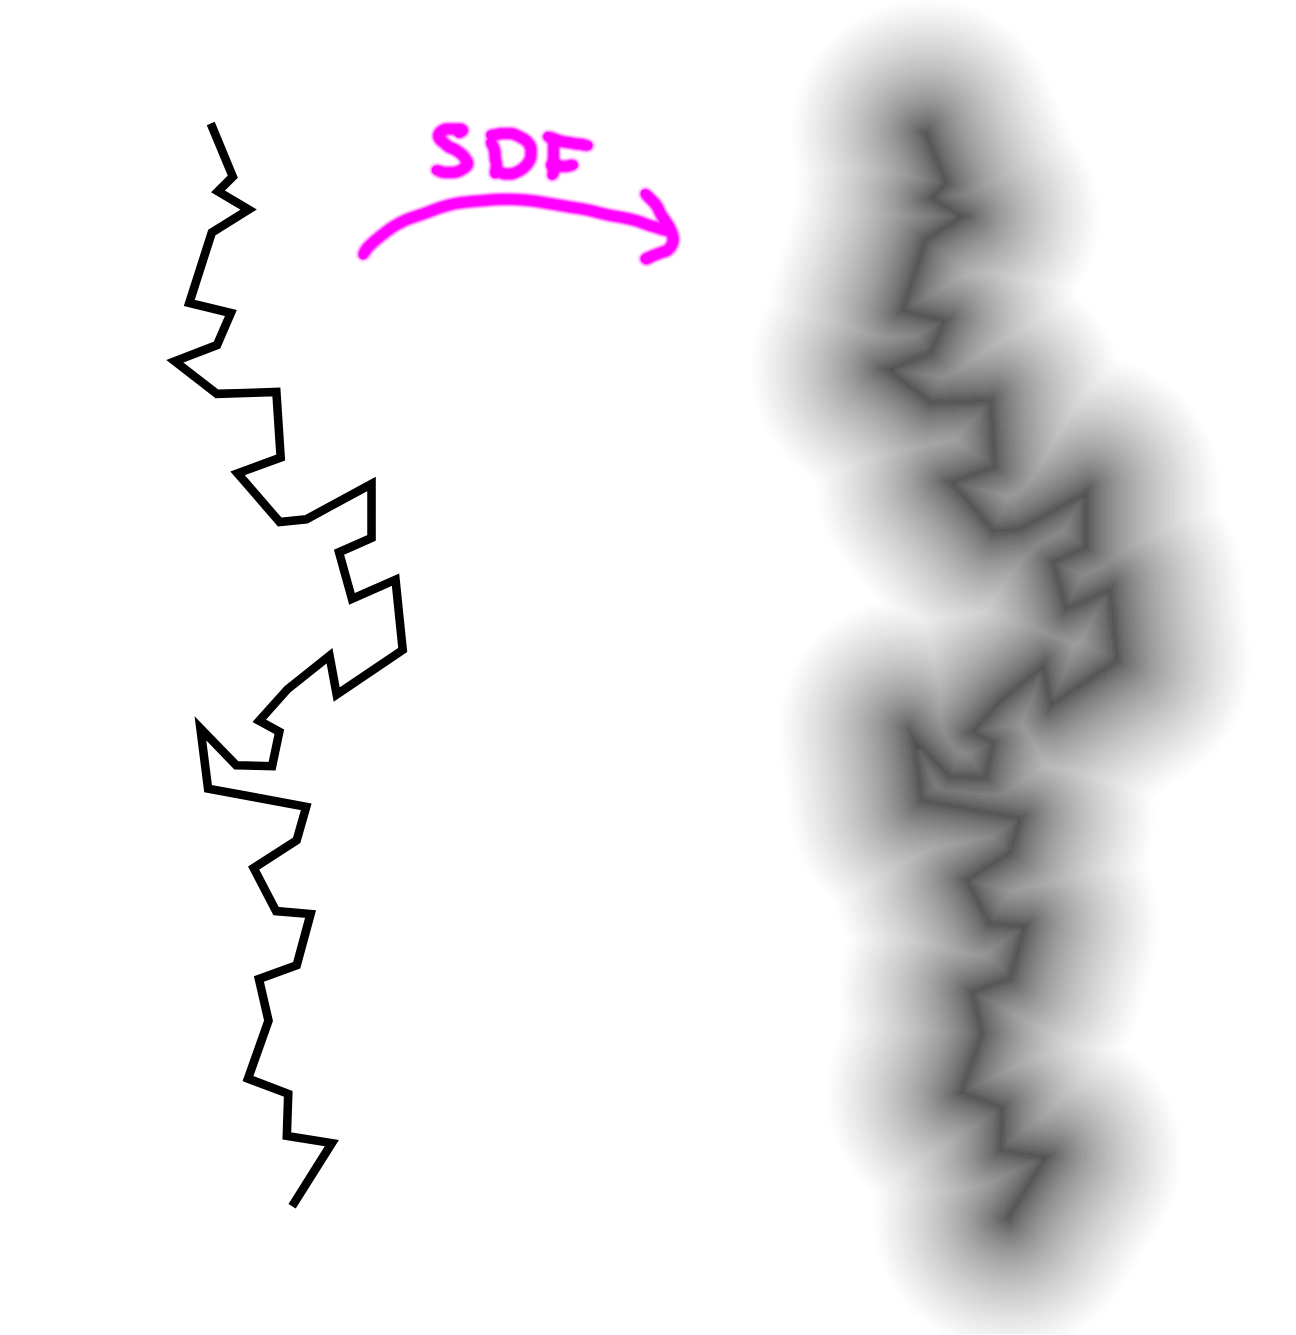
As you can see, the distance field looks like a blurred version of the original vector graphic, since pixels become more opaque the closer they are to the line.
It’s quite intuitive how we could use this to render variable thicknesses: if we want a very thin line, we only consider the pixels with the highest opacity and discard the rest. If we want it to be thicker, we lower this threshold and also consider lower alpha values to be valid:
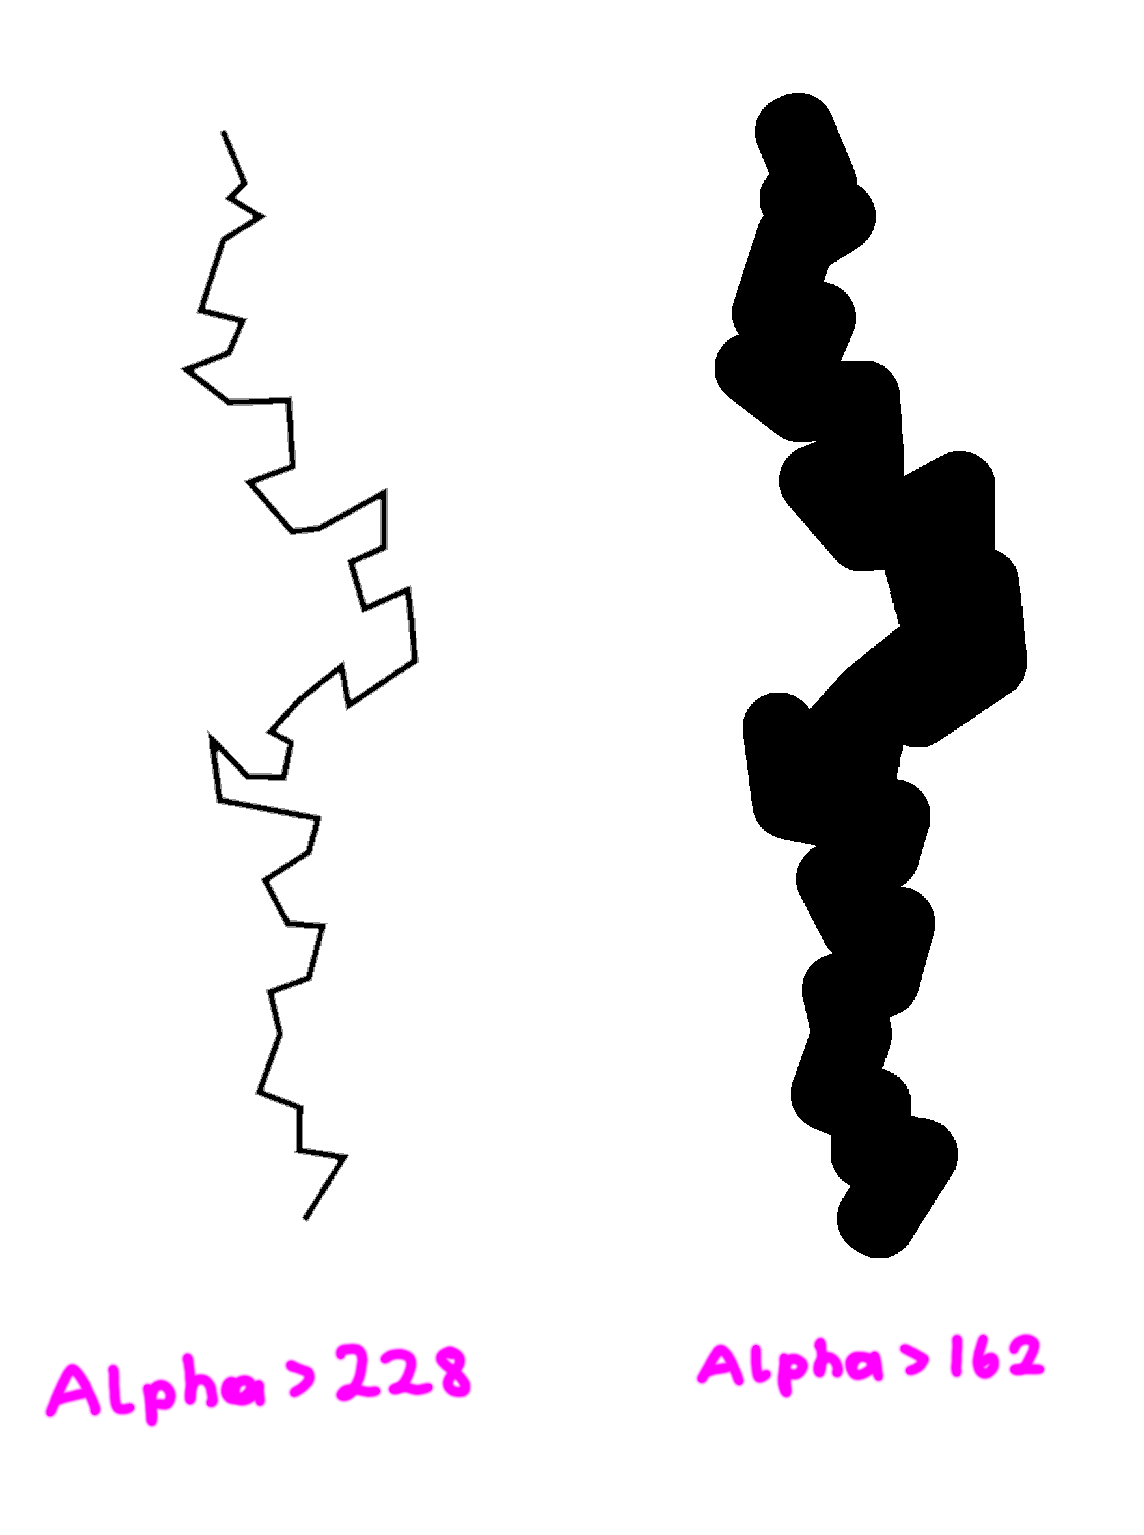
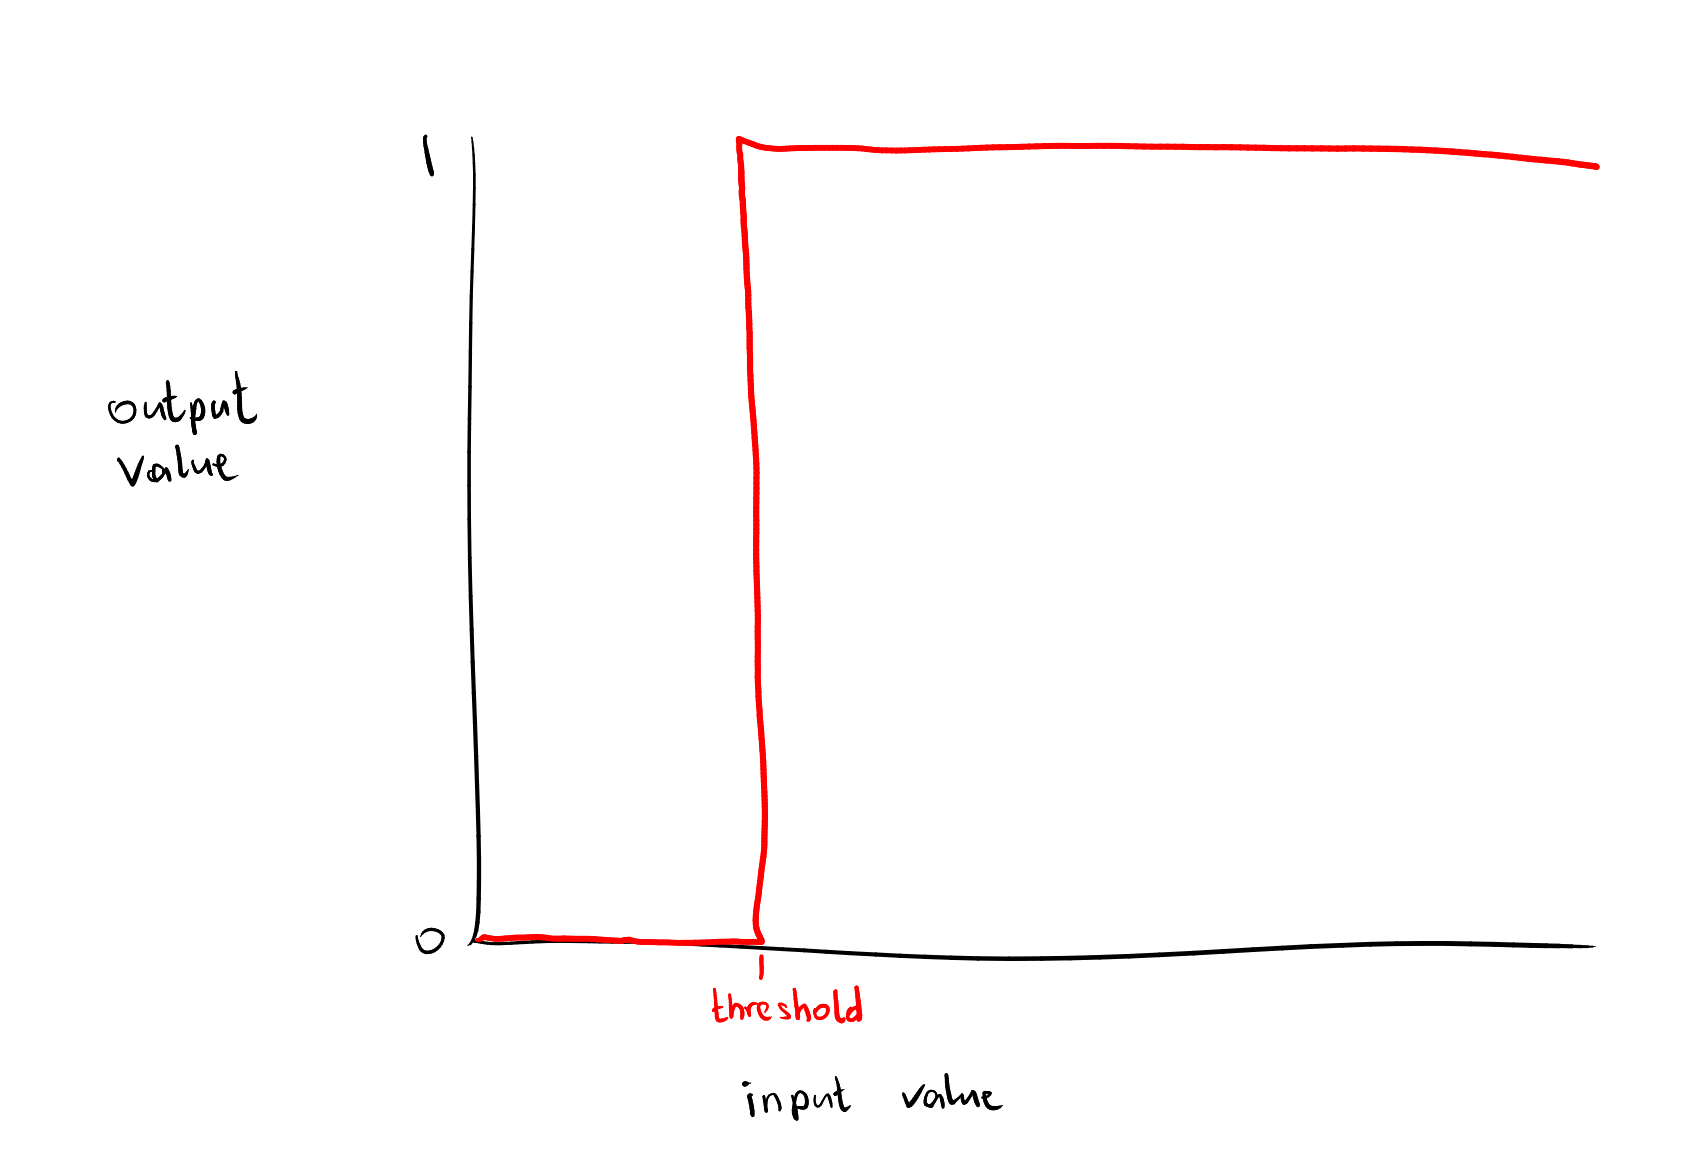
What I just described - considering only pixels whose value is above a certain threshold - is a typical use-case for the step() function. Specifically, it’s defined as step(value, thresold), and what it does is essentially just this:
func step(value, threshold):
    if value > threshold:
        return true
    else:
        return false
Or visually:
Let’s use this knowledge and start writing a shader. I set up a MeshInstance with a quad, scaled to 1x4m. I also set up a WorldEnvironment with a black background since that’s more fitting for a lightning strike effect. Then I gave this quad a shader - I’ll use a node-based VisualShader here.
To start, let’s set the color to white and emission to something like 2, so that we have an object that’s always bright, regardless of lighting. For the lightning strike in its most basic form, we’ll just expose a “threshold” parameter, use that and our distance field as an input for a step node, and wire the result into our opacity:
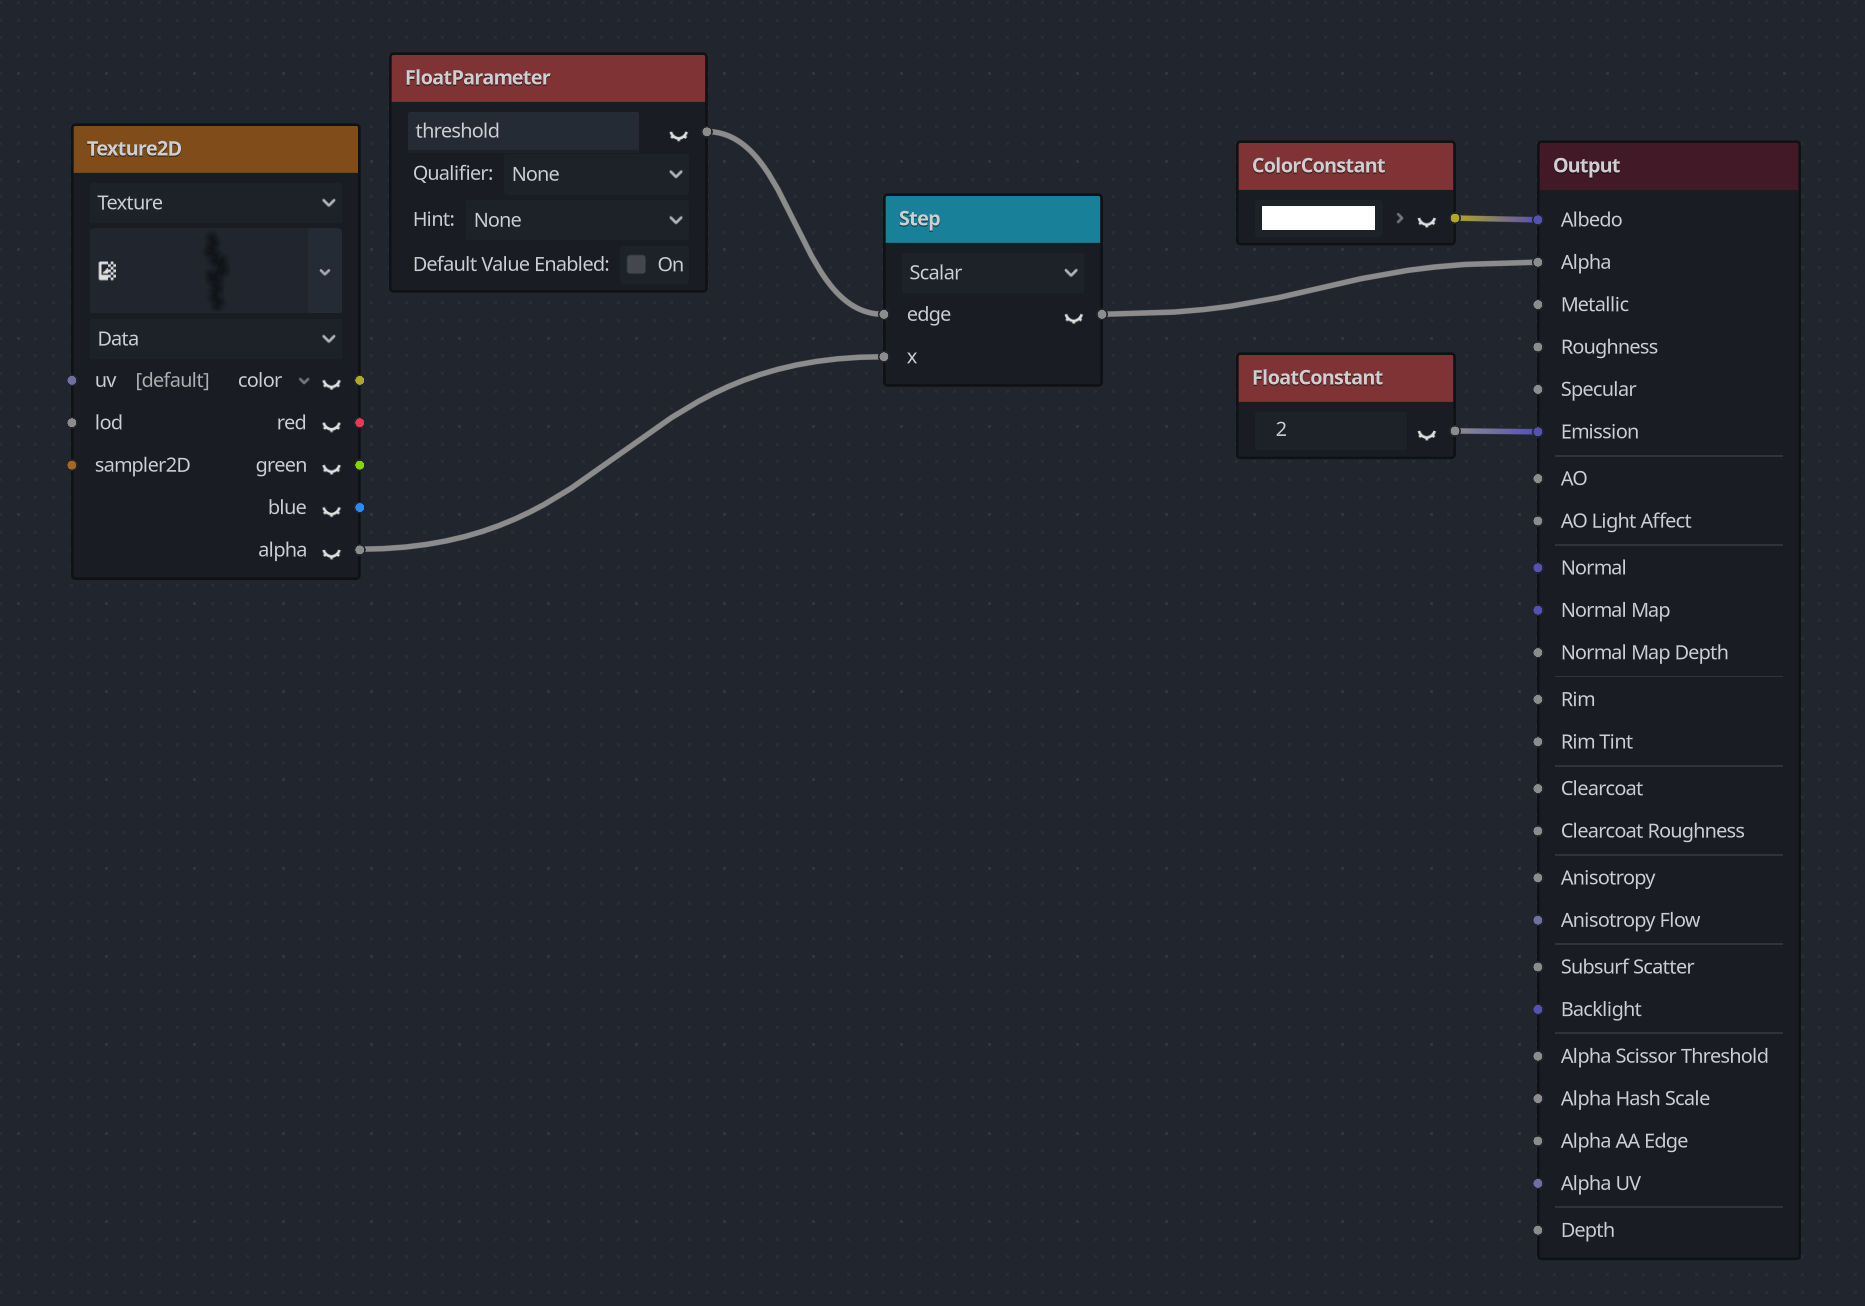
By varying the threshold, we can change the thickness of the lightning strike:
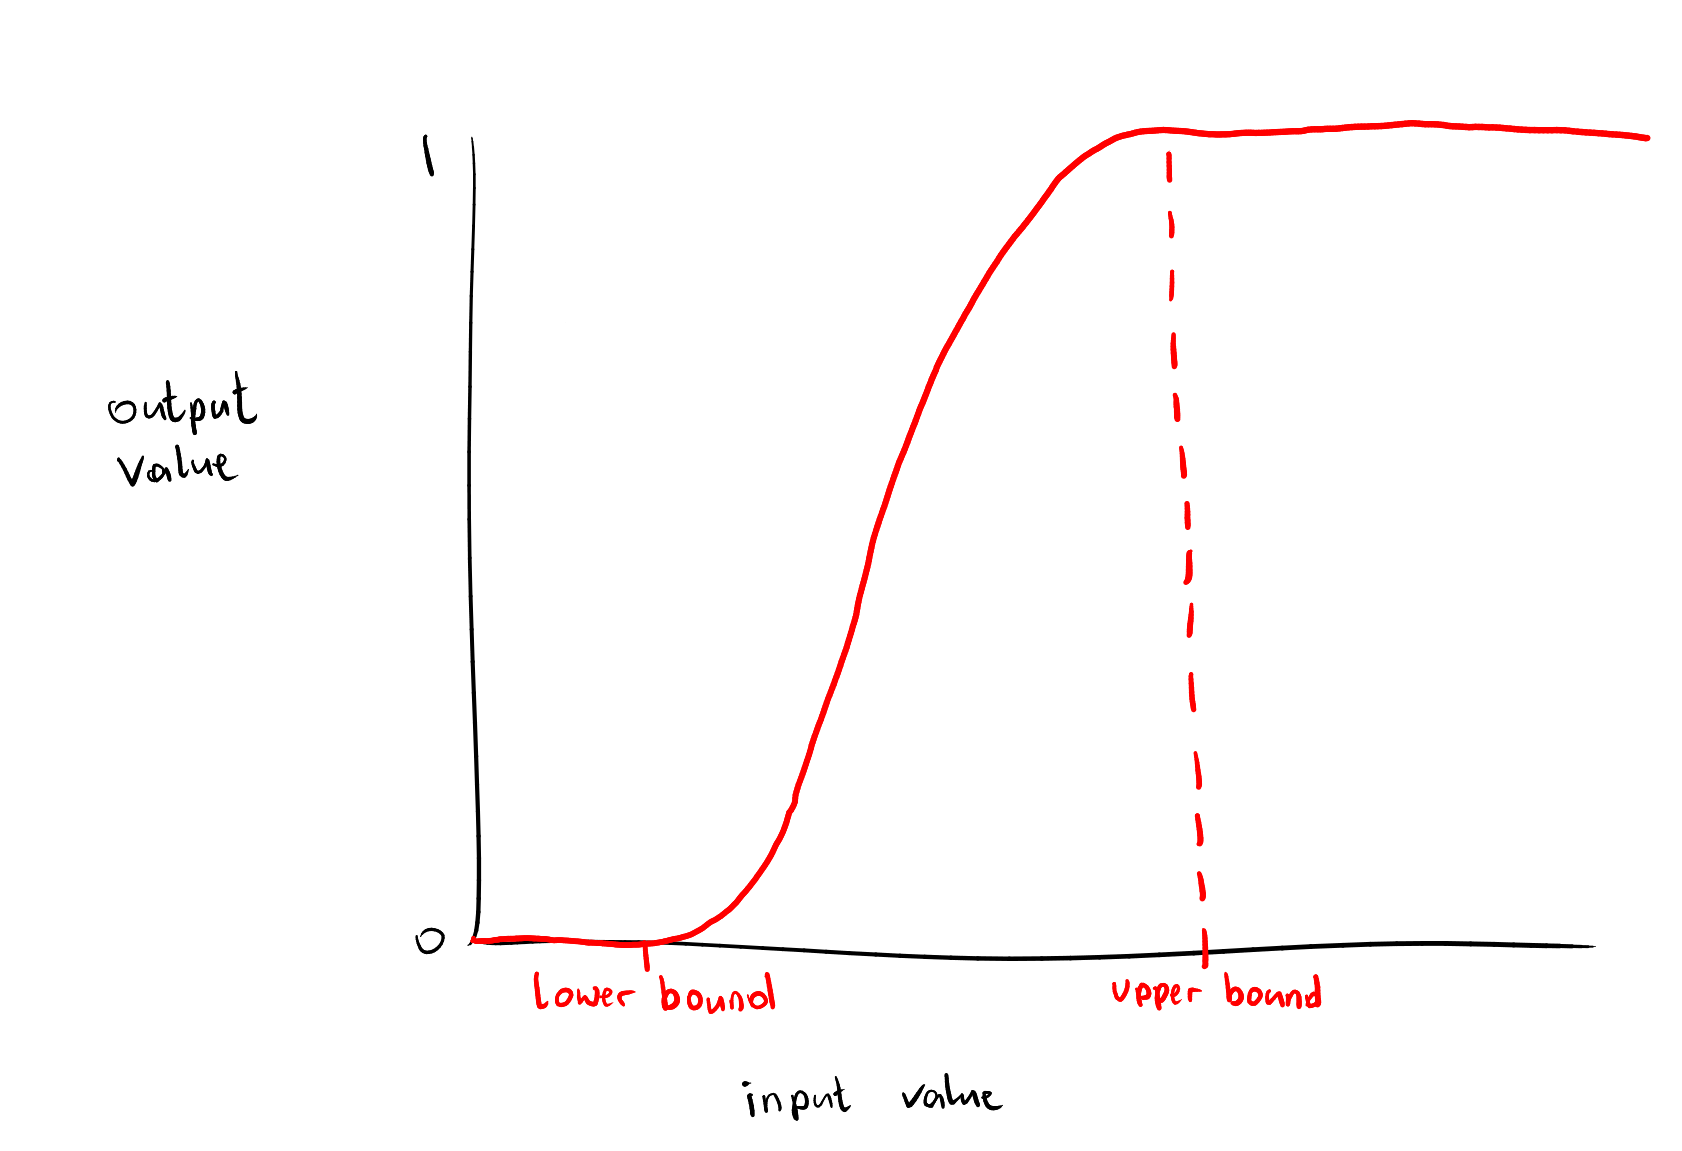
This works well, but the lightning strike has a pretty hard edge. I think a bit of fade-out would convey its brightness better. Luckily, there’s also a function we can use for that, and it’s called smoothstep. It works similarly to step, but rather than defining a single threshold, we give it an upper bound and a lower bound. If the value is below the lower bound, it returns 0, and if it’s above the upper bound, it returns 1, just like step. However, if the value is in-between the upper and lower bound, smoothstep interpolates between 0 and 1. It’s a bit like a reverse LERP: Instead of giving it a value between 0 and 1 and getting a result interpolated between two bounds, we give it a value between two bounds and get a result between 0 and 1.
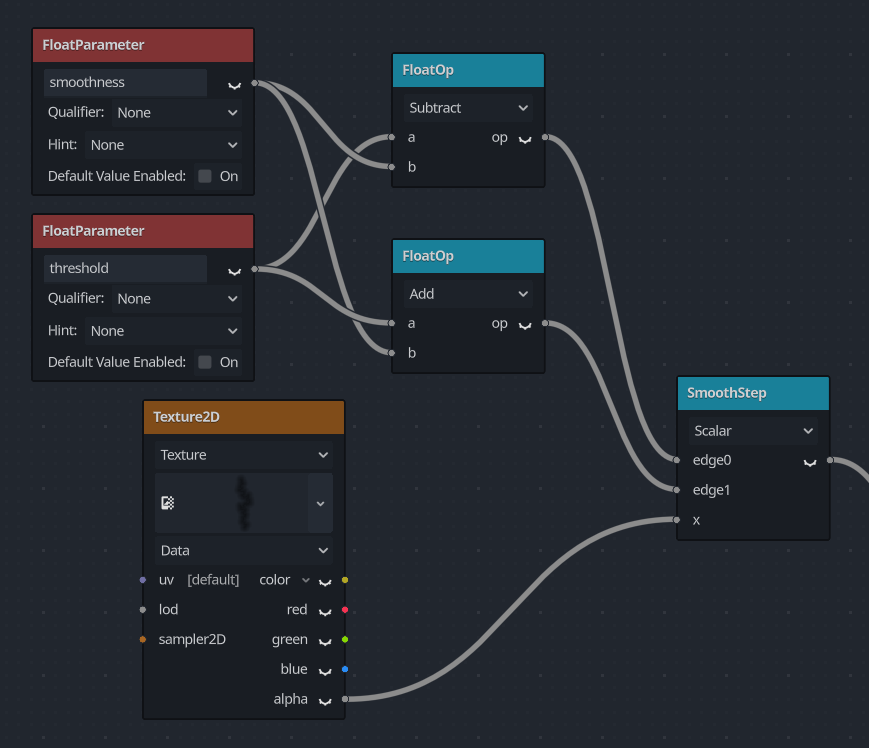
Using smoothstep, we need a “smoothness” parameter in addition to our “threshold”. Rather than using step to cut off at a specific threshold, we let smoothstep do its thing from threshold - smoothness to threshold + smoothness, such that when the value is much smaller than threshold, the result is 0, when it’s much larger, the result is 1, and in-between, the result is between 0 and 1. It looks like this in the shader graph:
Now, we can vary the smoothness to define how much “feathering” we want at the edge of the lightning strike:
These two values are quite suitable for making the lightning strike go from thick and bright (when it just hit the ground and we want to convey that it is conducting a lot of electricity) to fading out. The only thing left to implement now is the first phase: making it go towards the ground from top to bottom.
In shader terms, what we want to do is make pixels transparent when they are further down (on the y axis) than a given threshold. For deciding how far “down” a pixel is, we can look at the UV coordinates. What we can do is check UV.y and, if it is higher than a given threshold, multiply the transparency by 0 (and keep it the same otherwise). And again, whenever we’re thinking of “checking if something is higher than a threshold”, that sounds like a case for step. So we could implement the downwards motion as follows:
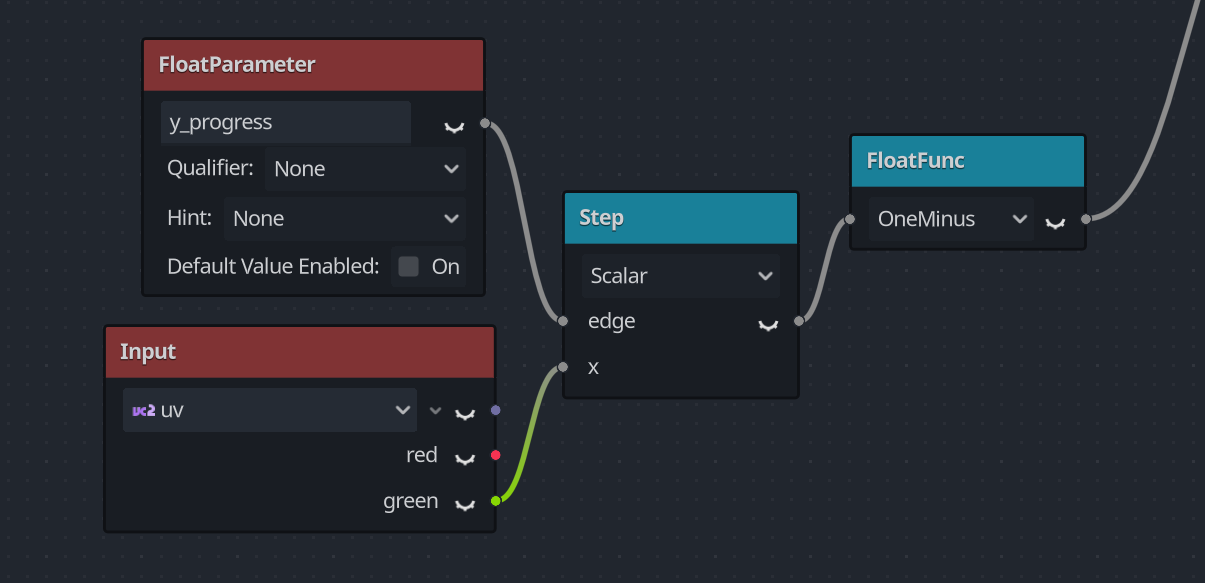
Now, by varying the new “y_progress” parameter, we can decide how far the lightning strike has moved towards the ground.
The completed shader graph looks like this:
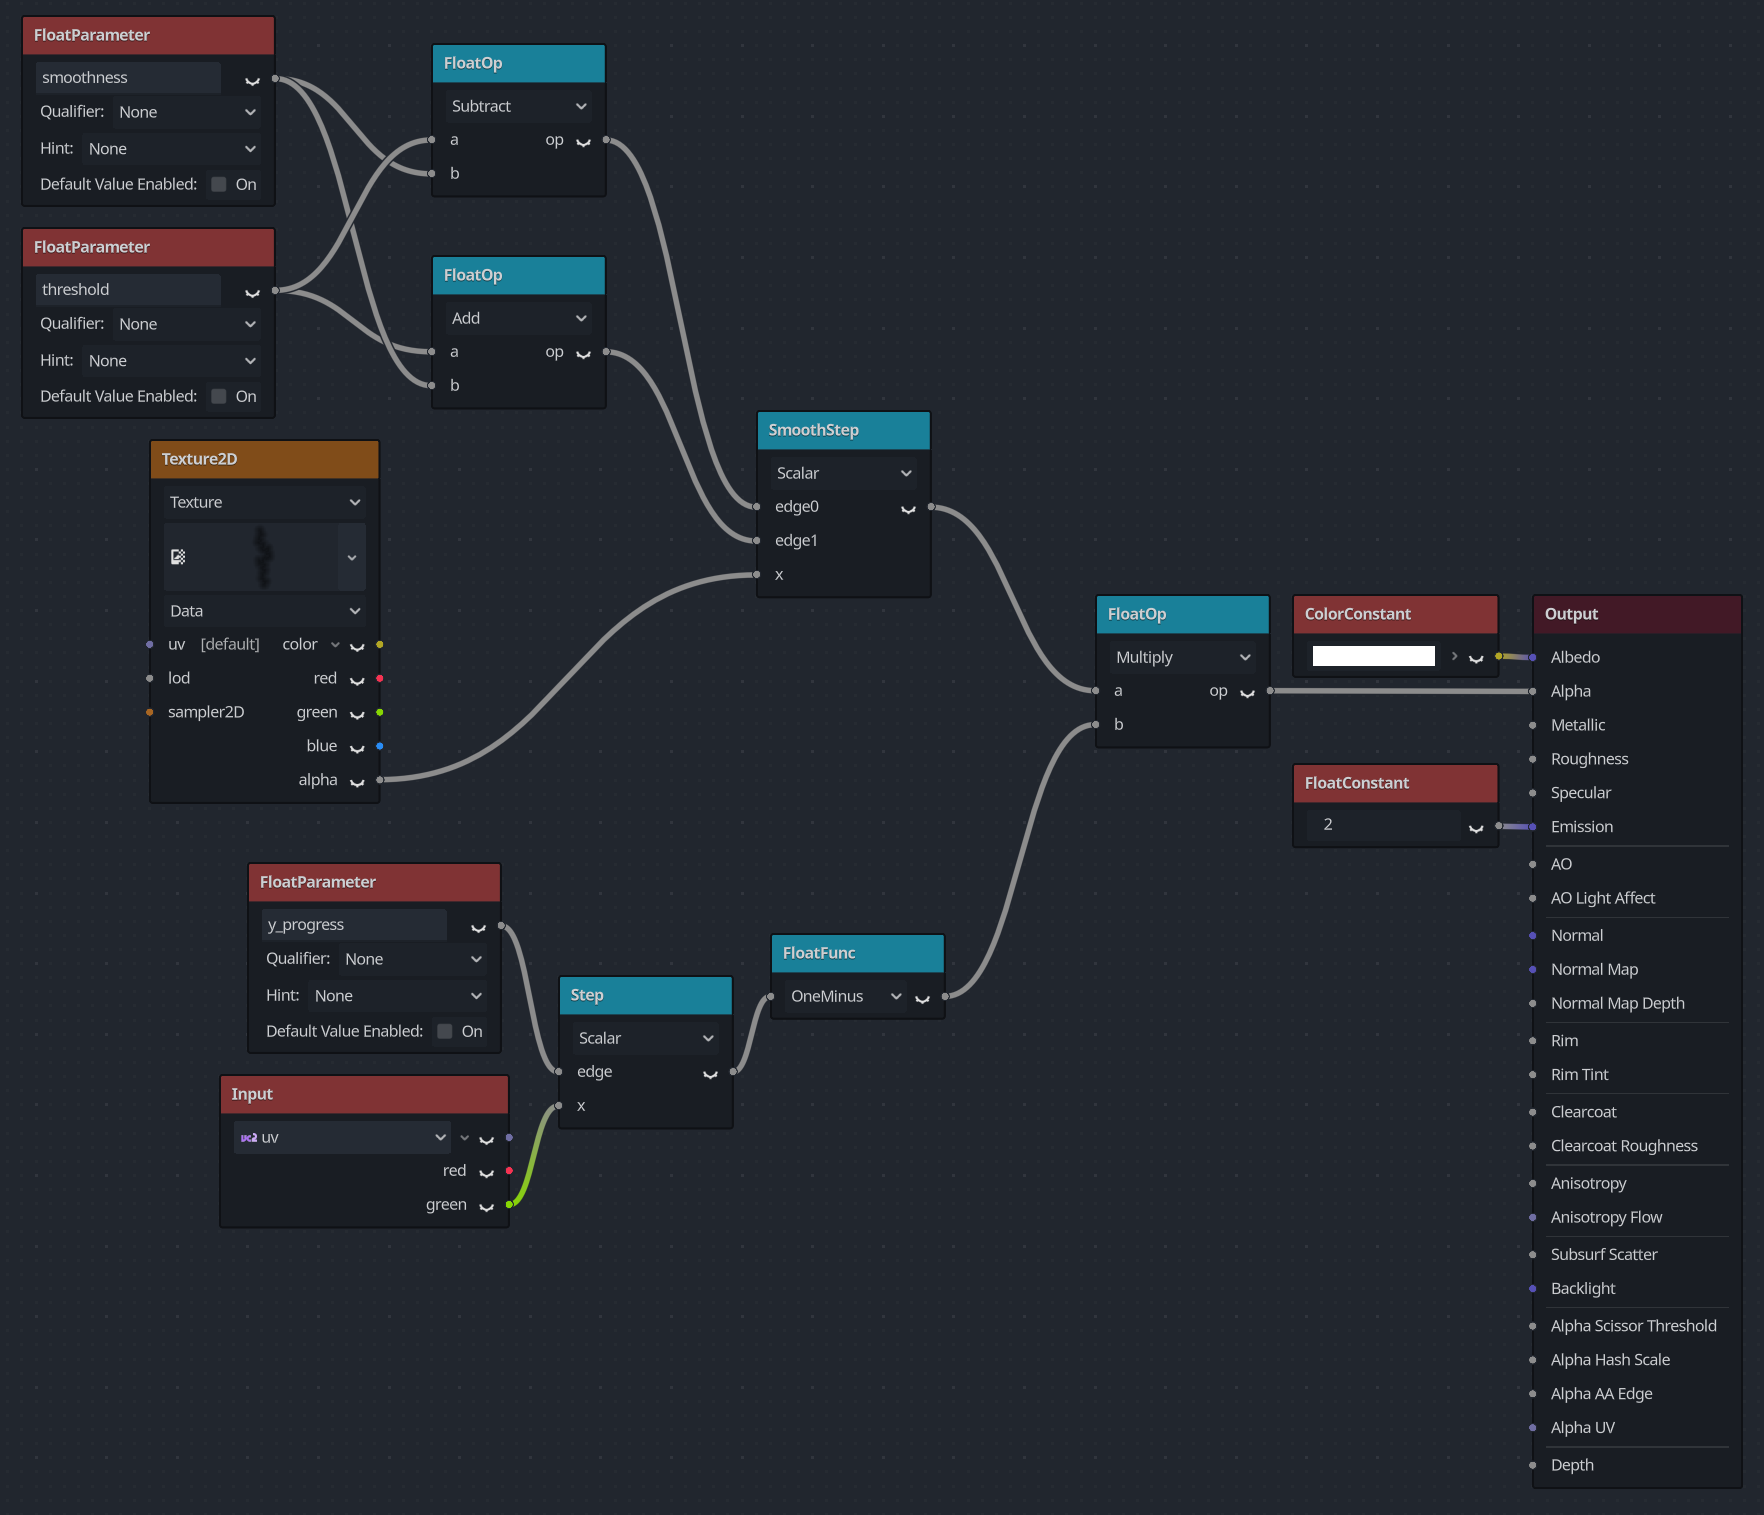
We now have shader parameters for everything we want our effect to be able to do! All that’s left to do is to modify these parameters in an animation. So add an AnimationPlayer node to the scene and set some keyframes, maybe also add an OmniLight3D at the location where the strike hits the ground and include it in the animation. This is how mine turned out:
As you can see, the step and smoothstep functions are quite versatile. Hopefully, this tutorial was able to give you an idea of how they can be used, and also show you a bit of the thought process behind implementing an effect and translating an idea into a shader.